Last Updated on March 10, 2025 by Owen McGab Enaohwo
![What Is Client Management? [+Examples & Tips From Service Providers]](https://www.sweetprocess.com/wp-content/uploads/2025/02/client-management.png)
Did you know that getting a new client is five to 25 times more expensive than maintaining an existing one?
According to Forbes, 84% of companies that work to improve their customer experience report increased revenue.
These stats and a hundred more like them only point to one thing: keeping existing clients satisfied and happy is as important as acquiring new clients, if not more—at least, we know it’s cheaper. One surefire way to keep your clients satisfied and happy is to manage them effectively. Hence, the importance of client management.
Would you like to manage and maintain your existing clients effectively for long-term loyalty and retention? Then, let’s dive together into the world of client management.
Just one more stop before that: Getting your client management process right separates struggling businesses from thriving ones. Think of it as the engine that powers smooth client relations, where resolving concerns builds trust, loyalty, and, most importantly, revenue. One great way to manage your clients better is by investing in process management software like SweetProcess.
With SweetProcess’s 14-day free trial, you can explore amazing features that’ll help you better manage your clients and grow your business with less stress. Click here to try SweetProcess for free today—no credit card needed.

What You’ll Learn From This Guide:
Why Is Client Management Important?
9 Principles to Manage Clients Effectively
How to Streamline Your Client Management Process With SweetProcess
Client Management Tips & Best Practices From Successful Freelancers, Consultants, and Agency Owners
Client Management Pitfalls To Avoid
Level Up Your Client Management Process Using SweetProcess
What Is Client Management?
One of the goals of business is to have a large number of returning customers. You want your clients to keep coming back for the good stuff, but the question now is: How do you get them hooked for life? This is where client management comes into play.
Client management is about building a strong customer-client relationship by understanding their needs, solving their pressing problems, and finding ways to make them feel valued—a feeling that lingers long after the service is delivered.
To better understand what client management is, let’s take a look at its importance.
Why Is Client Management Important?
A happy client is your biggest advocate and your most valuable asset. Just as Jeff Bezos, founder of Amazon, said: “If you build a great experience, customers tell each other about that. Word of mouth is very powerful.” Nothing could be truer. Let’s face it: A business won’t last long without happy clients. That’s why client relationship management is so crucial. It’s the foundation of every successful business, and without it, you’ll just keep struggling instead of enjoying the benefits of forging meaningful client relationships.
Client management is very important for several reasons. Let’s, however, boil down its importance into three (3) points for better understanding:
- Manage Client’s Expectation
Client management helps you communicate clearly, deliver on your promises, and set realistic expectations. Effective client management lets you get on the same page with your clients on their expectations and avoid awkward situations where unmet promises lead to frustration. Let’s say you run a tech support service, and a client files a complaint. Good client management helps you to acknowledge the issue promptly, provide an estimated resolution time, and follow through. This keeps your clients informed, reassured, and confident in your service.
- Create a Positive Impression

First impressions may last long, but positive impressions last even longer. When it comes to positive impressions, this quote by Will Rogers comes to mind: “You never get a second chance to make a first impression.” The idea here is to make your clients feel like royalty when they do business with you, and effective client management can help you achieve this.
- Long-Term Satisfaction
Client management is key to long-term satisfaction. It’s not just about providing great service once and letting them go, but making them feel cared for and valued enough to keep coming back. The goal is to make every client feel welcome and convert them into loyal returning customers. This can only be achieved through effective client management.
It’s not enough to just have theoretical knowledge of client management; employ the help of the right software, with accessible features for effectively managing your clients. There’s no better fit than SweetProcess.
And guess what? You don’t need a credit card to get started. Take advantage of its 14-day free trial and explore all its features before committing.
9 Principles to Manage Clients Effectively
Client management is more of a journey than a destination. It’s like a clear plan that requires a balance between building strong client relationships and following a structured approach. Here are nine actionable principles to help you manage your clients effectively:
1. Be Honest and Transparent
Honesty and transparency build trust, a crucial aspect of client management strategy. Failing to be honest and transparent might create a trust gap between you and your client. For example, imagine a logistics company that promises fast delivery but fails to communicate delays—clients may feel misled when promises aren’t met. On the other hand, being upfront about delays builds credibility and makes clients feel valued.
2. Communicate Well

Good communication builds client trust and satisfaction. When you communicate clearly and regularly, your clients feel well-informed and like a part of the process. This leads to greater satisfaction and a stronger partnership. On the other hand, poor client communication breeds confusion and frustration.
Effective communication goes beyond interactions with clients and also includes internal team communication. How your team communicates directly impacts the quality of your service delivery. Investing in tools like SweetProcess enhances team collaboration and ensures everyone is aligned with clients’ needs and project details.
3. Build Trust
Trust is the foundation for building strong, healthy, and long-lasting relationships. Client relationships are no exception. Here’s what you get when your clients trust you:
- They feel comfortable sharing confidential details that help you understand their needs better.
- They trust your opinions and take your advice on matters, which leads to better outcomes.
- They become loyal, leading to long-term relationships and, most importantly, referrals.
- When mistakes occur, your trusting clients quickly forgive and give you another chance.
To build trust, you must:
- Be honest and transparent
- Maintain regular and open communication
- Set realistic expectations
- Follow up on commitments, fulfill promises, and meet up with deadlines
- Be empathic and understanding
4. Set Expectations
Every business should set clear and realistic expectations from the beginning. This will help eliminate confusion and misunderstandings because clients will already know what to expect.
Here are some key strategies for setting expectations for successful client management:
- Establish and communicate a clear understanding of timelines, deliverables, and project goals.
- Set up a functional communication protocol that defines how and when you’ll communicate with clients, including the frequency, format, and expected response time.
- Utilize a well-structured client intake form to gather essential details and align expectations early in the process. A thoughtfully designed client intake form ensures clarity on client needs, helping you deliver tailored solutions efficiently.
- Set realistic timelines and deadlines that are achievable, considering factors such as project complexity, dependencies, and available resources. Allow yourself enough time to work effectively while also ensuring client satisfaction.
- Establish measurable criteria to evaluate project success, ensuring all teams are aligned and working toward the same goals.
5. Learn Your Client’s Industry
Understanding your client’s industry gives you knowledge of their challenges, needs, and values and helps you offer more personalized services and effective solutions. For instance, a marketing firm that specializes in the real estate industry should understand the unique needs of its clients and should be able to recommend highly specific campaigns that lead to better results and stronger relationships. Having industry knowledge positions you as a partner and not just a service provider.
6. Align Expectations
In managing clients effectively, you must align your expectations to enhance good communication and mutual understanding. Here’s how to do this effectively:
- First, know what your client wants you to achieve, then outline and communicate what you can deliver. This ensures transparency, and both parties know what to expect.
- Be honest and straightforward about the timeline for completing a task. Avoid overpromising; it’s always better to underpromise and overdeliver.
- Document agreements to avoid misunderstanding.
- Be transparent about changes such as delays, change in plans, adjustments, and so on. State clearly the reason for change and how you plan to handle it.
7. Measure Success

Measuring success is important so both you and your clients know if goals are being met. It provides tangible proof of the value you deliver, helps you build trust, and identifies areas that need improvement. Measuring success regularly means you’re accountable and can celebrate achievements, which equals client satisfaction and loyalty.
How to Measure Success:
- Set clear and measurable goals from the start, e.g., increased sales, improved engagement, or streamlined processes.
- Track specific metrics that align with the project objectives, e.g., website traffic or customer retention rates.
- Use surveys or interviews to understand client satisfaction and areas to improve.
- Compare results to the original goals to measure success.
- Share detailed reports with clients to show achievements, challenges overcome, and the overall impact of the project.
8. Focus on the Long Term
Building long-term relationships is the secret sauce to customer loyalty. When you focus on your clients’ evolving needs, you ensure they stay happy and stick around. For example, a salesperson who pushes clients into quick purchases without considering their long-term goals might make a sale, but they risk losing trust and future business. By thinking long-term, businesses can build strong relationships, earn loyalty, and pave the way for lasting growth.
9. Continuously Improve

When you constantly improve and sharpen your skills, it shows your clients that you are fully committed to delivering the best service by staying ahead of the competition. As a freelance graphic designer, always update your design skills, for example, you stay on top of your game by keeping up with new design and branding trends. This ensures your work remains fresh and relevant, and keeps clients coming back for more. Without constant improvement, you’ll fall behind on innovative trends that make your work better and also lag behind your competitors.
There are several ways to effectively manage your clients, but following these nine principles will provide a solid foundation—not only for building strong client relationships and enhancing satisfaction but also for driving long-term success in your business.
How to Streamline Your Client Management Process With SweetProcess
A crucial part of client management is streamlining communication and organization through structured processes and collaborative teamwork. SweetProcess is a business process management software that simplifies and optimizes client management, fostering a more efficient, productive, and successful partnership.
How to Document and Manage Your Company’s Procedures, Processes, and Policies

Work inefficiencies and lost productivity are two major problems businesses face due to ineffective process and procedure documentation.
How to Create and Manage Procedures in SweetProcess
In this section, we’ll first show you how to create procedures in SweetProcess, and then how to manage the procedures to create. Here’s how to create your procedures inside SweetProcess:
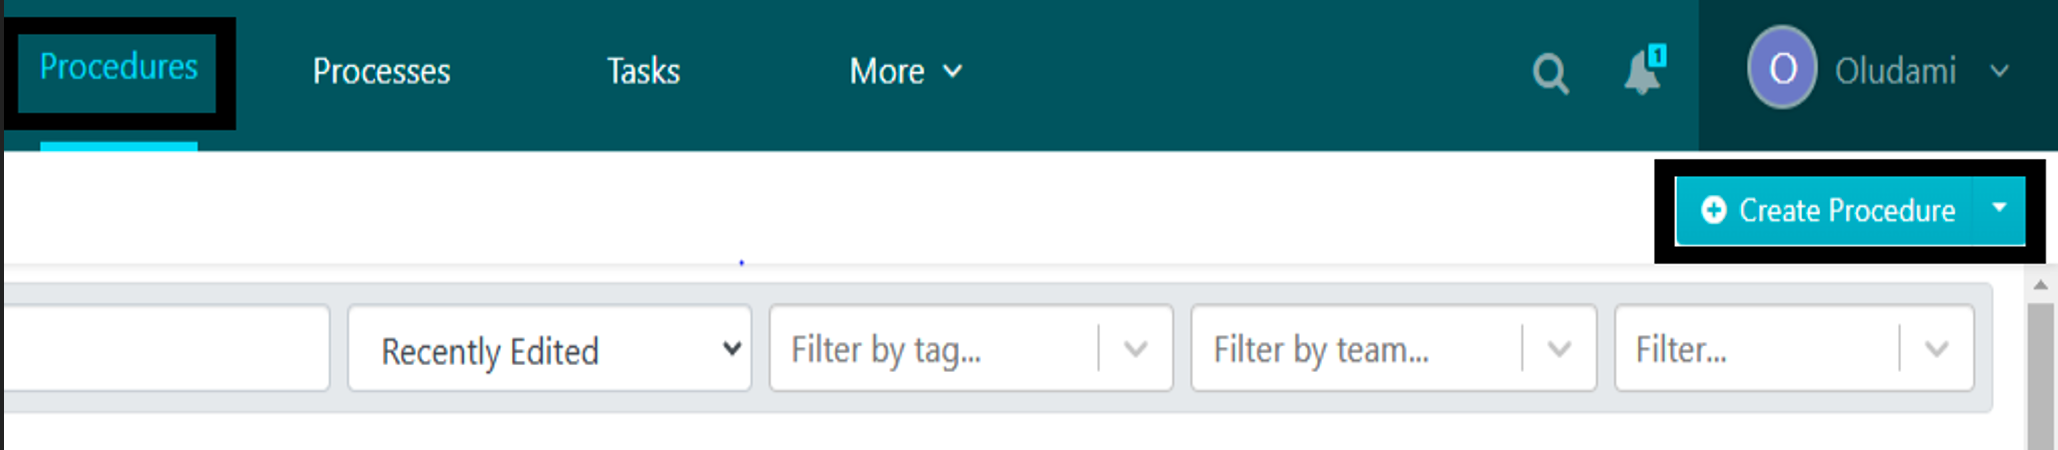
- From the SweetProcess header, click on the “Procedures” menu.

2. Click “Create Procedure” at the top-right corner of the page.
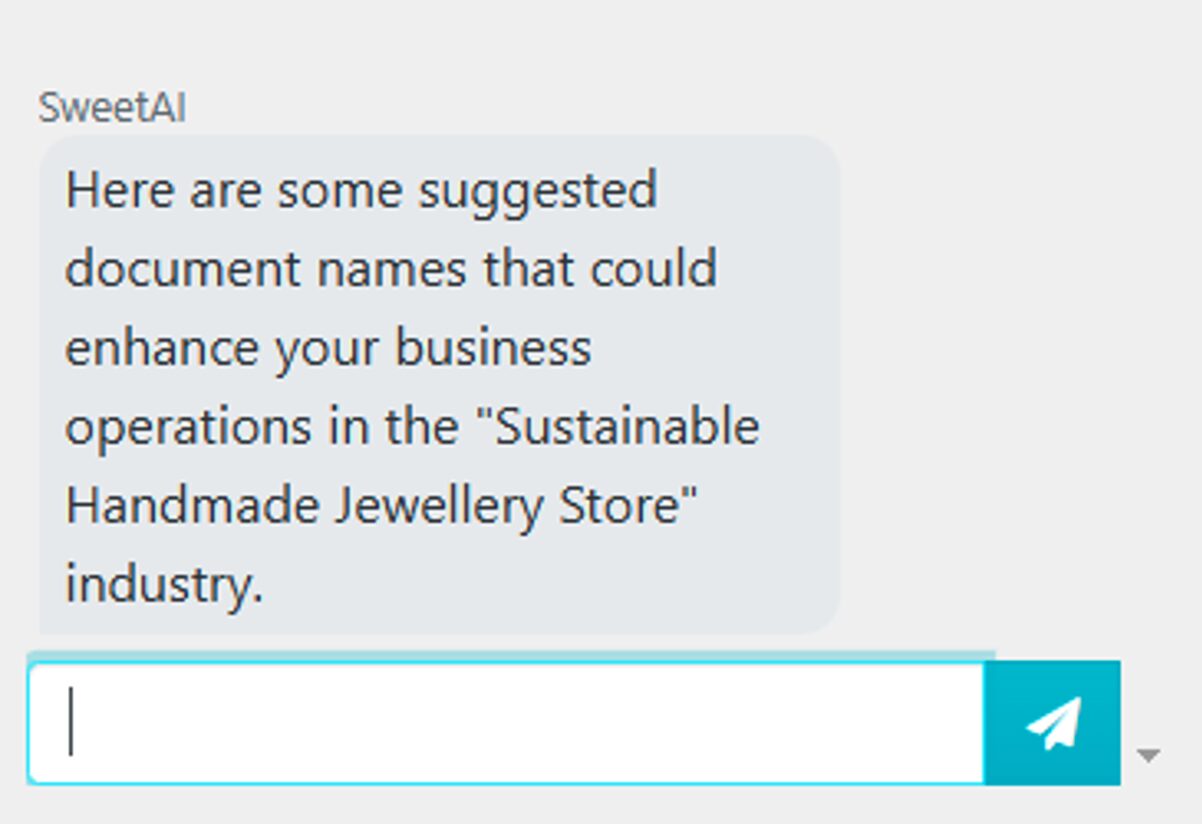
3. The next page opens up and your cursor blinks on an AI suggestion tab. That’s SweetAI, SweetProcess’s dedicated AI tool. You can simply type in your industry and get related procedure titles generated by SweetAI.
Or you can ignore it and instead scroll up to enter your procedure title in the title bar.
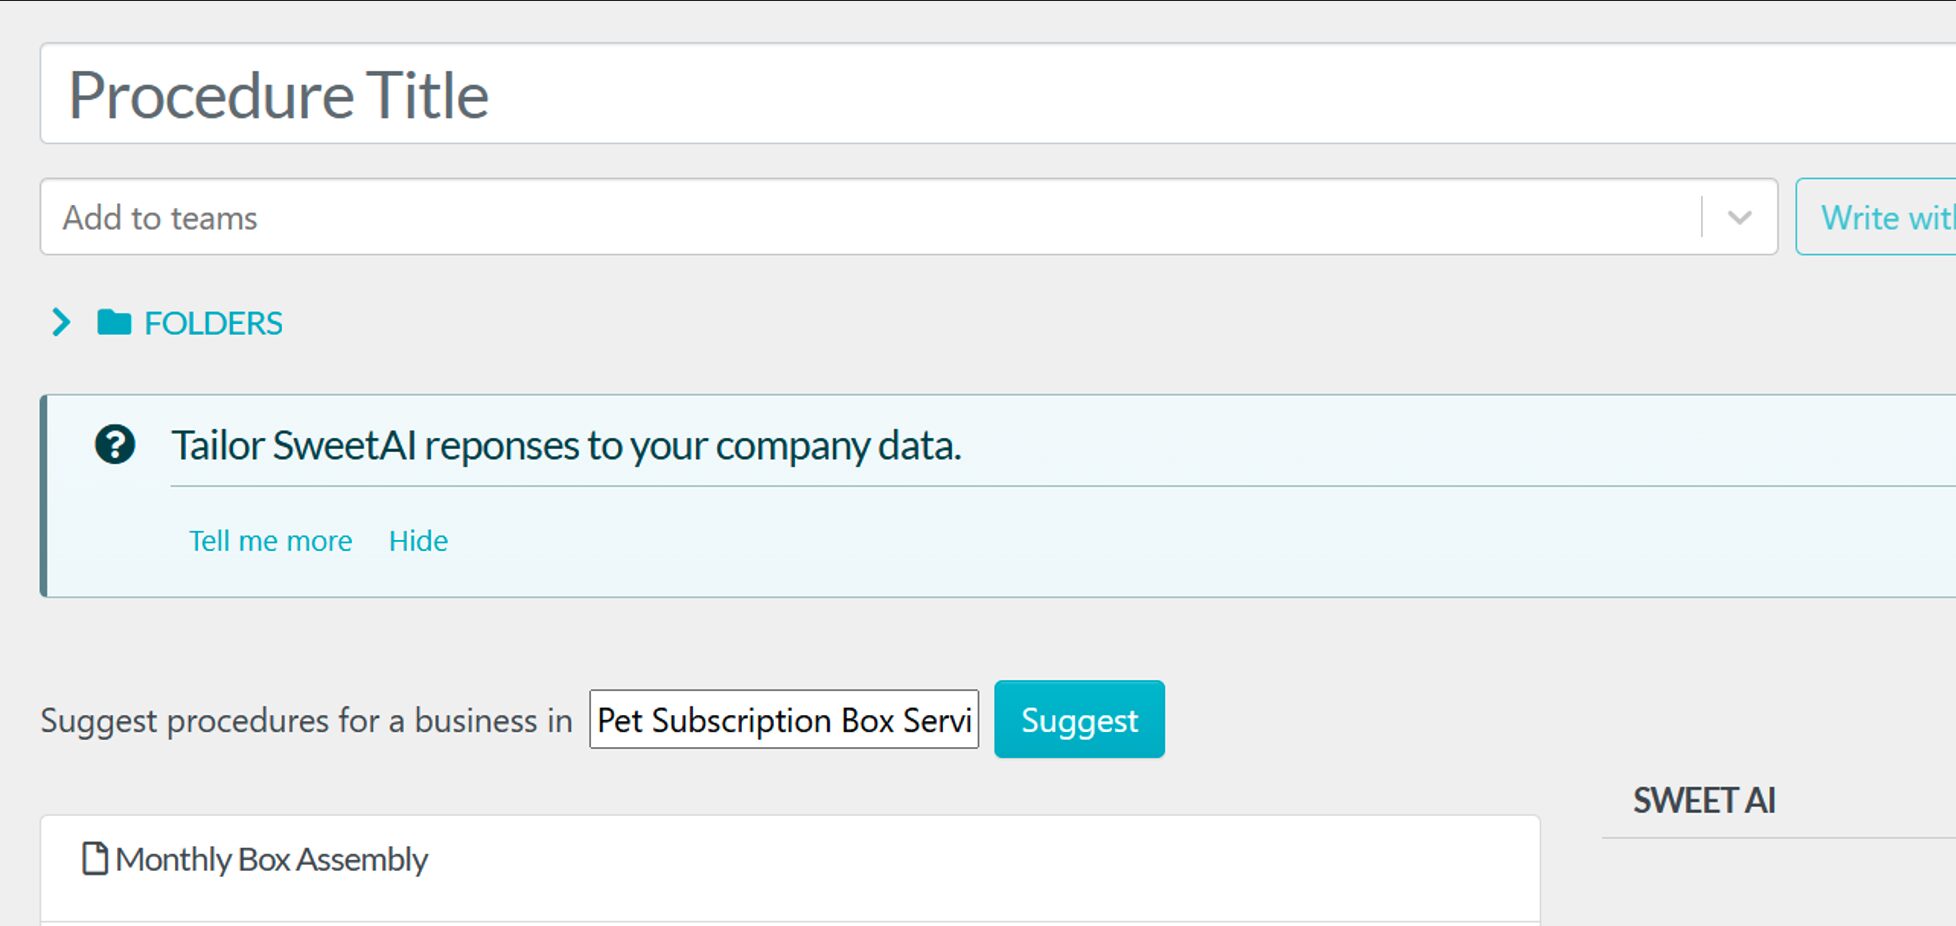
4. Next, you can either click on “Continue” to get to the editor and input your procedure content or click on “Write with SweetAI” to get your procedure content automatically generated by AI based on your title.

If you decide to write with SweetAI, here’s an example of what you’ll get:
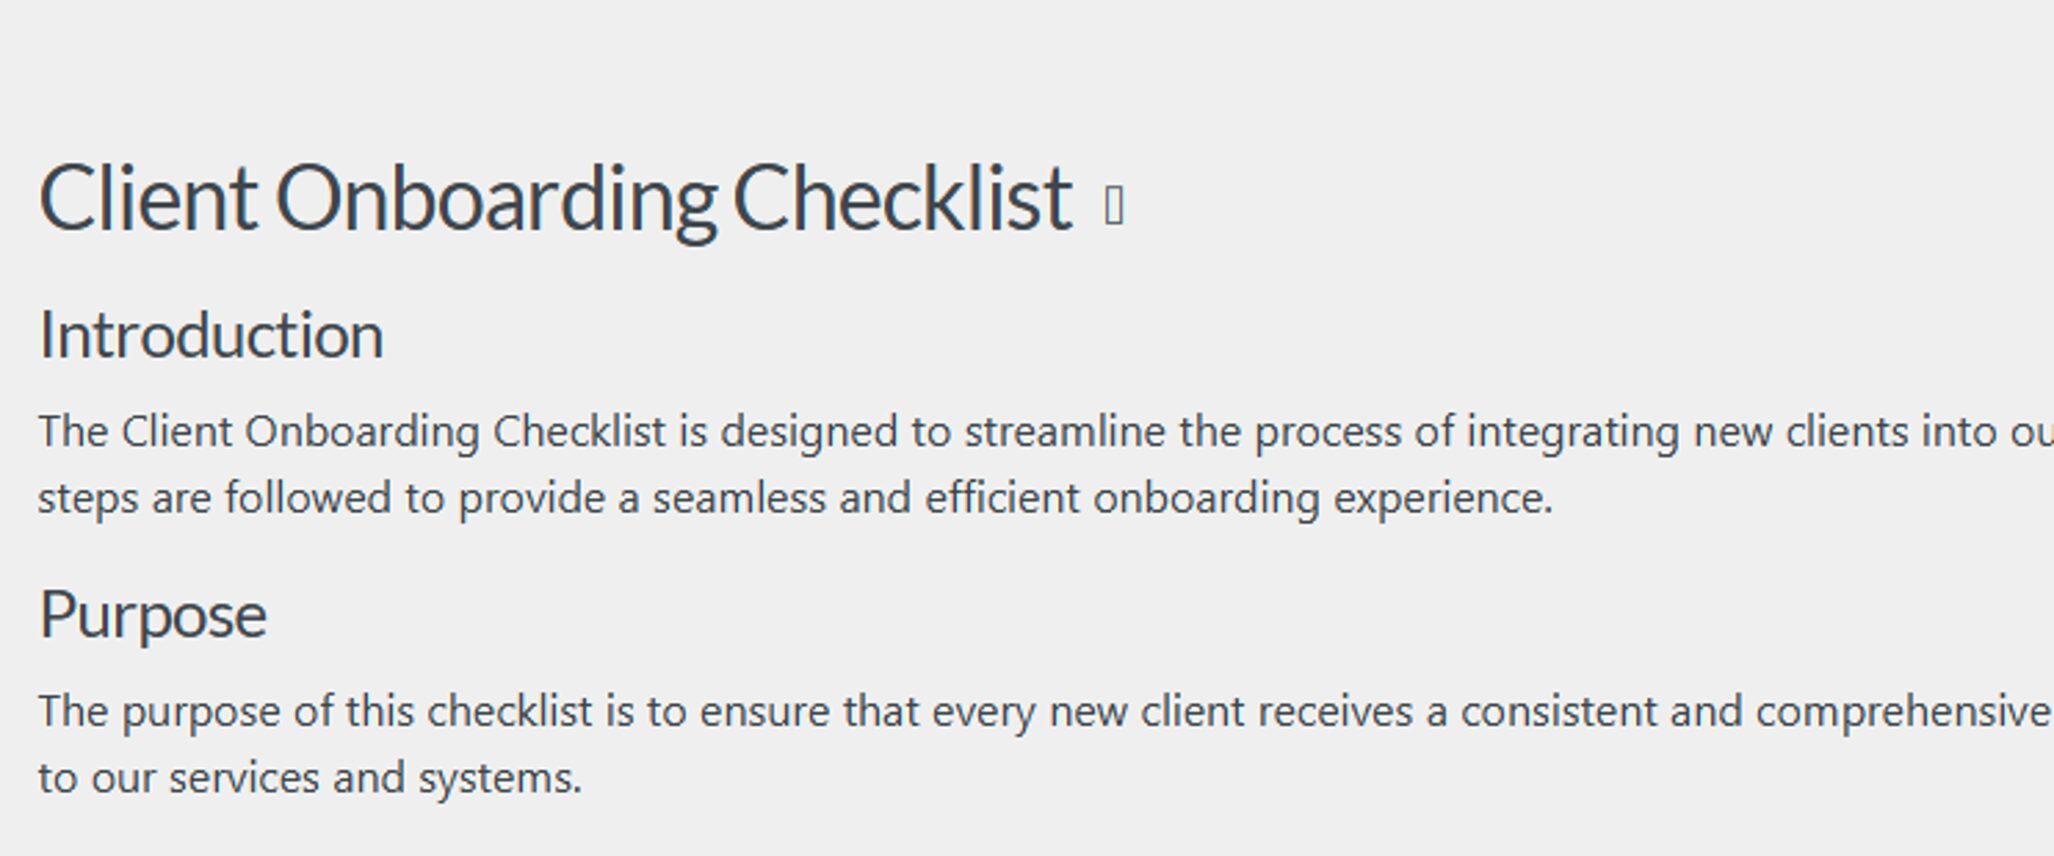
You can then edit the AI-generated content as you wish.
5. If you create your procedure manually and click on “Continue” instead, you’ll be taken to a page where you can draft your procedure.
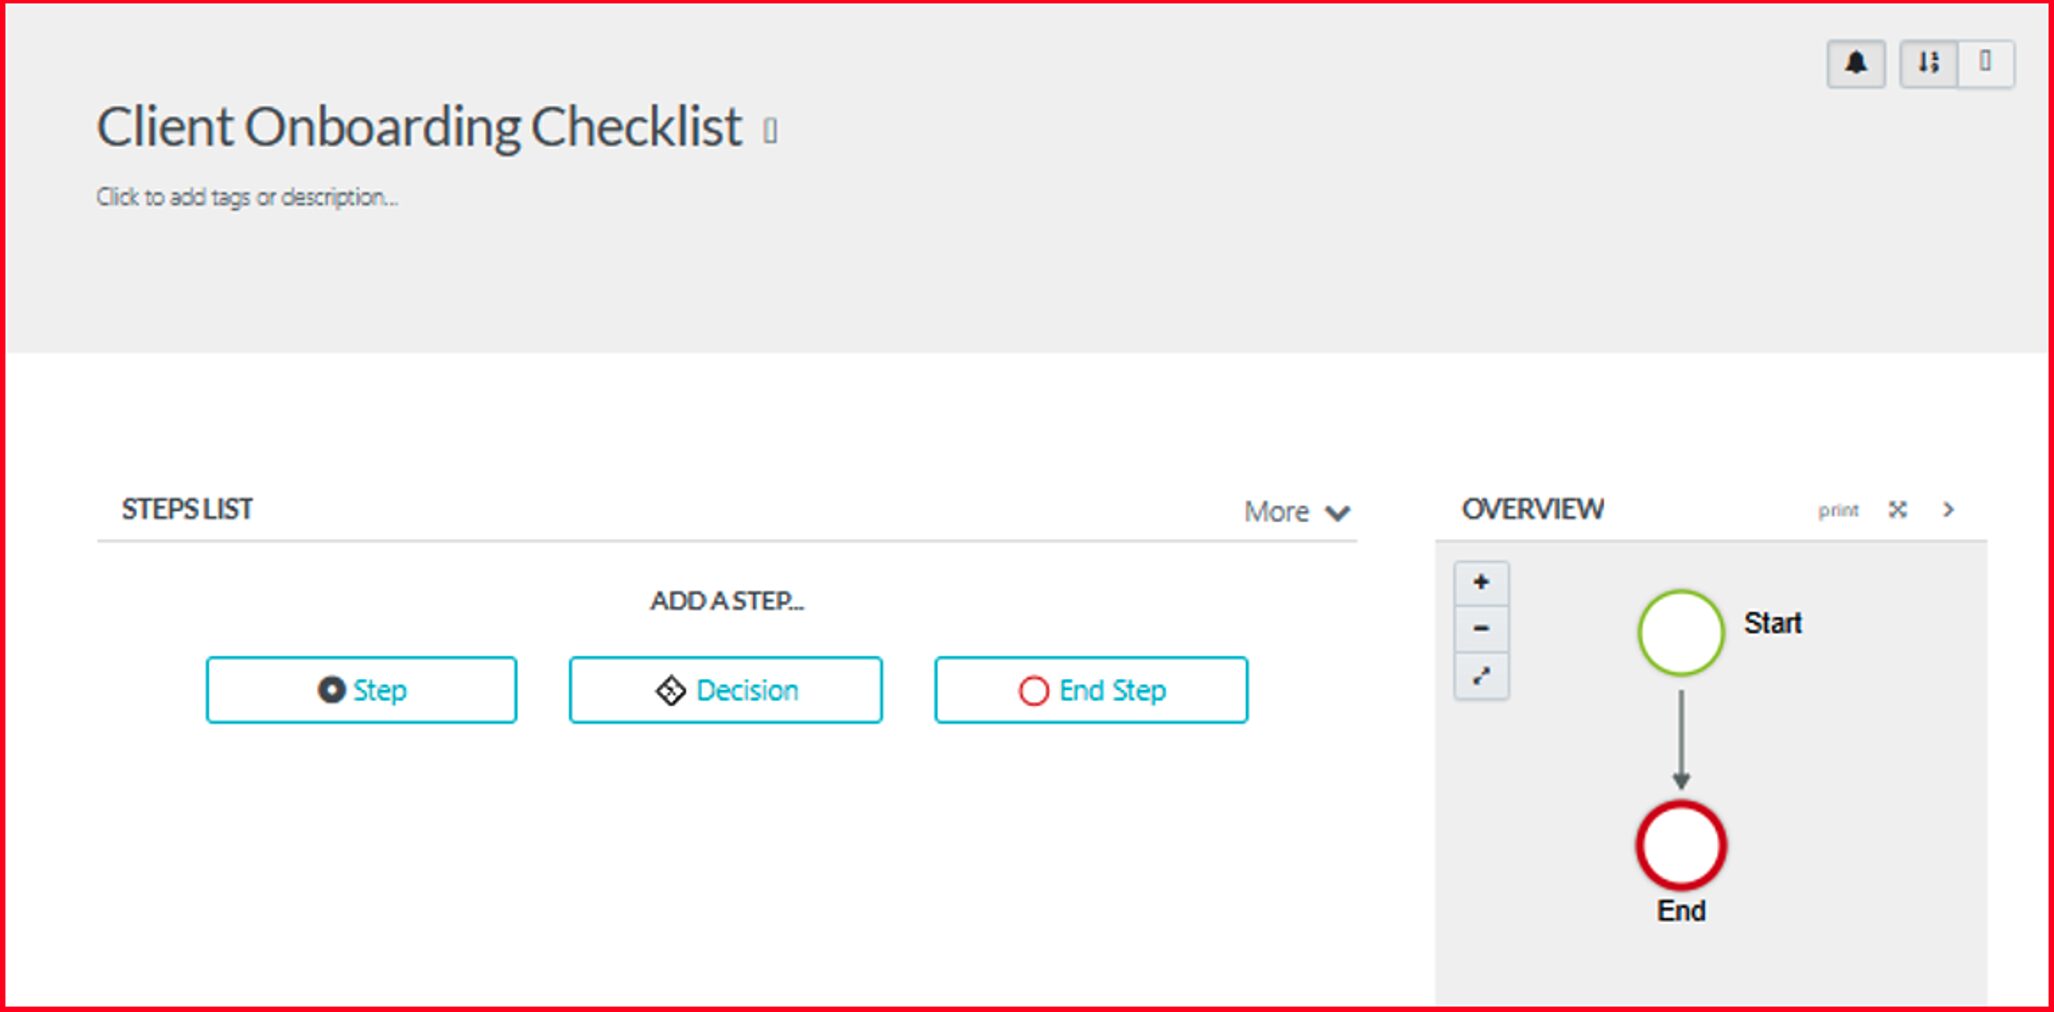
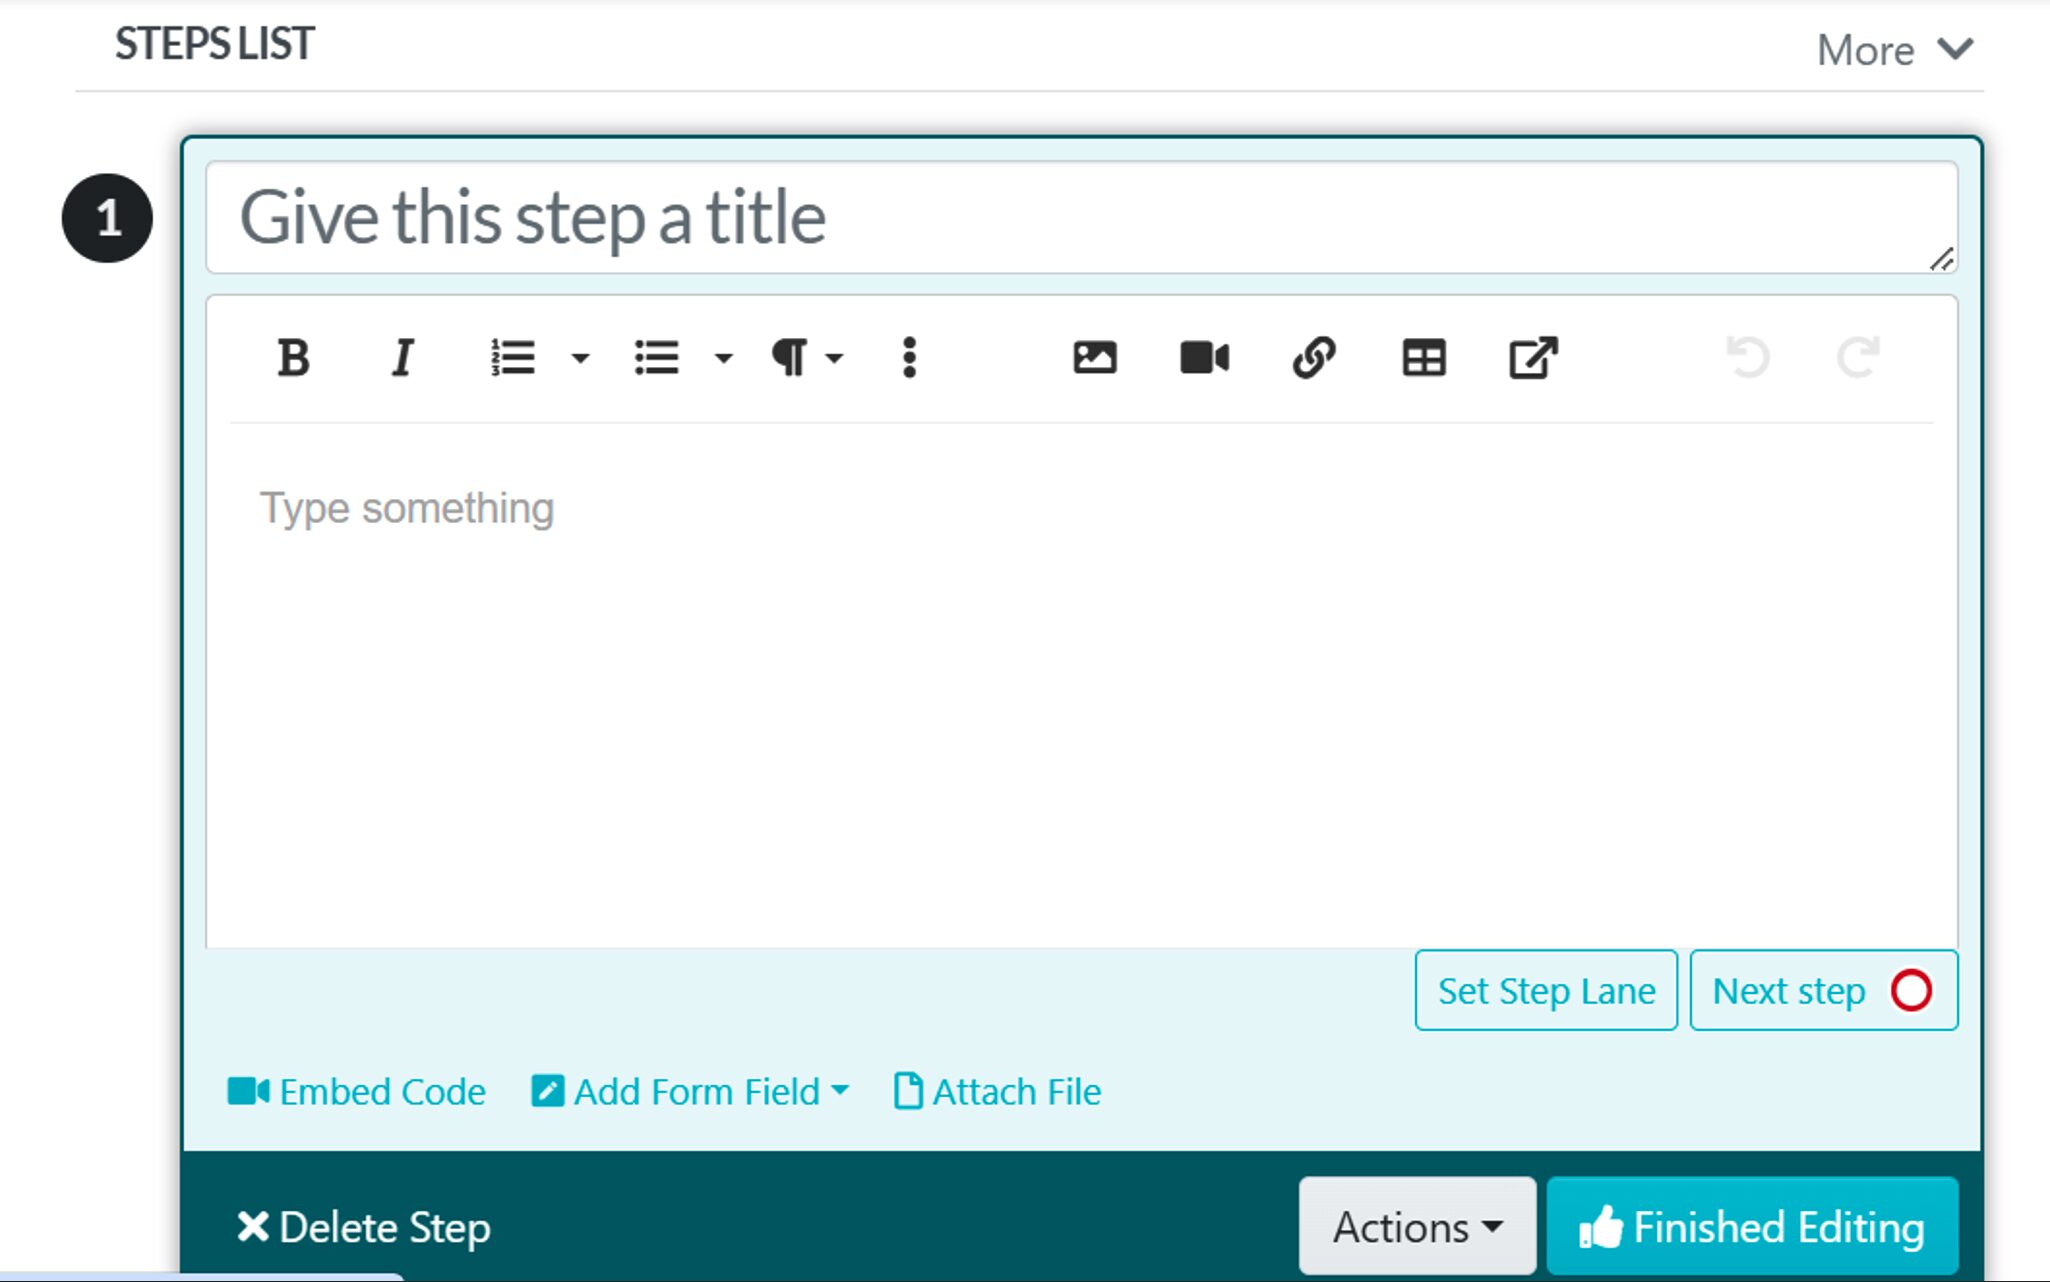
6. The first thing you do on this page is click on “Step” (as seen above) to add the first step in your procedure. A box will open where you can give your step a title and enter other details of the step. You can also attach images, videos, tables, links, and other files as necessary. Click on “Finished Editing” when you’re done.
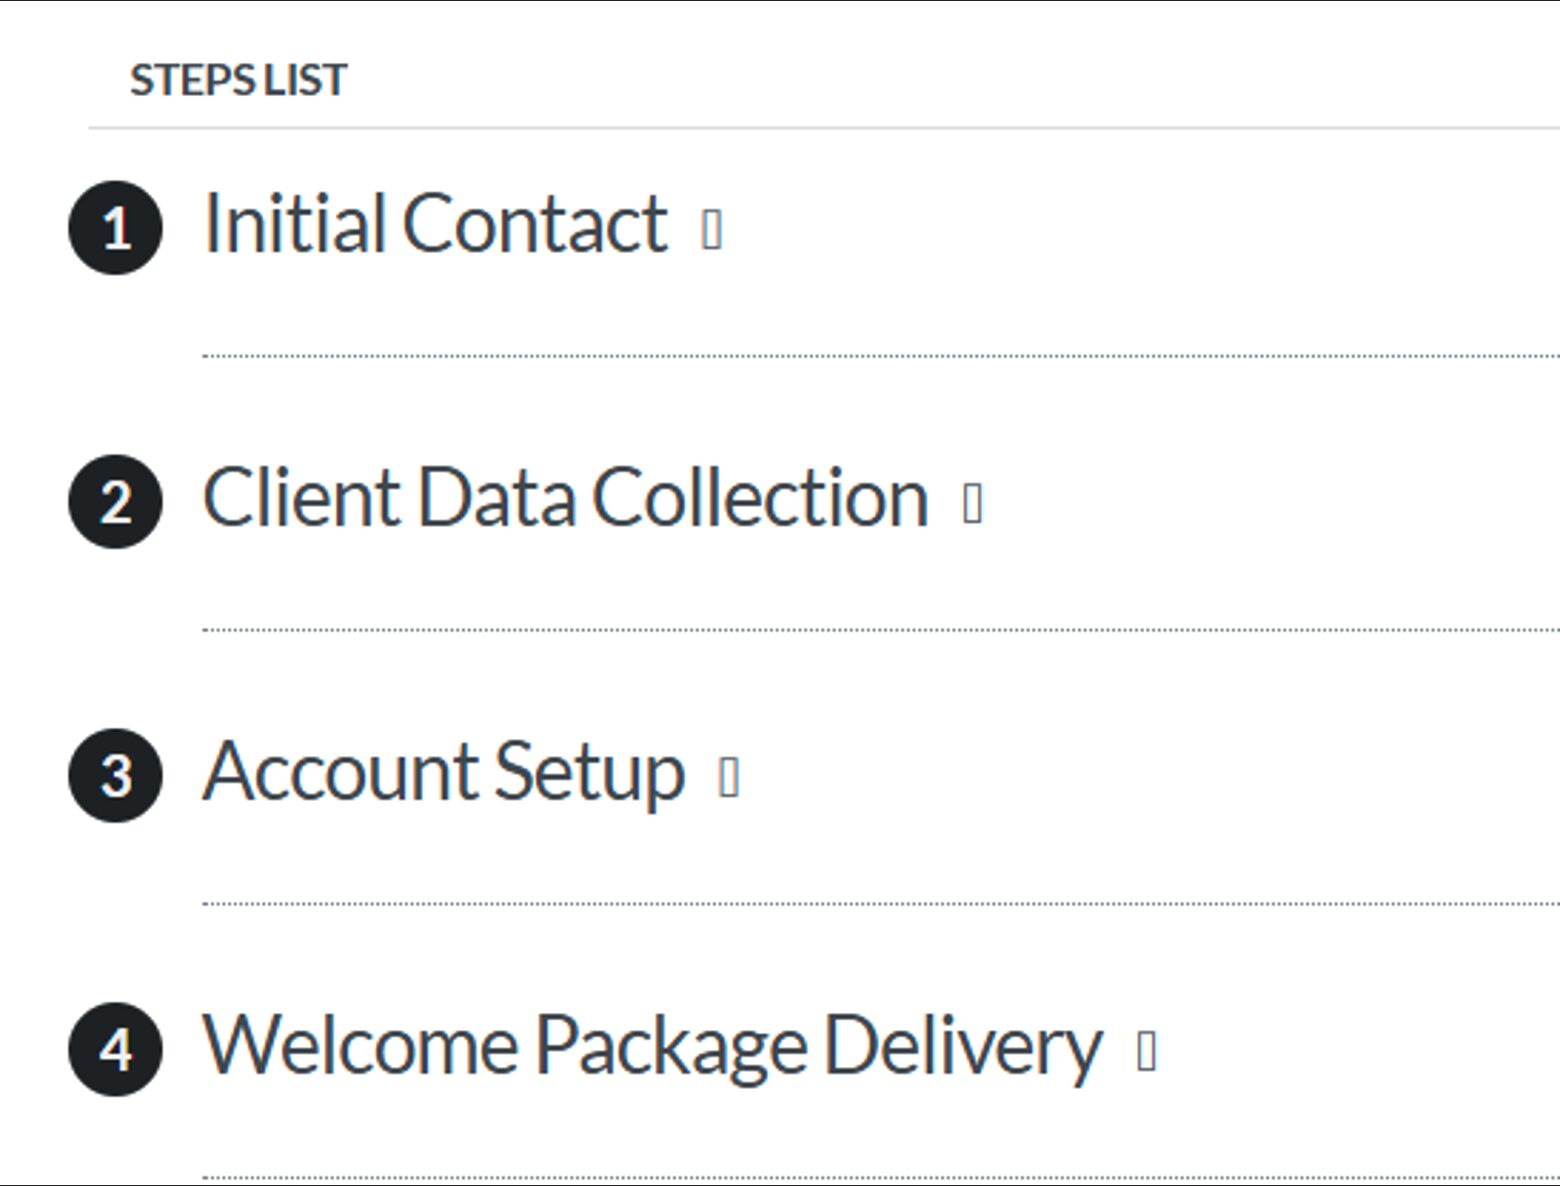
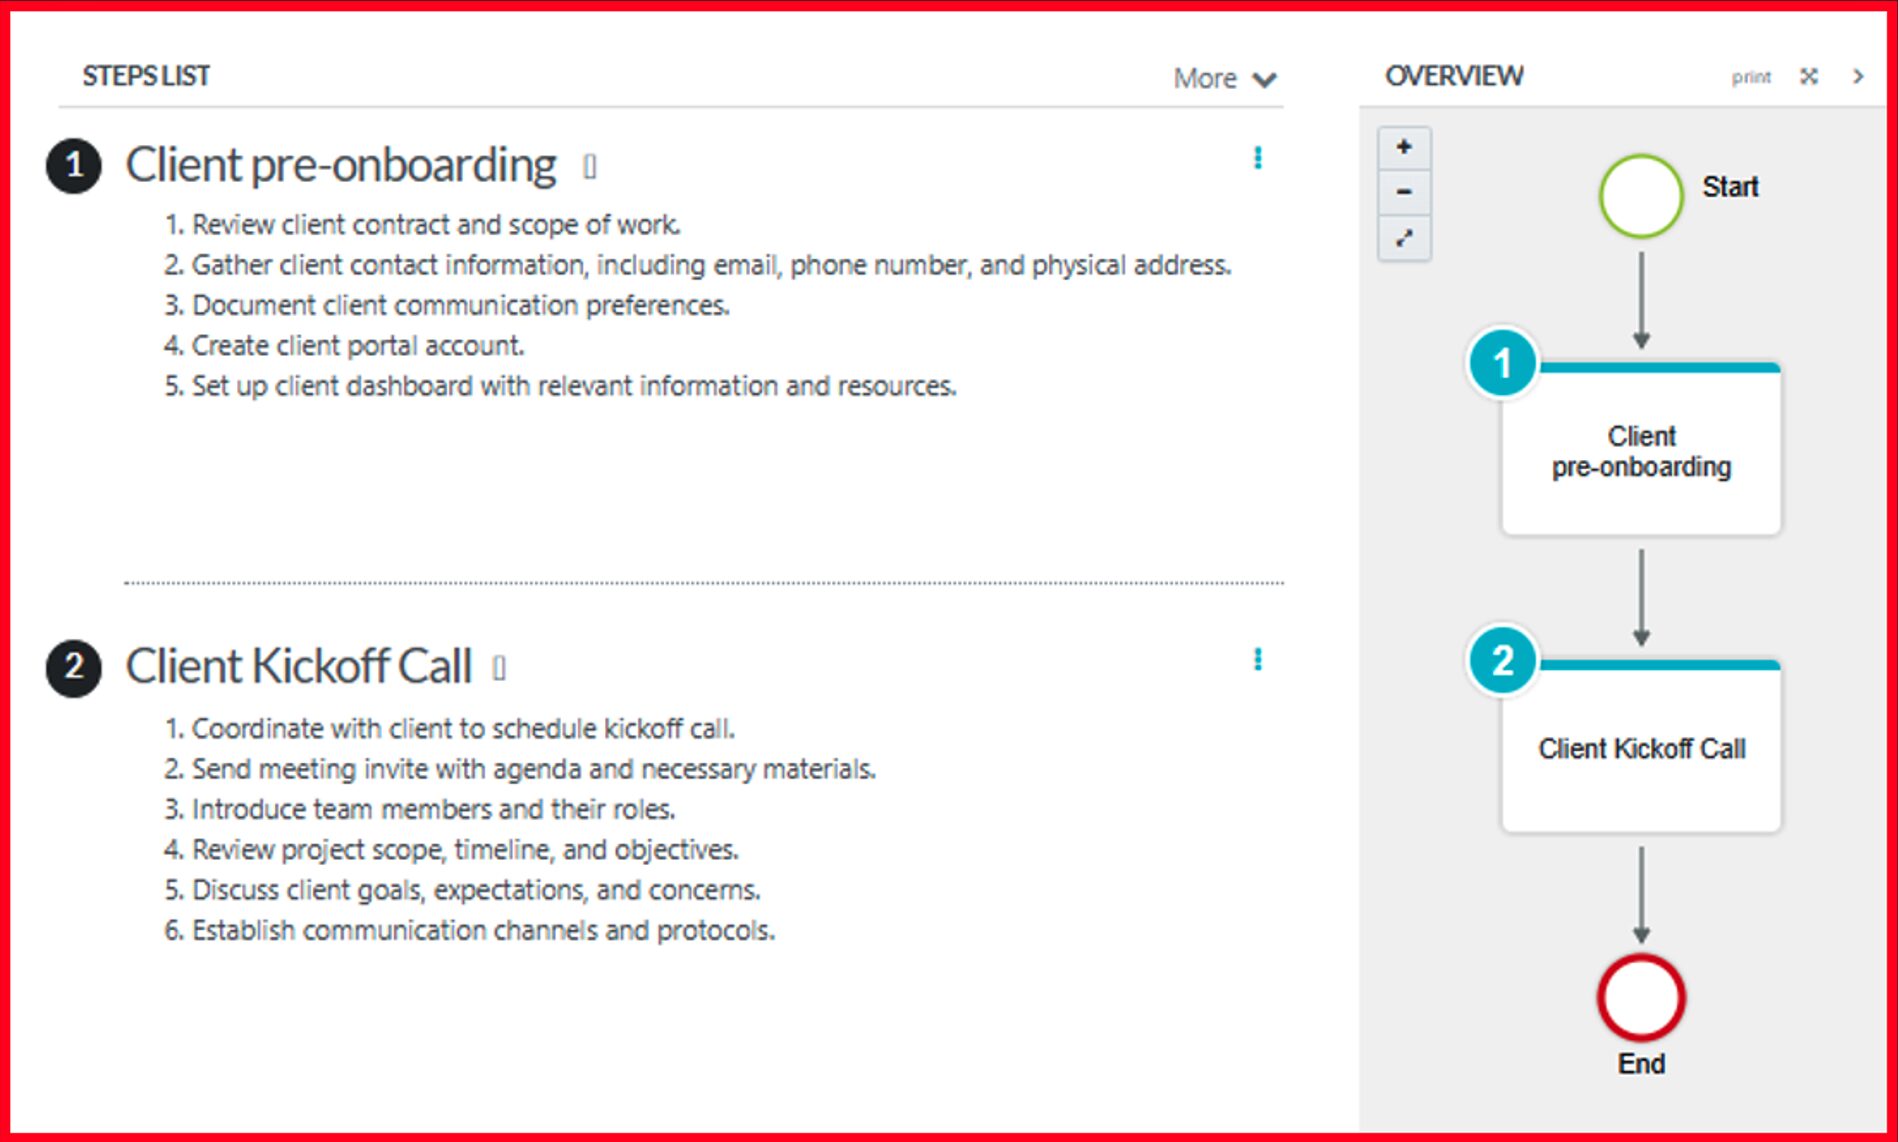
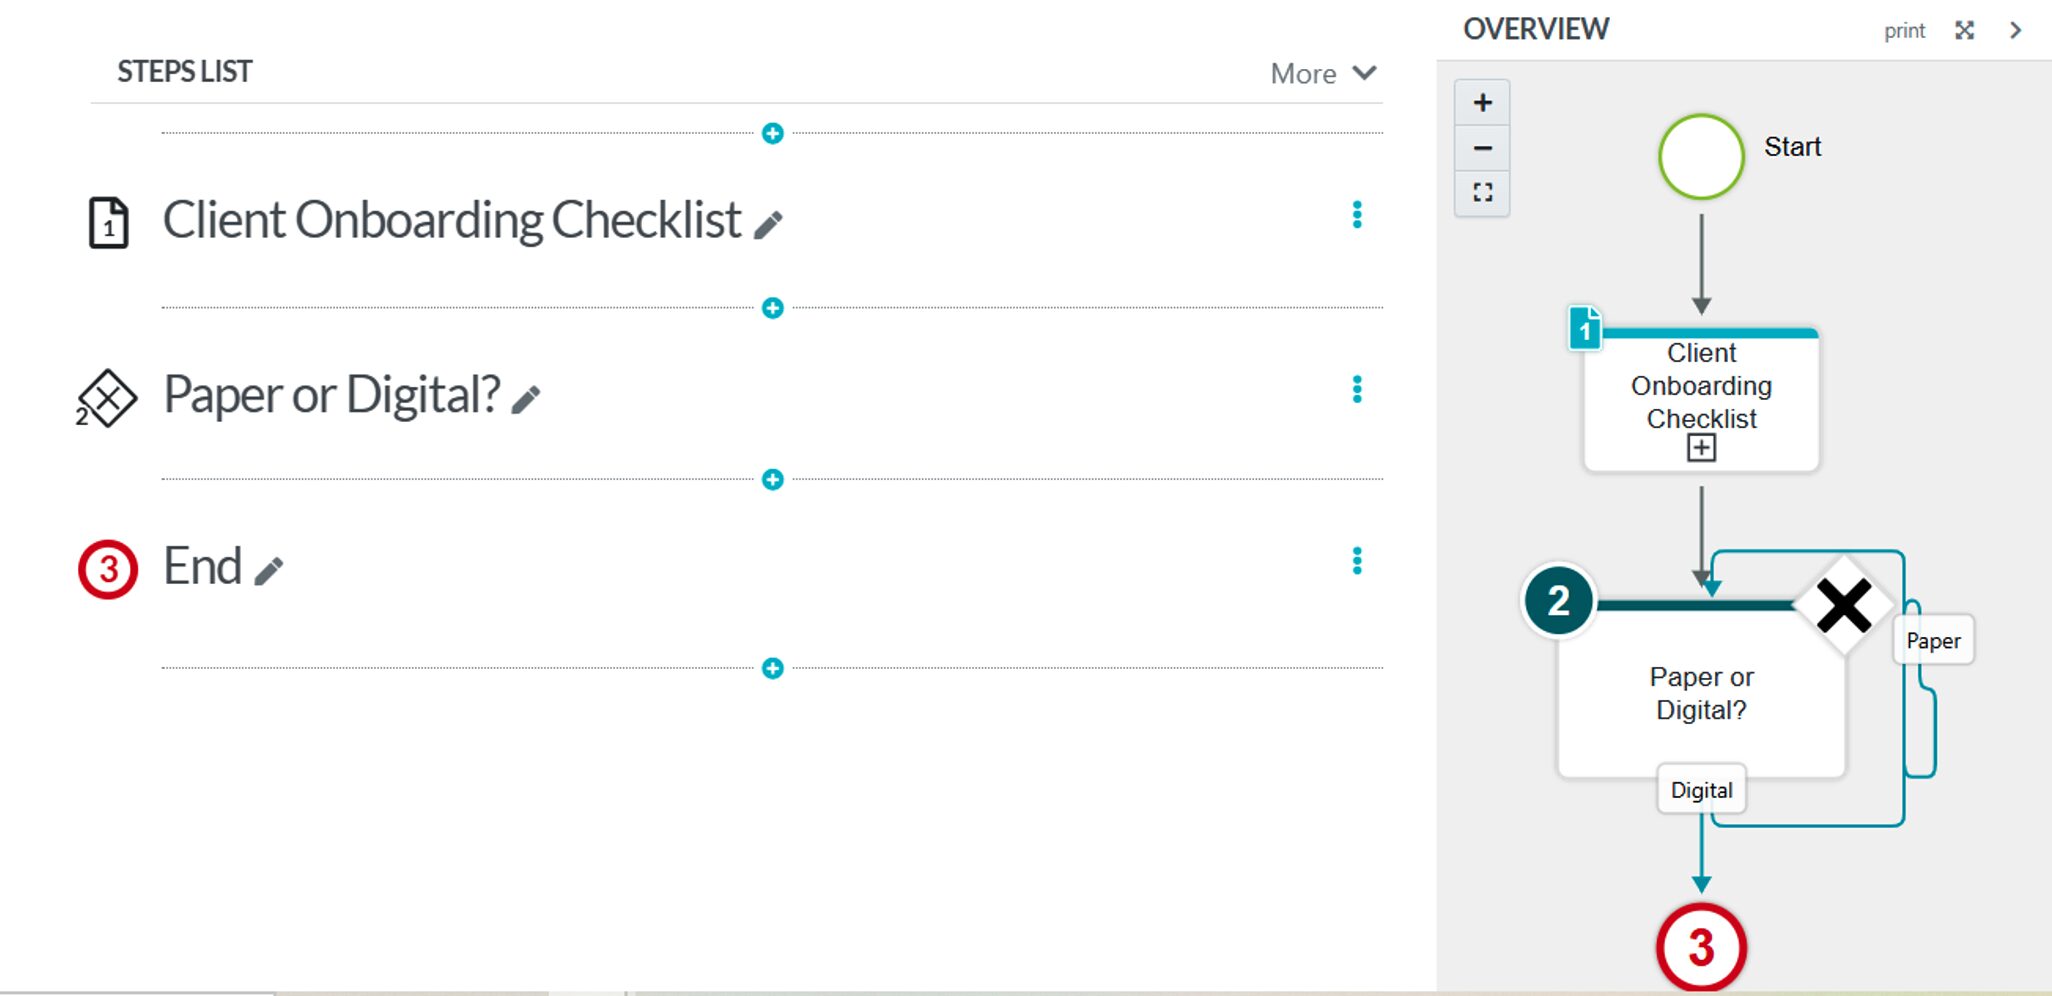
7. Just as you did before, click on “Step” again to add as many steps as you want to your procedure. When you’re done adding all the steps and their content, you’ll see your steps list. Each list can be managed by clicking on the three vertical dots beside it; you’ll be able to move the step, delete the step, duplicate the step, etc.
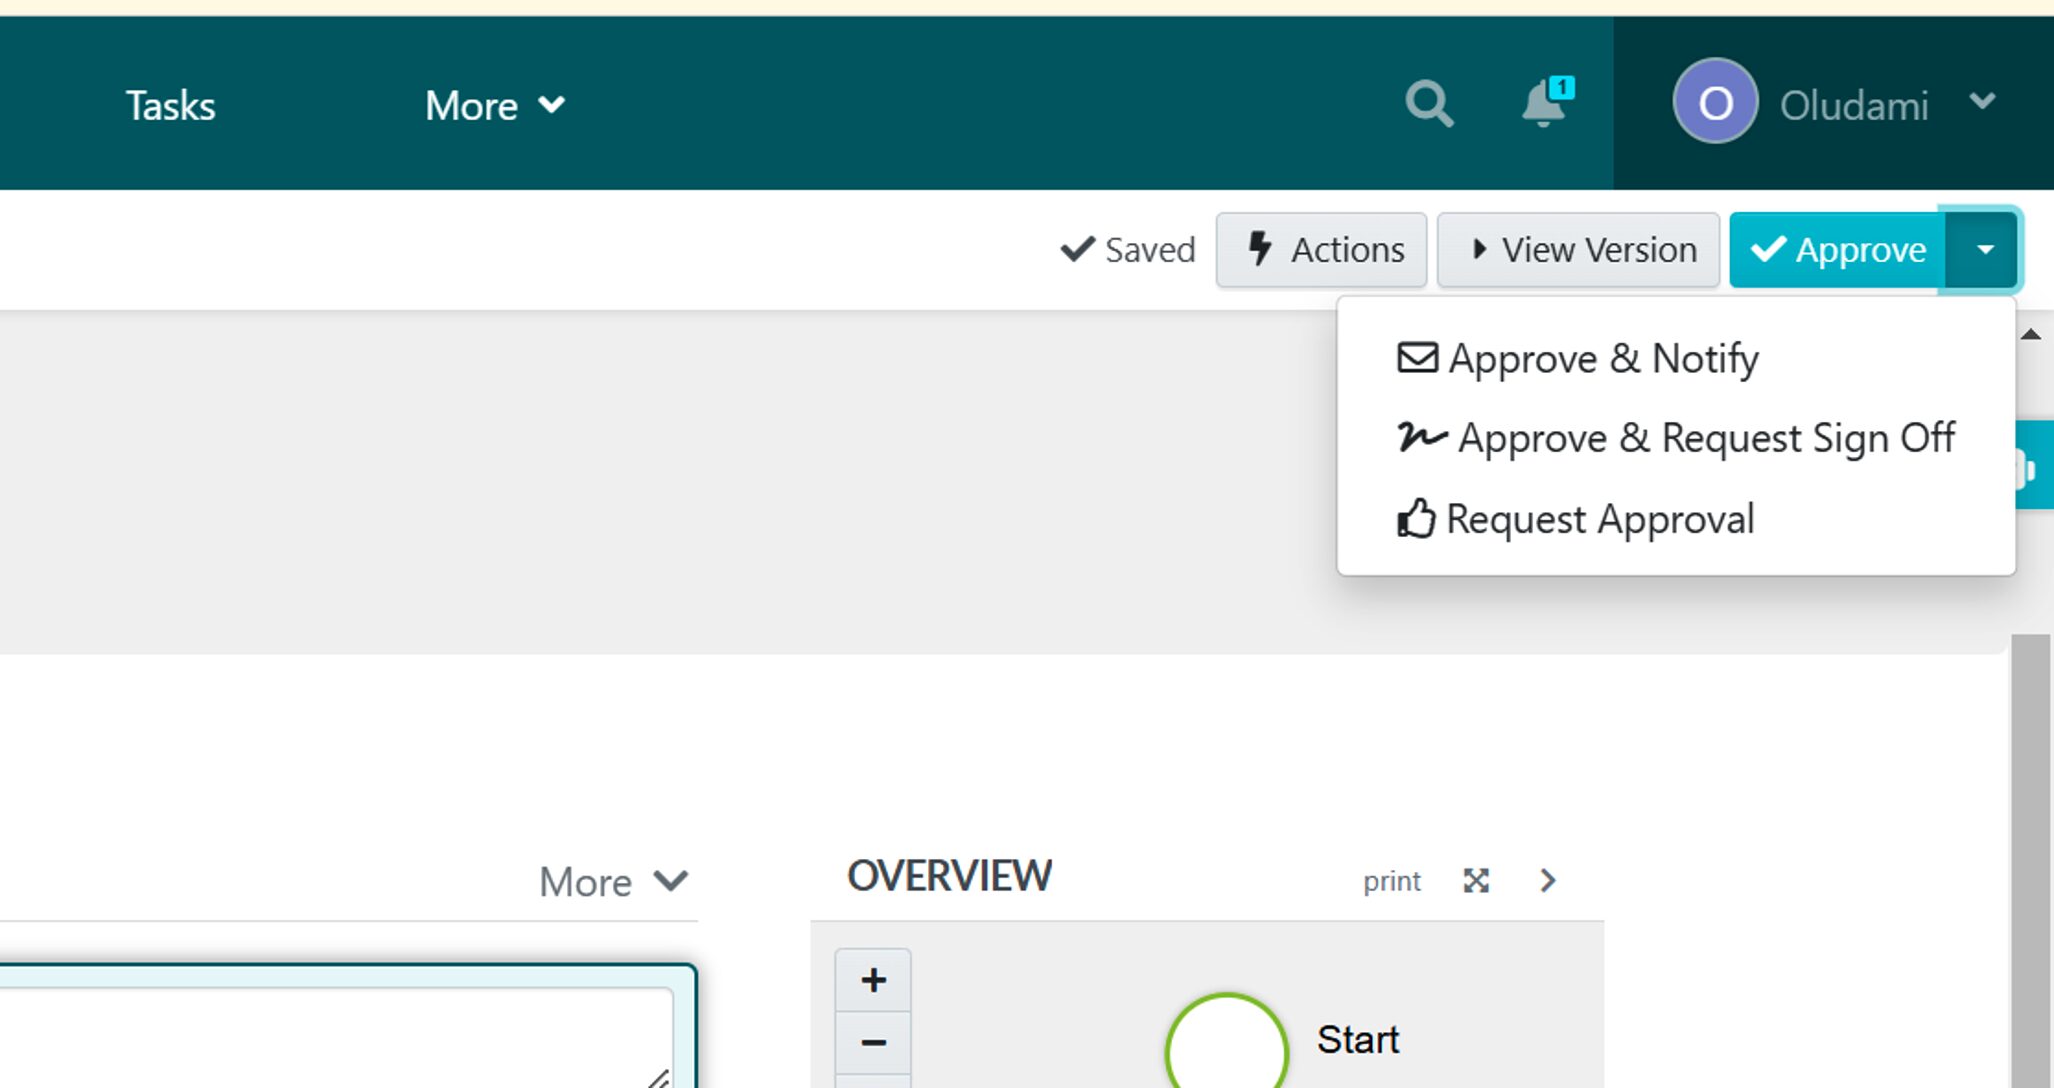
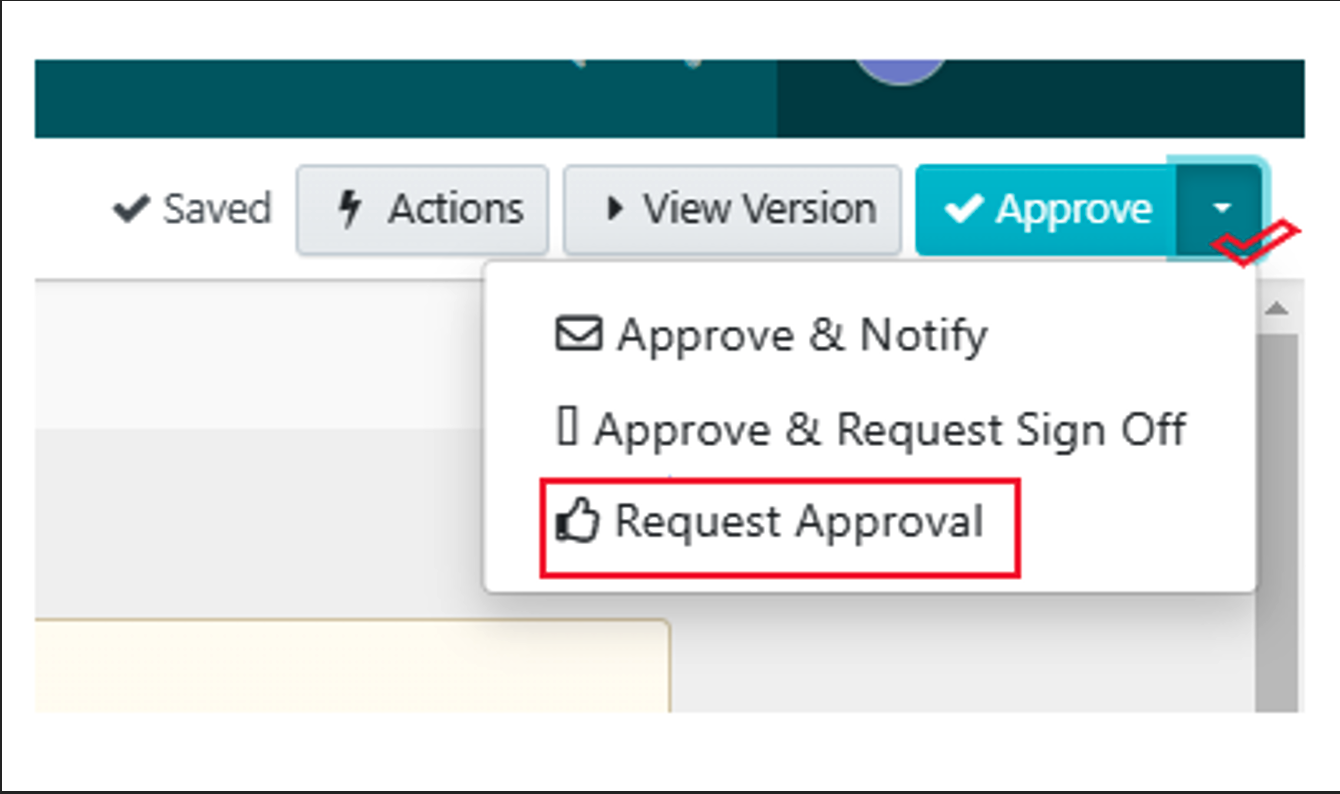
8. Once you are done editing, click the “Approve” button at the top-right corner of your screen to make your procedure live, provided you have the necessary permissions. If not, click on the dropdown icon beside the “Approve” button and click on “Request Approval” so that whoever has permission can approve it.
And there you have it: the simple step-by-step guide to creating procedures using SweetProcess.
How to Manage Procedures in SweetProcess
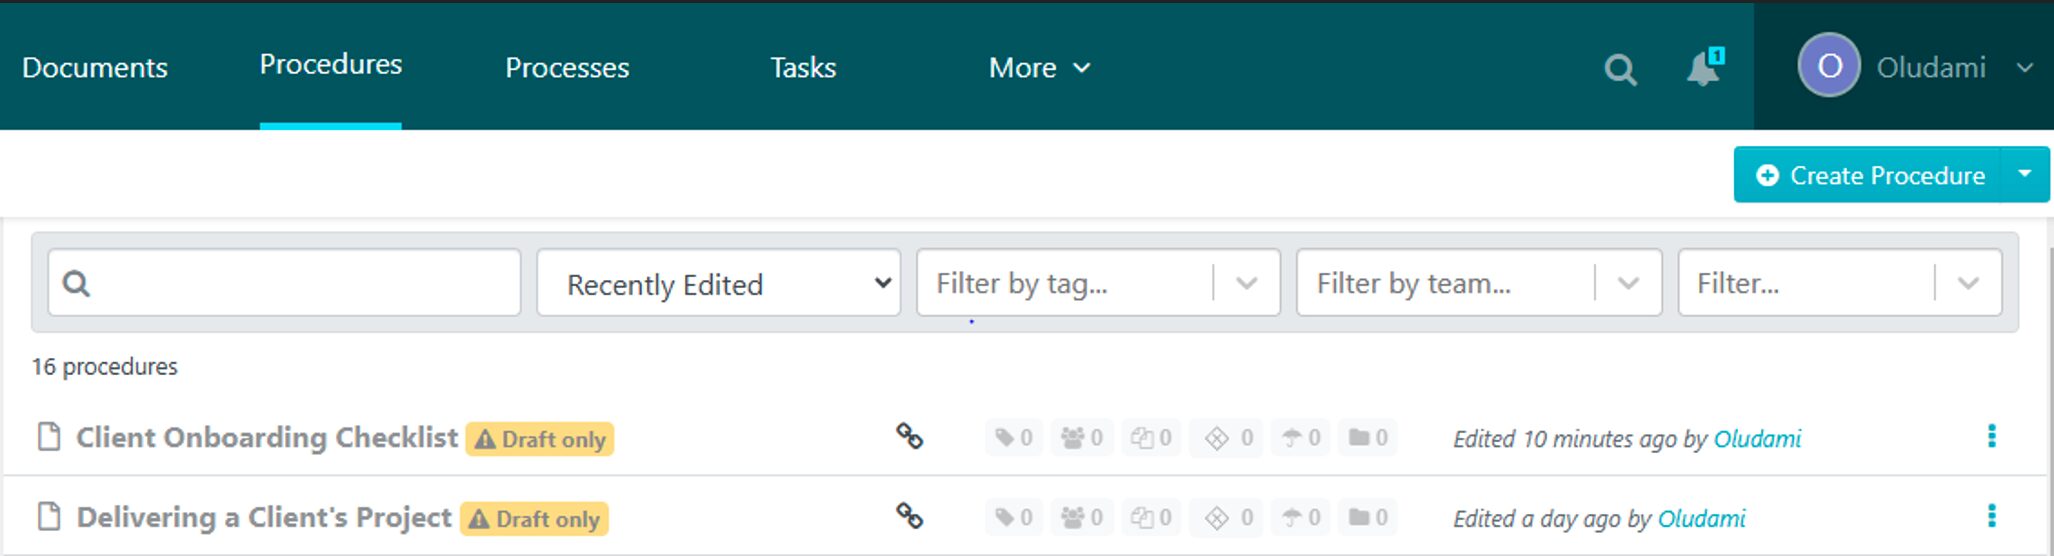
- Click on the “Procedure” menu from the home page, and you’ll be taken to a list of your procedures.
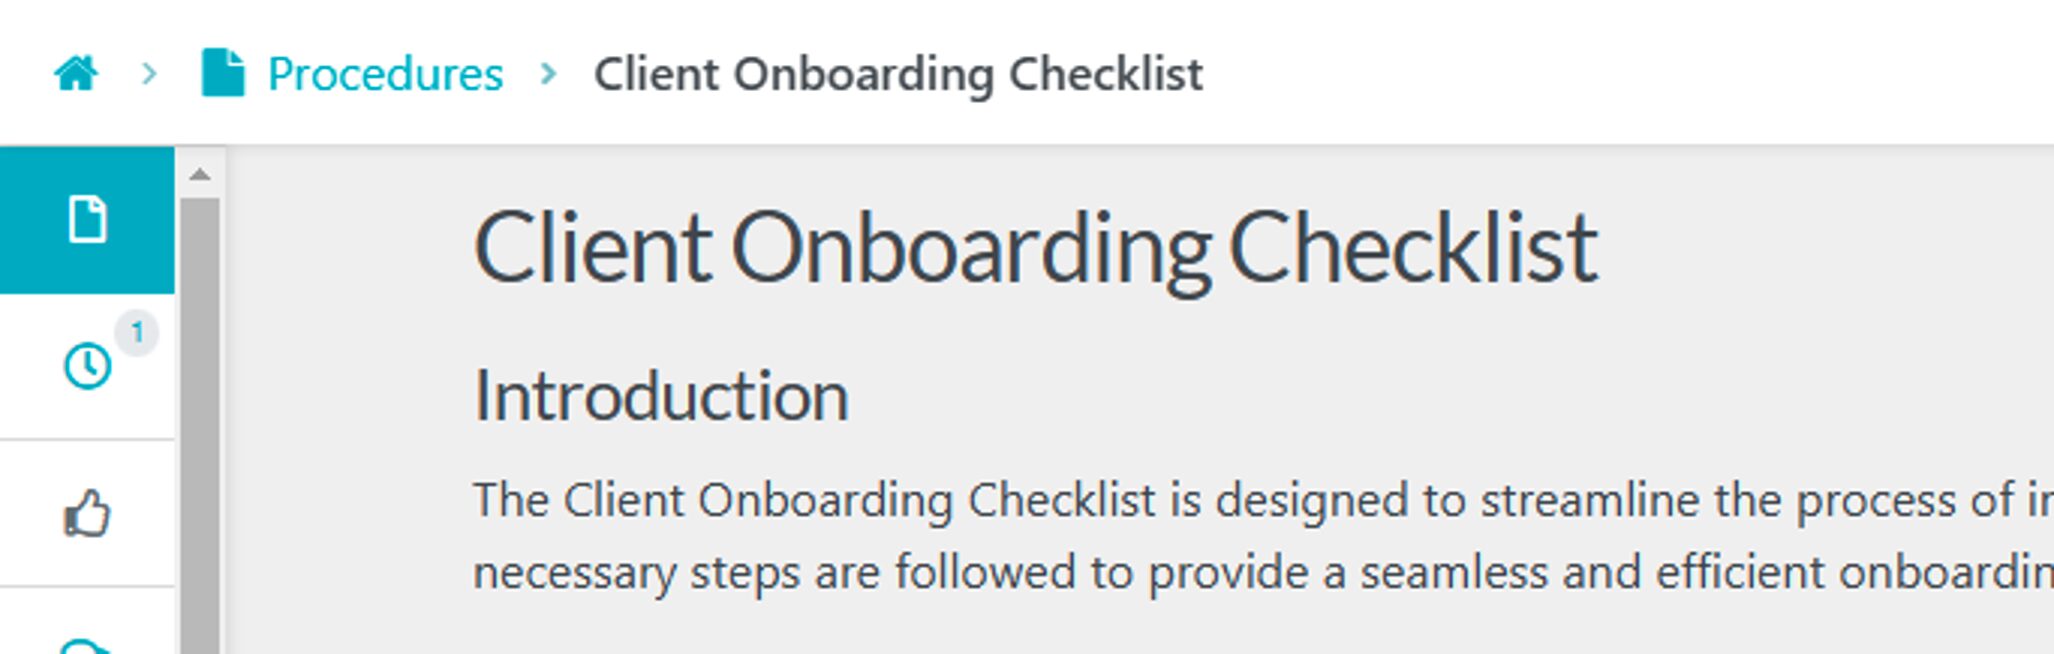
2. Select the procedure you wish to manage, and it will open the procedure’s page where you can edit and review.
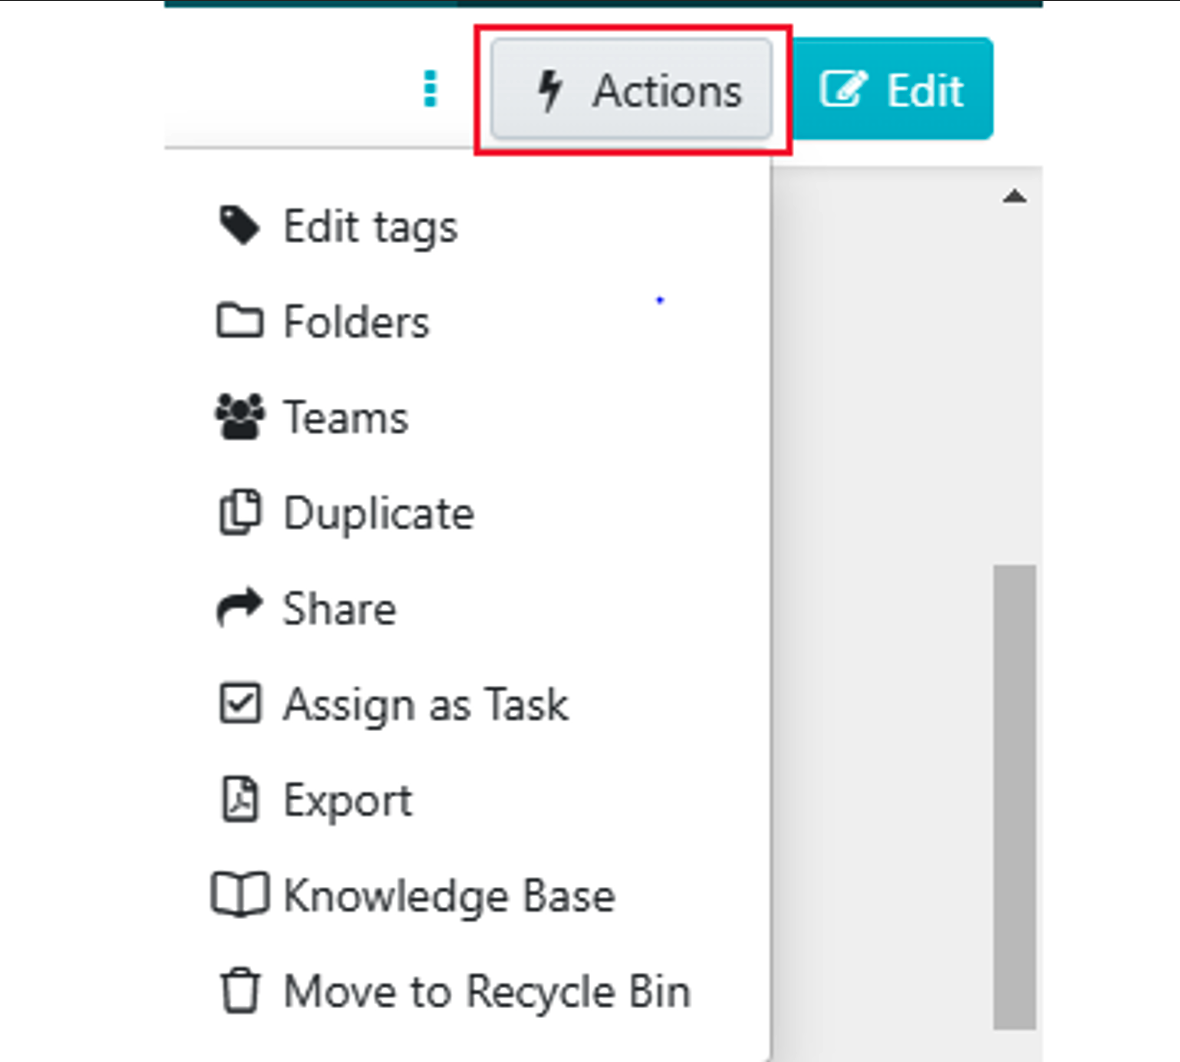
3. You can then click on the “Action” button to add a team, assign a task, export the procedure, and do a host of other things.
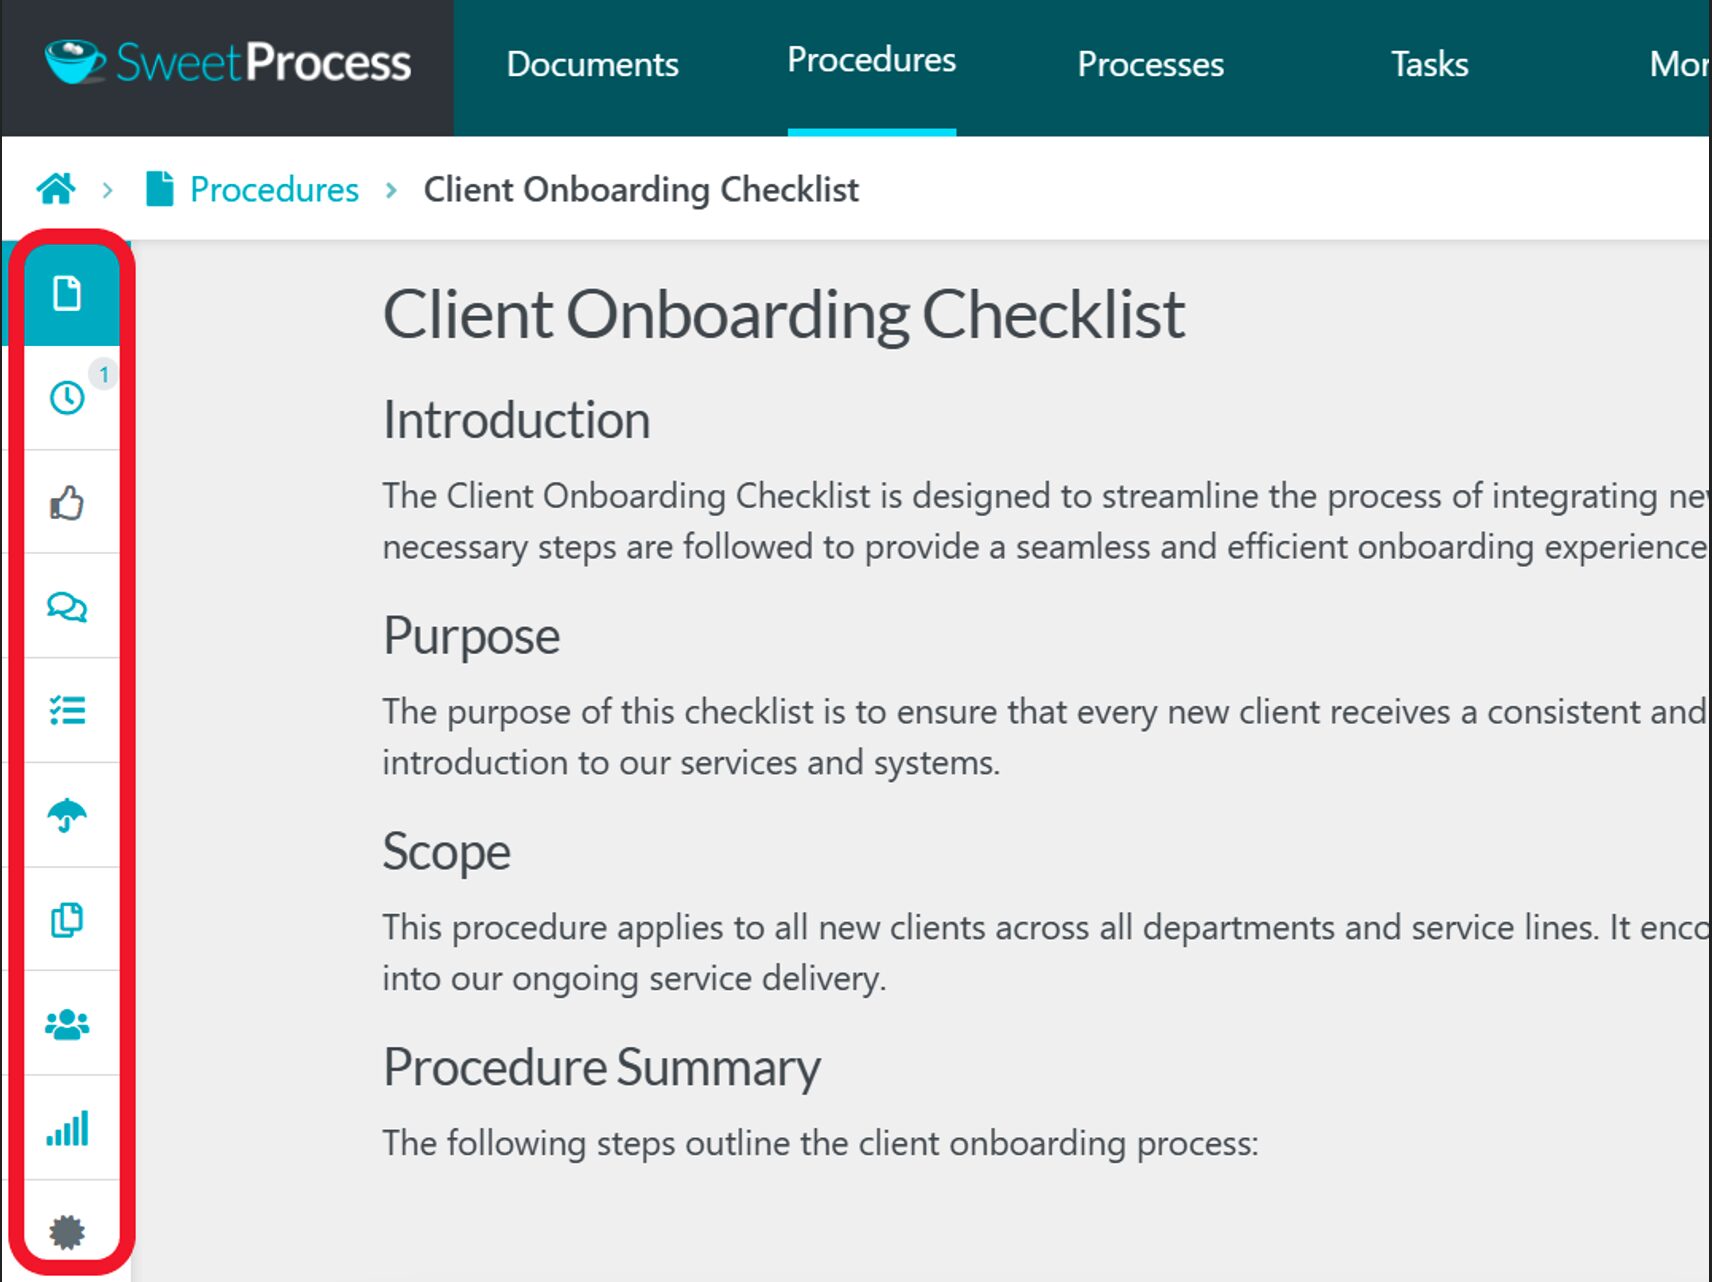
4. Also, on the same page, on the left-hand side, you’ll find a list of tools to help you manage your procedures to suit your preferences. Here you can check and reply to comments, see related tasks, access version history, add to teams, view procedure activities, and so on.
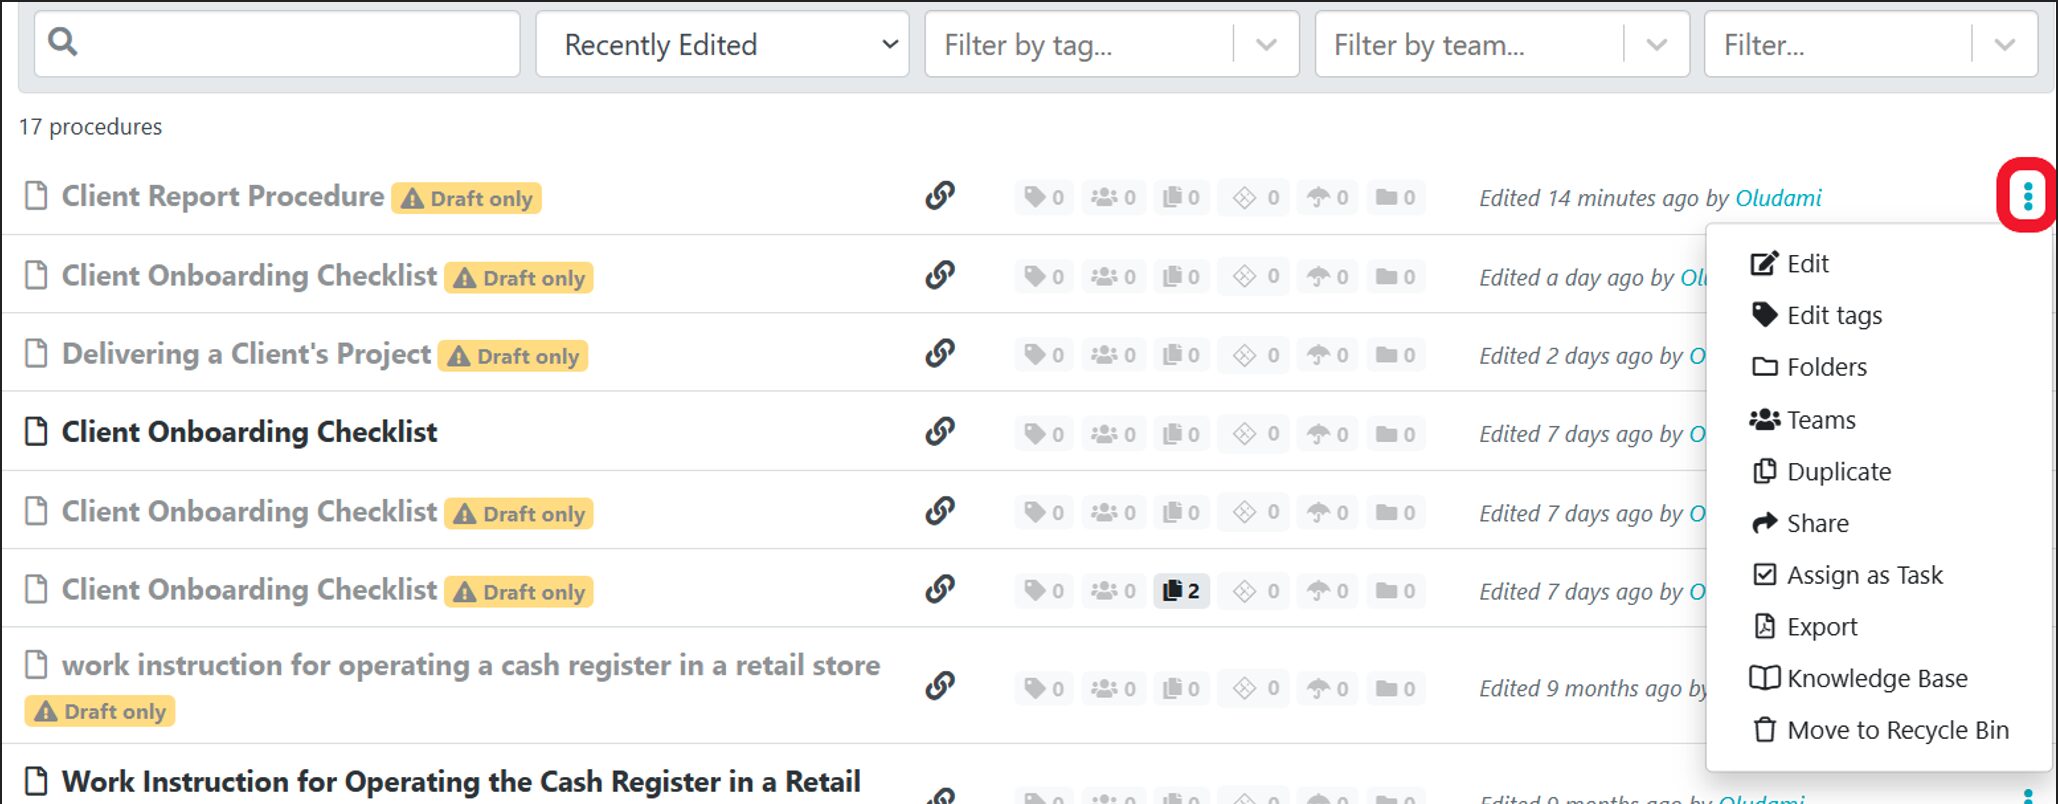
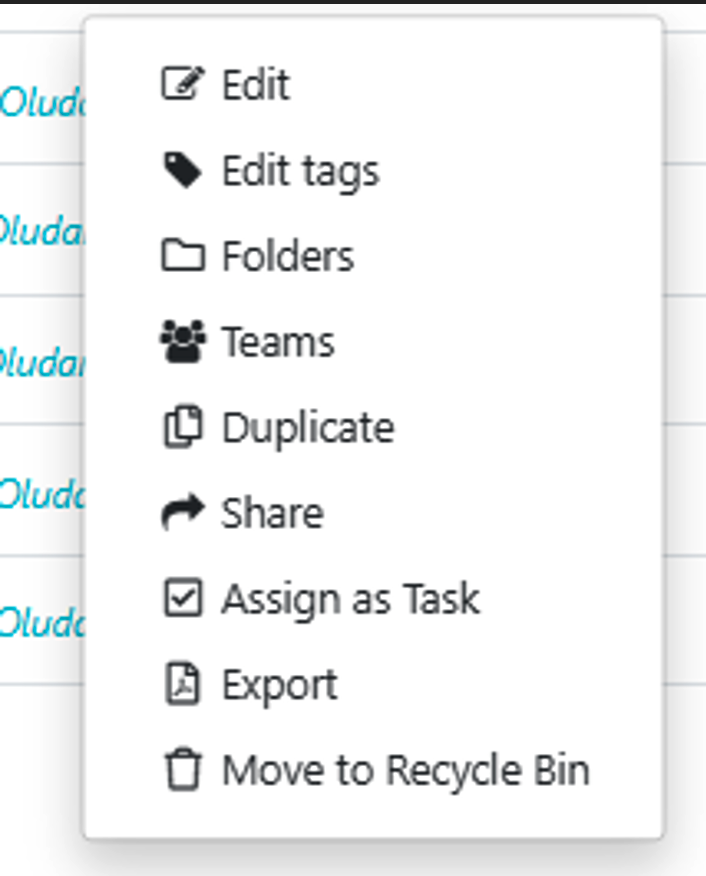
Alternatively, you can quickly manage your procedures by selecting the three dots on the right-hand side of a specific procedure in the procedure tab, as shown below:
What should be your expectation when using SweetProcess to document and manage your business’s procedures? Let’s check out a real-life case study.
How Thimbleberry Financial Improved Its Employee Onboarding With Effective Documentation

Amy Walls, president of Thimbleberry Financial, realized that her team’s inefficient processes were affecting their productivity and their ability to provide top-notch client service.
Amy’s team used Microsoft Word documents to manage their processes, but it was like finding a needle in a haystack. Documents were getting lost, updated versions were being overlooked, and team members were doing things their own way. It was chaos.
That’s when Amy discovered SweetProcess, a process documentation software that transformed the way her team worked. With SweetProcess, they created standardized processes, comprehensive documentation, and linked procedures for complex tasks. And what were their results? Improved employee onboarding, streamlined communication, and enhanced overall client experience.
“Our new employees say they have never gone through a more organized onboarding. When they start, we literally have them get access to three things. One is their email. One is SweetProcess, and one was our Slack channel, but now it’s Teams,”
Amy says.
From Amy’s experience, here are a few things you can do with SweetProcess:
- You can ensure consistency and efficiency through standardized client management processes.
- You have a centralized documentation system where you store all clients’ information.
- You get to deliver exceptional client experience by providing your team with the tools and training they need.
Click here to read Thimbleberry Financial’s full case study and listen to Amy.
How to Create and Manage Processes in SweetProcess

You first need to create processes in SweetProcess before you can manage them. Here’s how:
How to Create Processes in SweetProcess
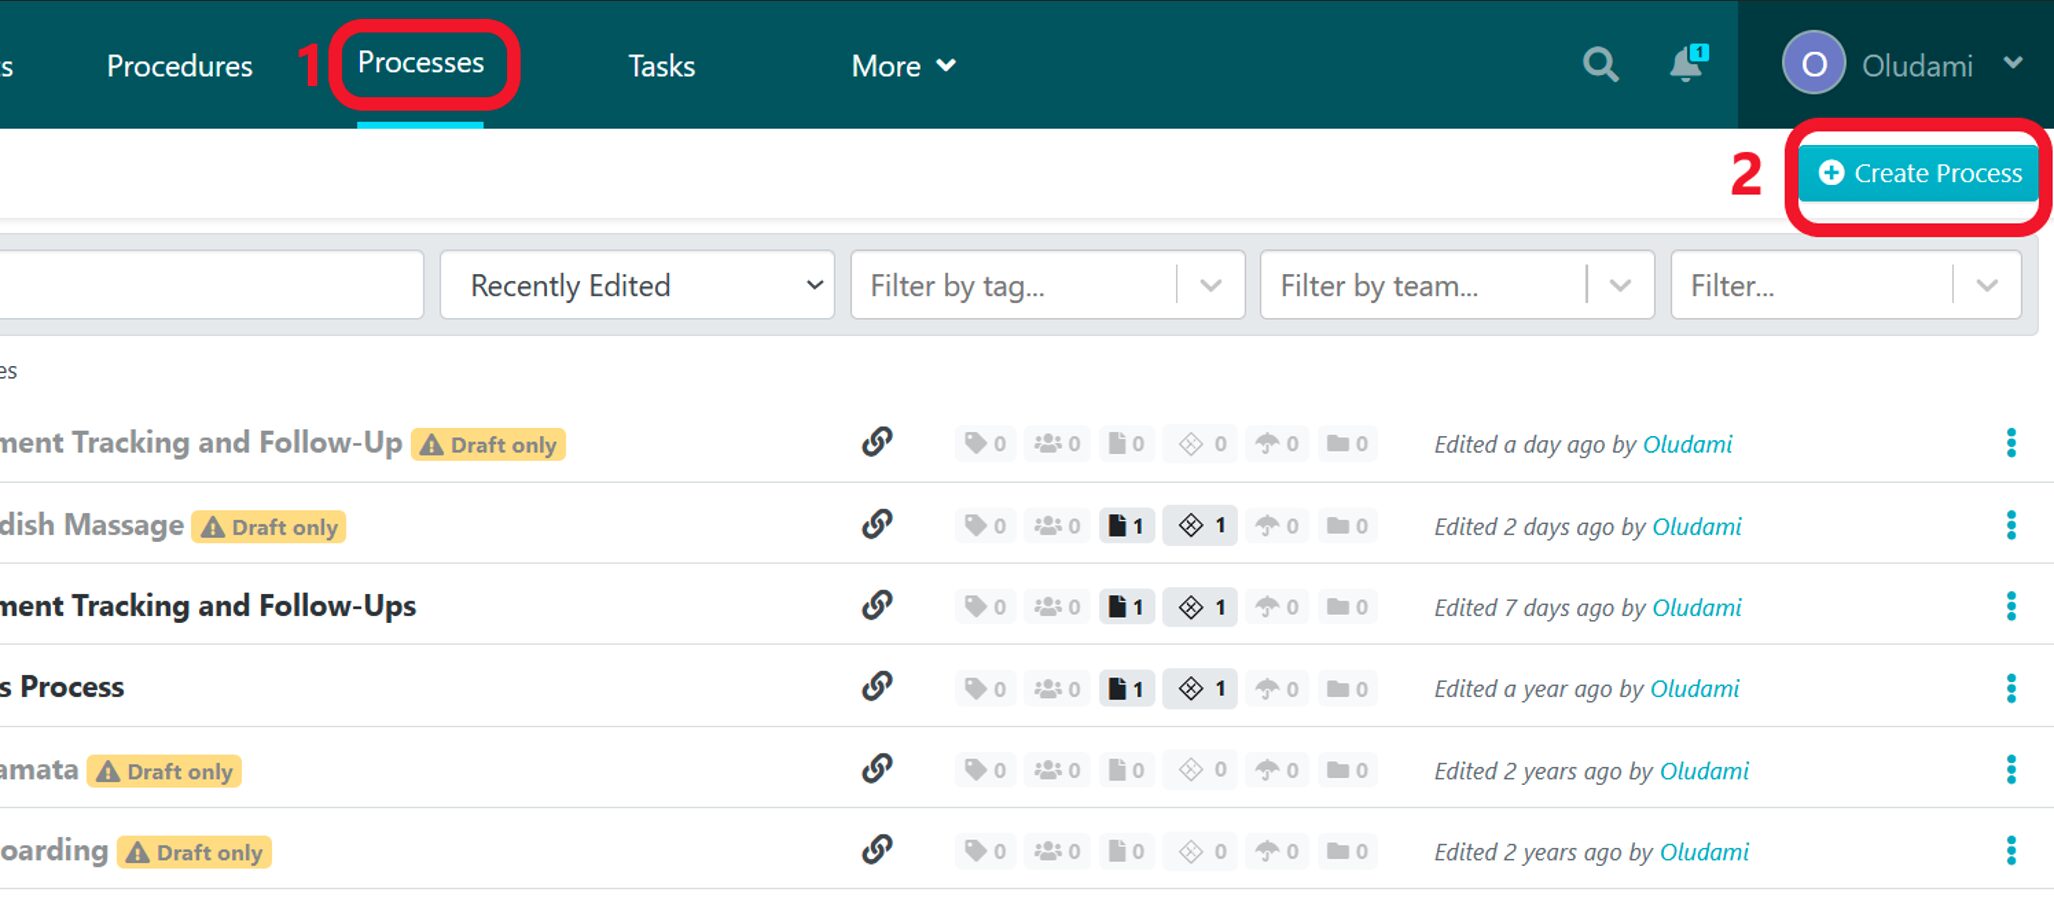
- From the SweetProcess home page, click on the “Processes” tab and then click on “Create Process” at the top-right corner of the next page.
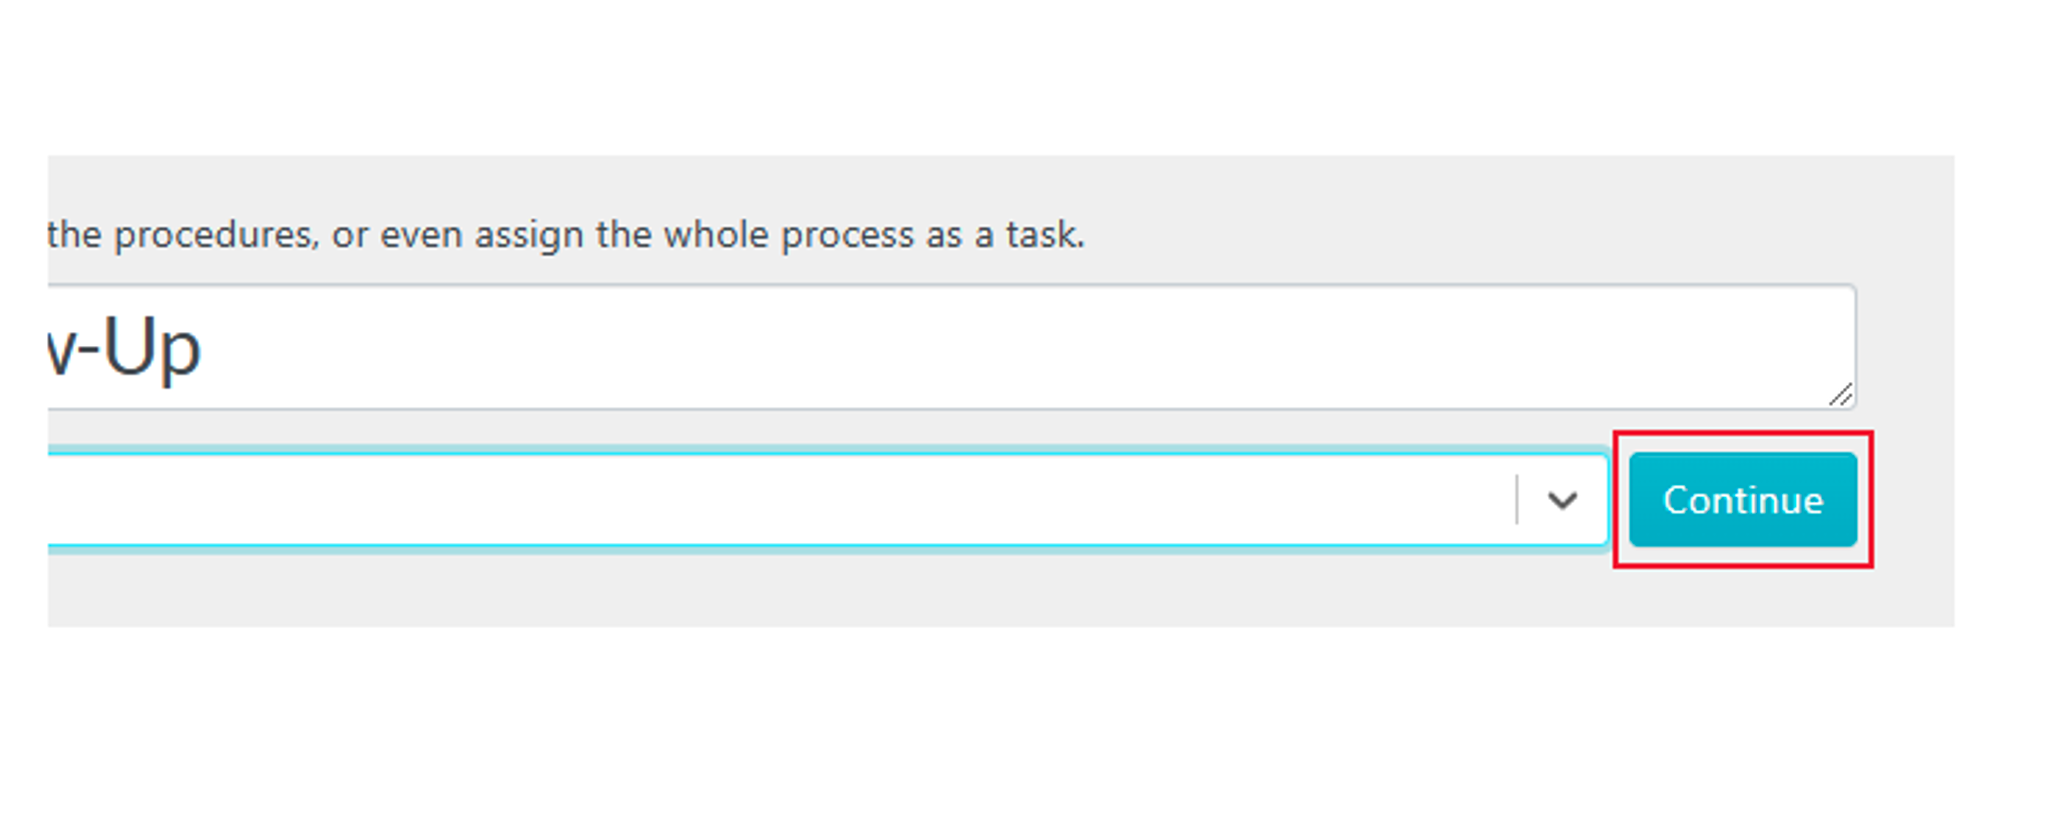
2. Next enter the title of the process in the “Process Title” bar.

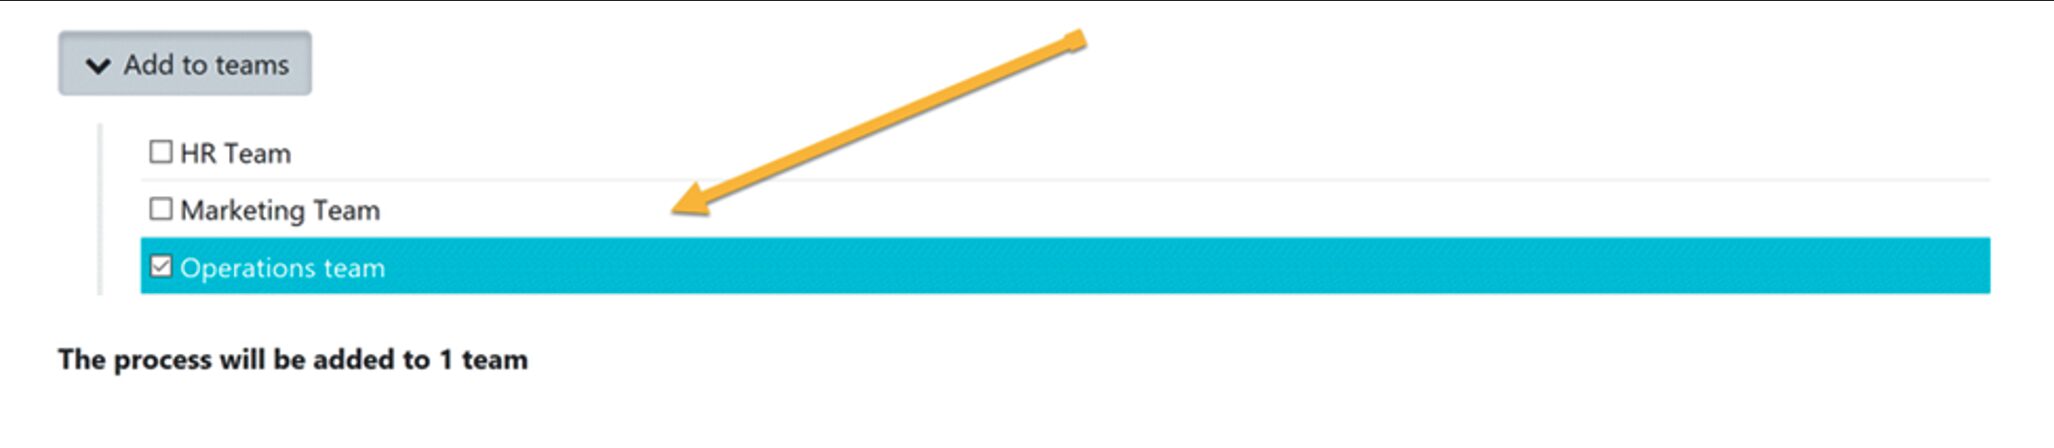
3. You can add a team or multiple teams by checking the checkbox under the “Add to teams” dropdown menu.
4. Click on “Continue” to be directed to the editing page.
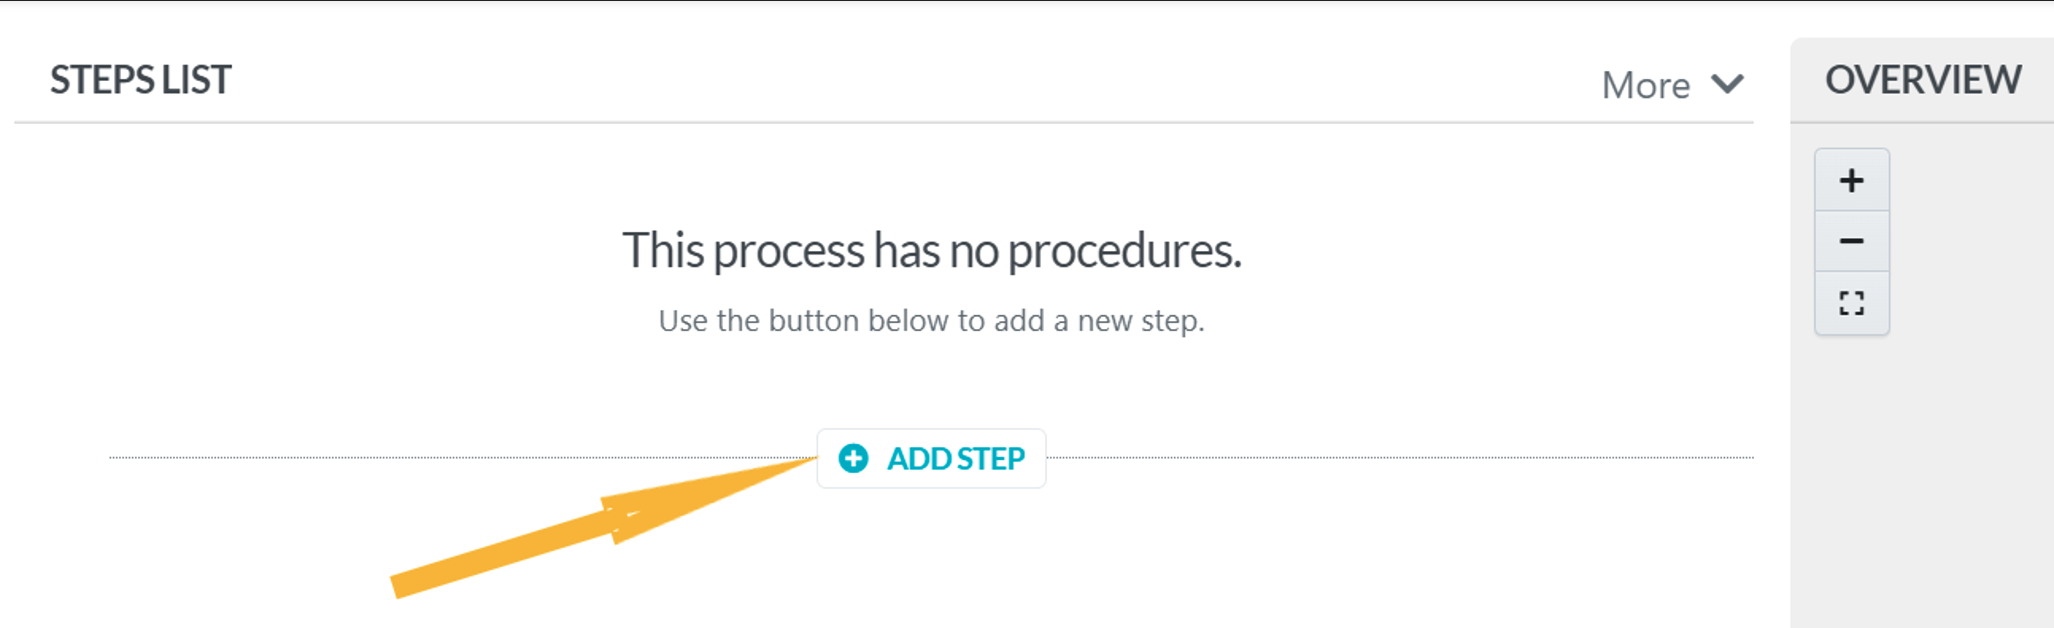
5. On the next page you can click on the title of the process to edit it and also format the description to your preference. You can add pictures, videos, tables or links. Click on “Finished Editing” when you’re done to save changes.

6. Next start creating your process by clicking on “Add Step.”
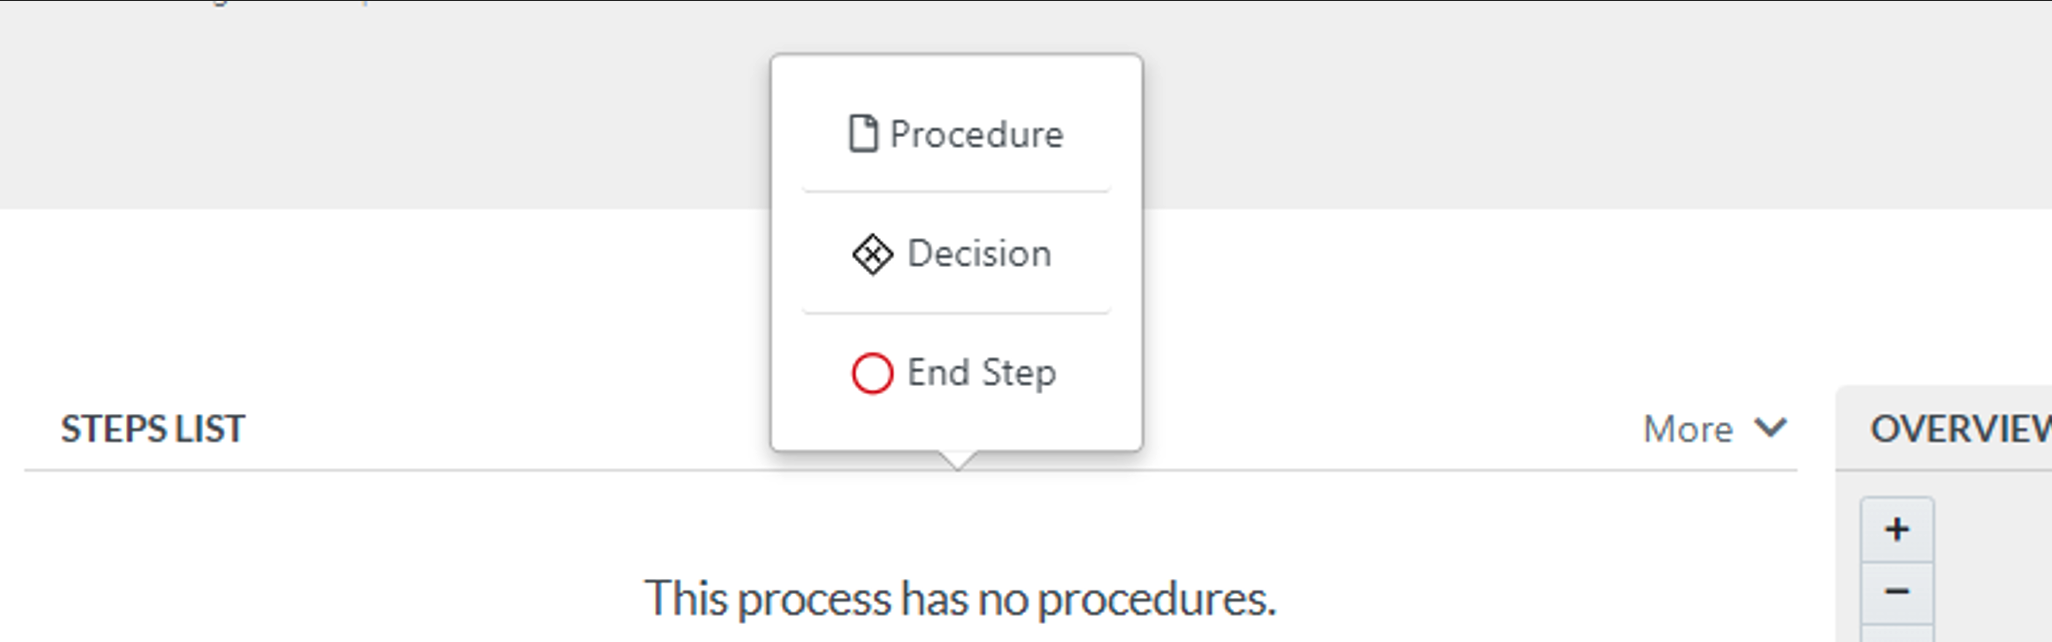
7. Choose your preference from the pop-up options based on the process you want to create. Your process steps can either be as a procedure or a decision. Click on “Procedure” to add a procedure or click on “Decision” to add a decision to the steps.
8. If you choose “Procedure,” a box opens up where you can search for and select an existing procedure or create a new one if you don’t have a procedure.
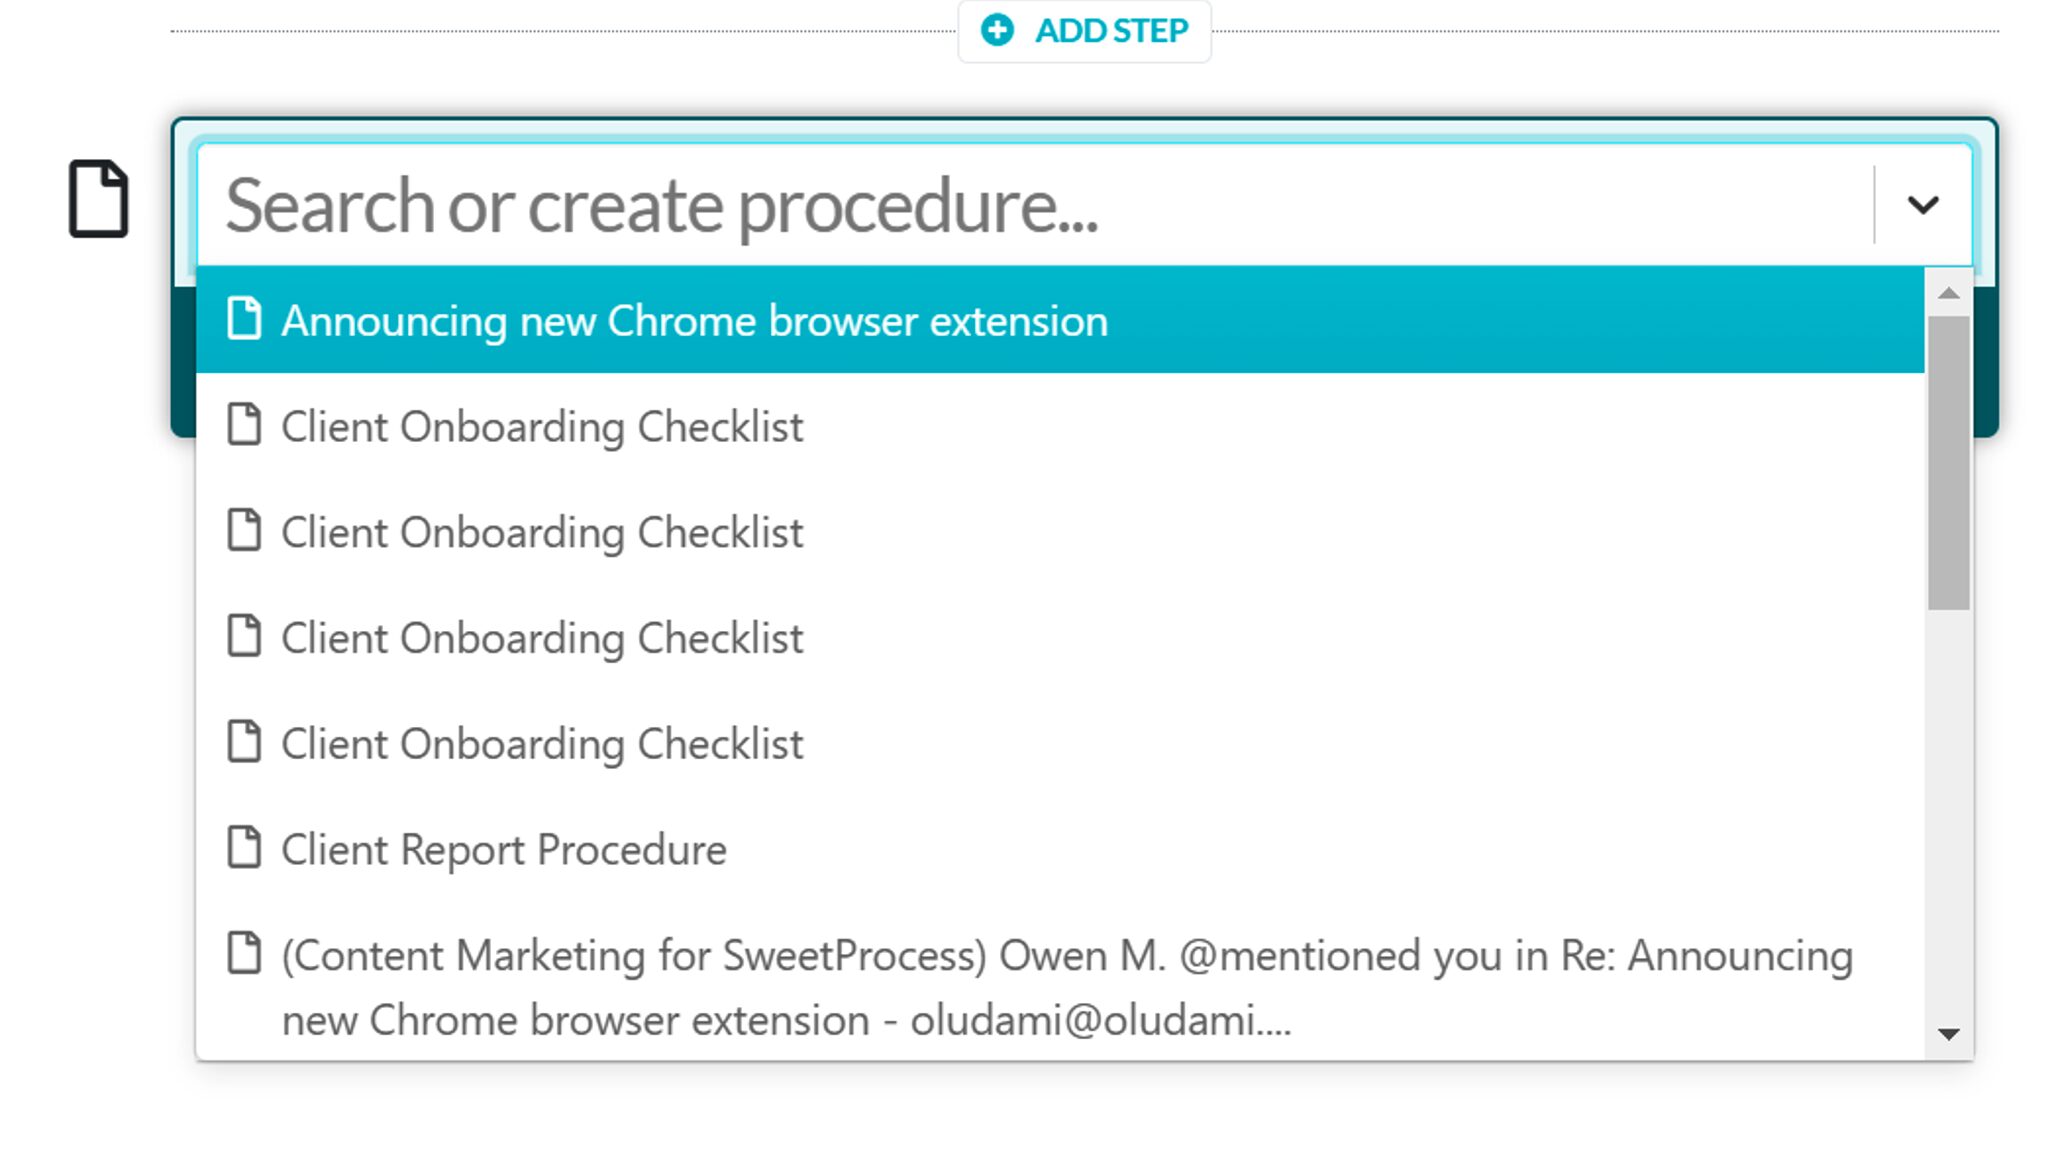
(If you have existing procedures but the one you want to turn into a process isn’t in the list, first create it as a procedure so it can appear here.)
9. If you choose “Decision,” an editor box will open where you can enter details of your decision.
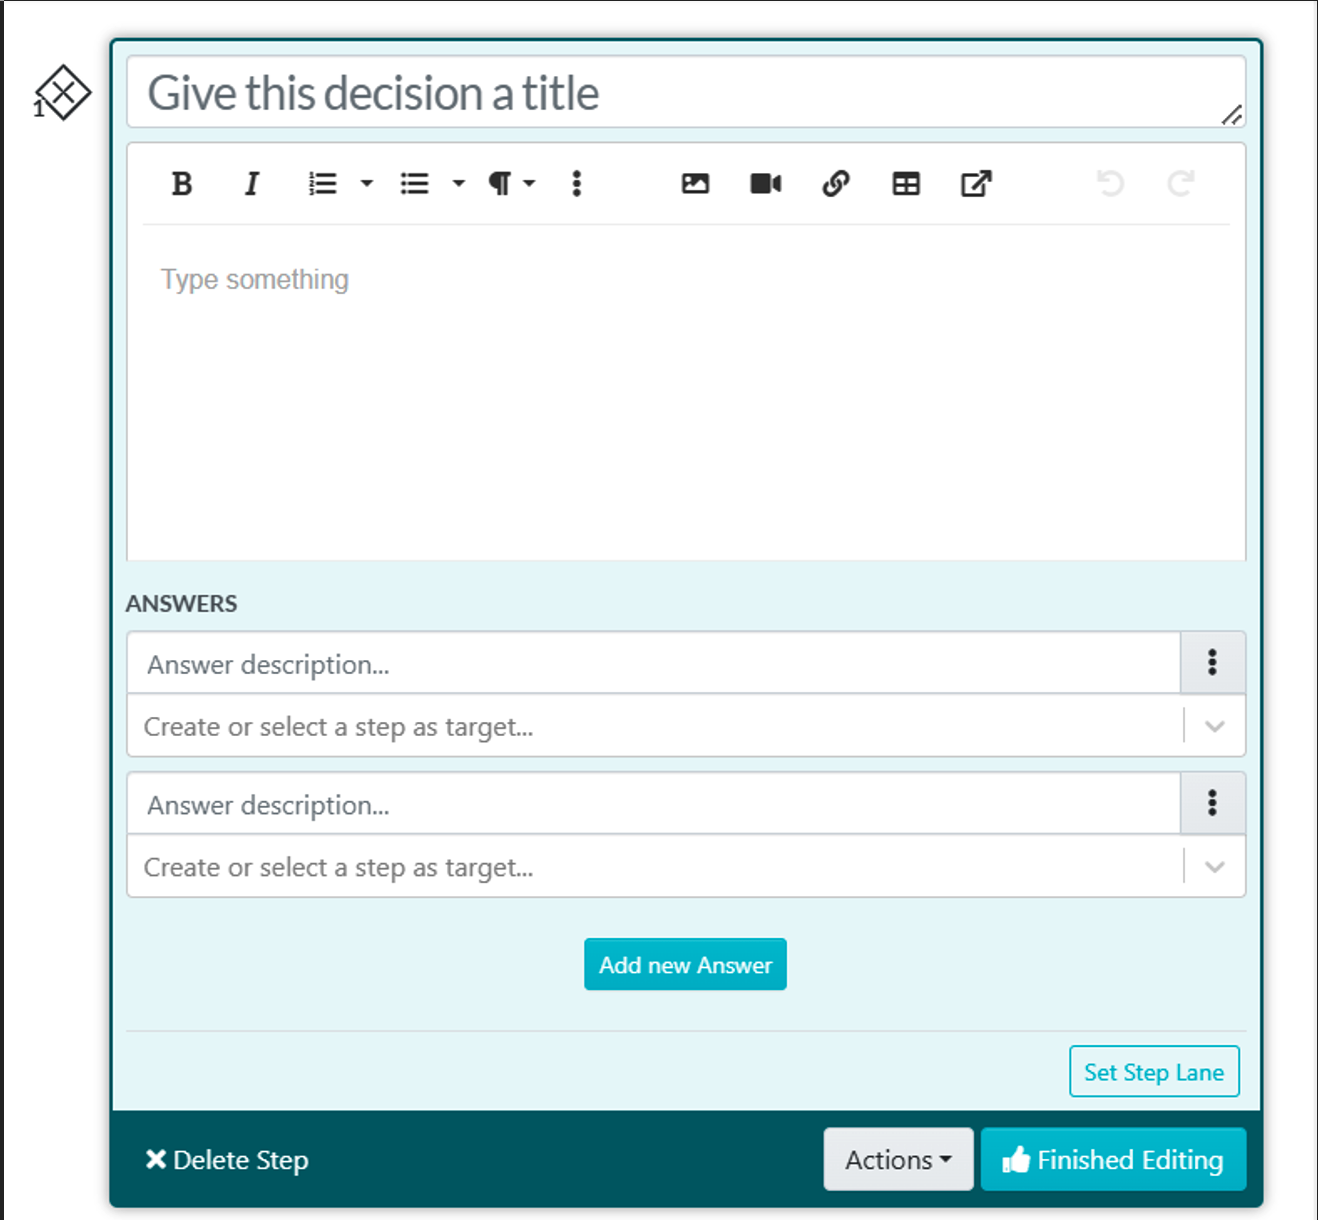
The “Decision” option is used to add conditional logic to a procedure. This is also known as branching, yes-no, and so on. Basically, when someone reaches the decision point of the procedure, they get to choose from the options you created, and based on the option they choose, they will go down a different path/branch.
Enter the options in the “Answer description” field and then select or create the step such option leads to.
Click on “Finished Editing” when you’re done creating the decision.
- You can add more steps to the process, be it a procedure or a decision. When you’re done, you’ll see your list of process steps.
- And when you’re satisfied with the process you created, approve it or get it approved by someone who has the authority.
Managing your process is similar to managing your procedures in SweetProcess. However, here’s the how-to guide:
How to Manage Processes in SweetProcess
- You can manage your processes by first clicking on the “Process” tab from the home page navigation menu. Then, from the list of processes, click on the three dots to manage the process you want to work on.

2. You can edit, duplicate, assign as a task, share, and so on.
- Alternatively, you can manage your process by selecting from the processes list the specific process you want to manage.
- Once the document opens, at the left side of the screen, you are provided with more management tools with which to work.

That’s how easy it is to create and manage processes with SweetProcess.
To see process creation and management in action, let’s have a look at another case study:
How Independent Retirement Improved Its Operations With Effective Process Documentation for Growth

Eric is the vice president of Independent Retirement, a family-owned, third-party administration firm in Portland, Oregon, that provides retirement plans to businesses and their employees.
Before using SweetProcess, Eric recognized certain challenges in their operations as a small business. One of these was the lack of well-documented procedures for their processes. As a small business with a vision to double its client base in the next five years, acquiring and training staff would have been difficult without standardized procedures.
In his quest to find a better system, he met Adi Klevit, a SweetProcess expert and consultant, who recommended SweetProcess for its ability to streamline operations and document processes effectively.
How did they implement SweetProcess?

They began by identifying the core processes in the business and mapping them out. For each process, they identified the procedures that needed to be written to ensure successful training, maintain consistency, and facilitate efficient knowledge transfer. They created these procedures using pictures and videos and interviewed their staff to gather additional knowledge.
What was their outcome with SweetProcess, and how did it benefit them?
By implementing SweetProcess, Eric and his team enjoyed several benefits:
- Process Documentation: New and existing employees now have access to clear, standardized procedures. No more relying on subject matter experts or hoping that employees would somehow magically know what to do.
- Training and Onboarding: The use of pictures and videos as task-based documentation made training new employees a lot simpler and more effective, helping them achieve consistency in their operations.
- Document Versioning: The team could track changes in procedures, ensuring everyone knows what is expected of them and when tasks are due, avoiding confusion.
- Task Management: It became easy to assign tasks to specific team members without the worry of overlap in effort or confusion from employees. This approach makes task management easier to monitor and maintain.
You can click here to read the full case study and also listen to Eric and Adi’s interview.
How to Create and Manage Policies in SweetProcess
Creating and managing policies in SweetProcess is straightforward and doesn’t require any technical expertise.
How to Create Policies in SweetProcess
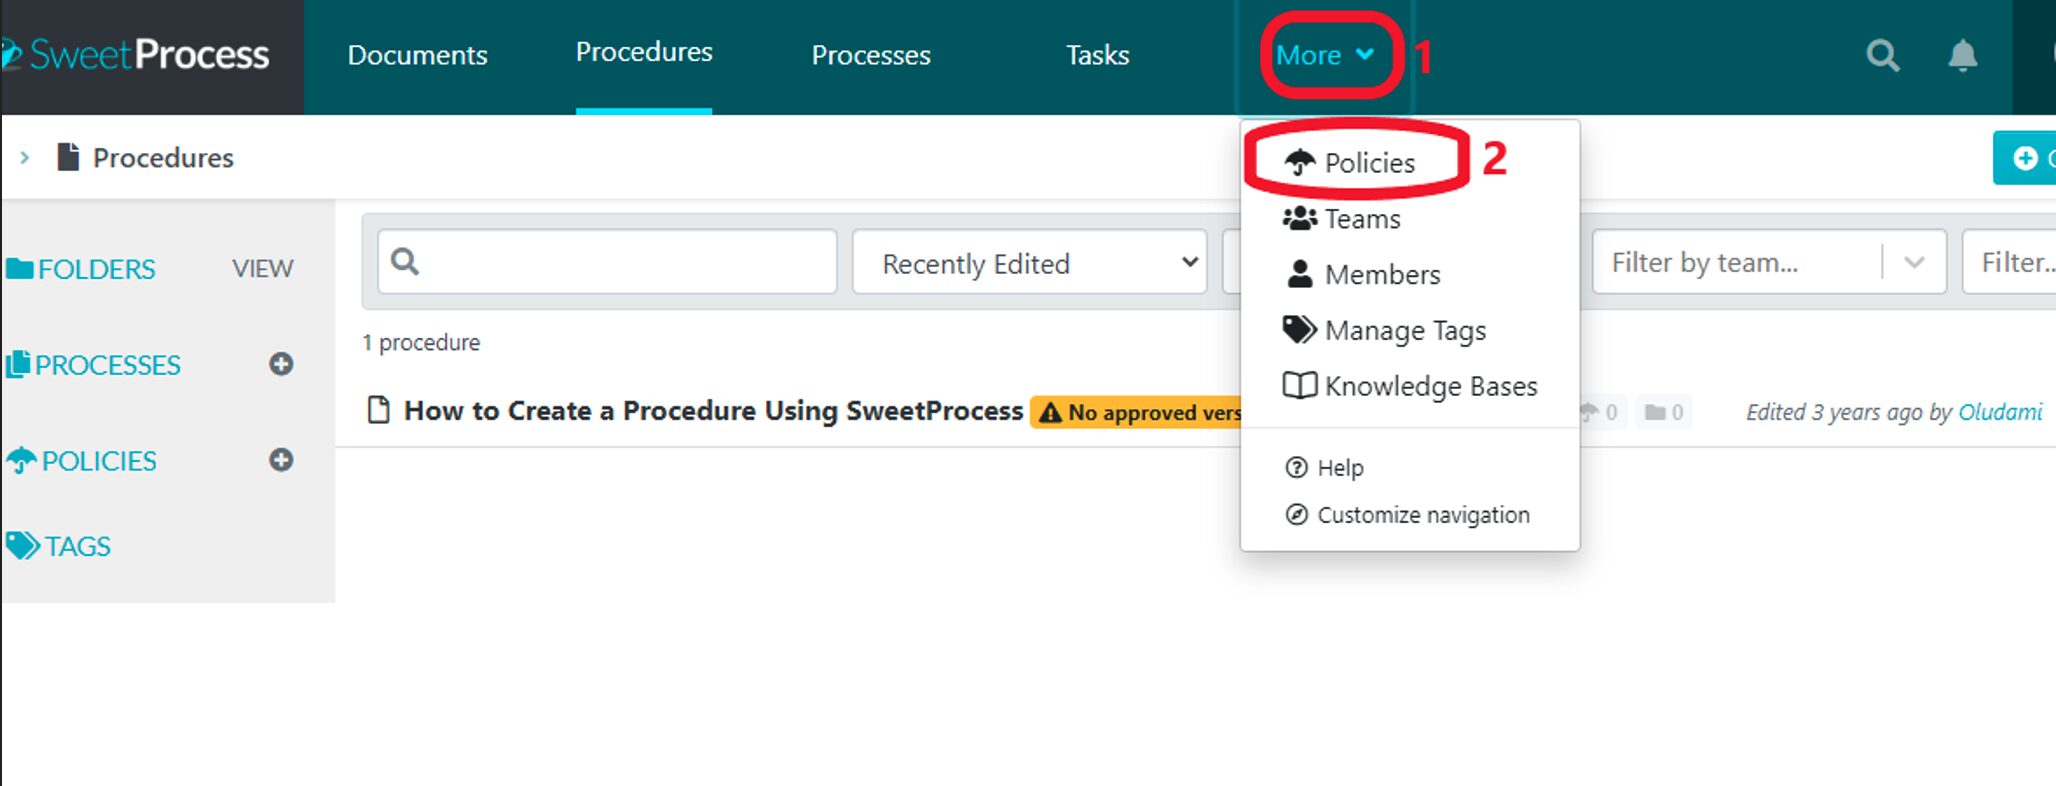
- From the dashboard, select “More”, then select “Policies” from the dropdown menu.
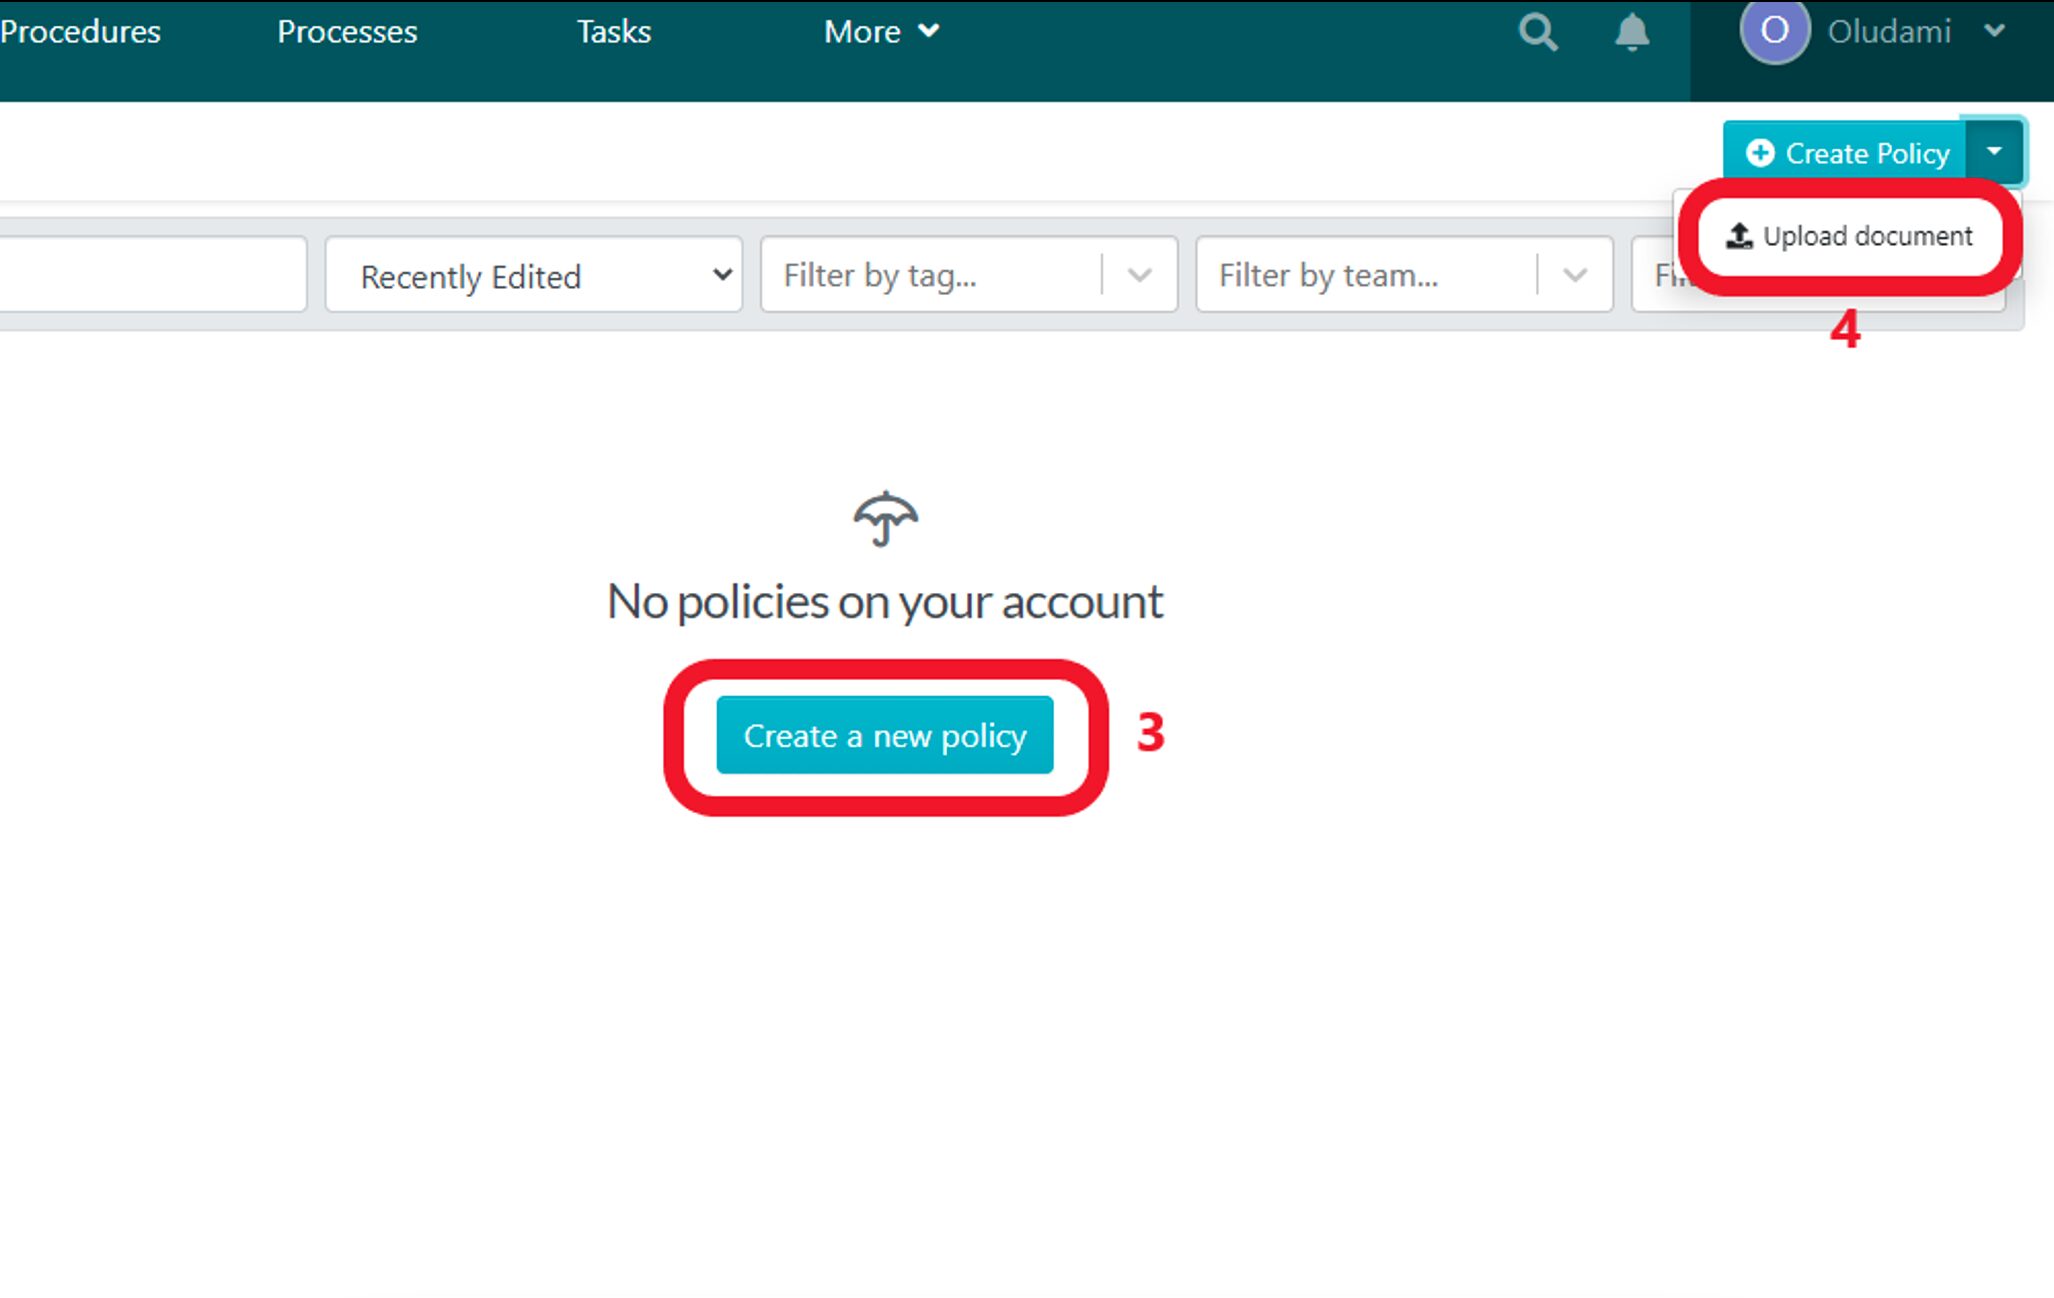
- Next click on the “Create a new policy” button to create your policy from scratch. Or you can upload an already created policy by clicking the dropdown icon beside “Create a new policy” and select “Upload document.” Note that the policy must be in a Word document (DOCX) format.
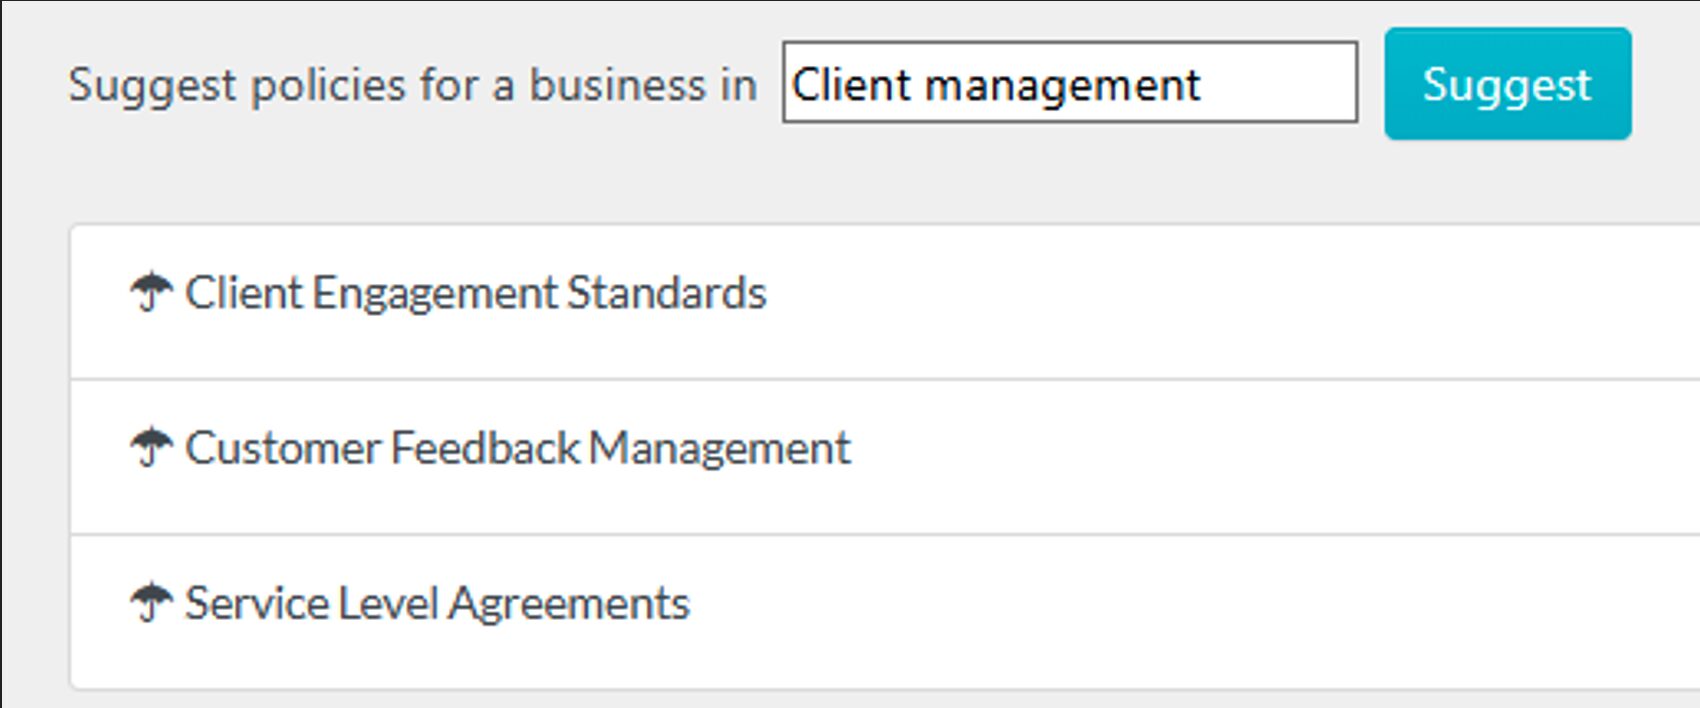
2. On the next page, use the SweetAI suggestion tab to find suggested policy titles for your industry.
3. Or scroll up to create your own by entering a title. You can click on “Add to teams” or folders.

4. Next click on “Write with SweetAI” if you want your policies automatically generated with AI based on your title, or click on “Continue” to craft yours, and you’ll be taken to the editing page.
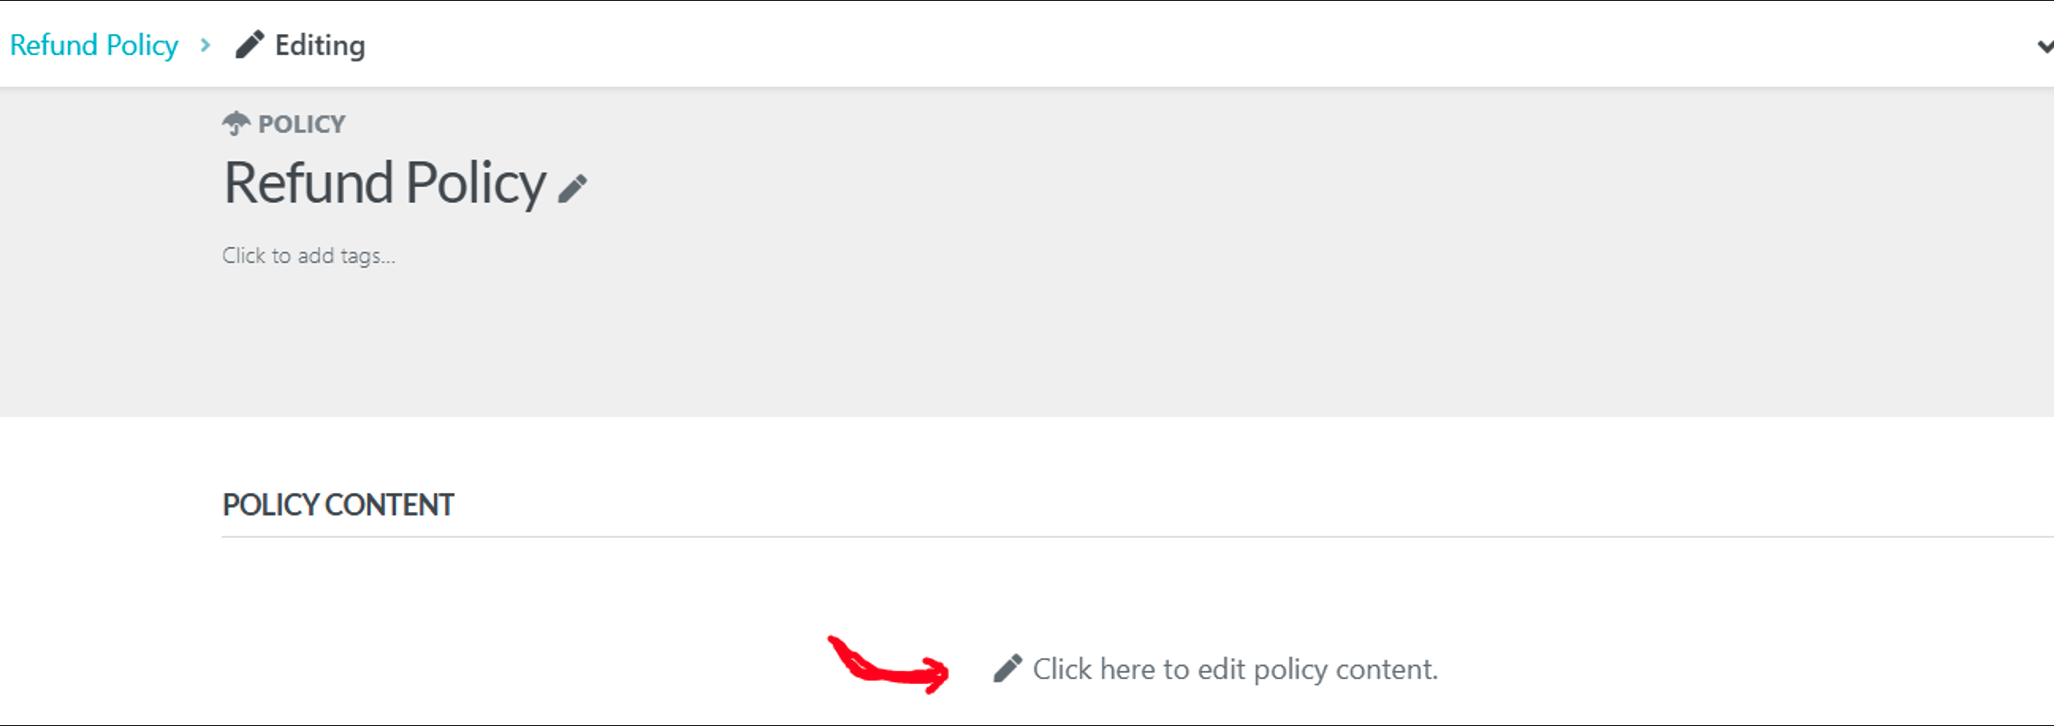
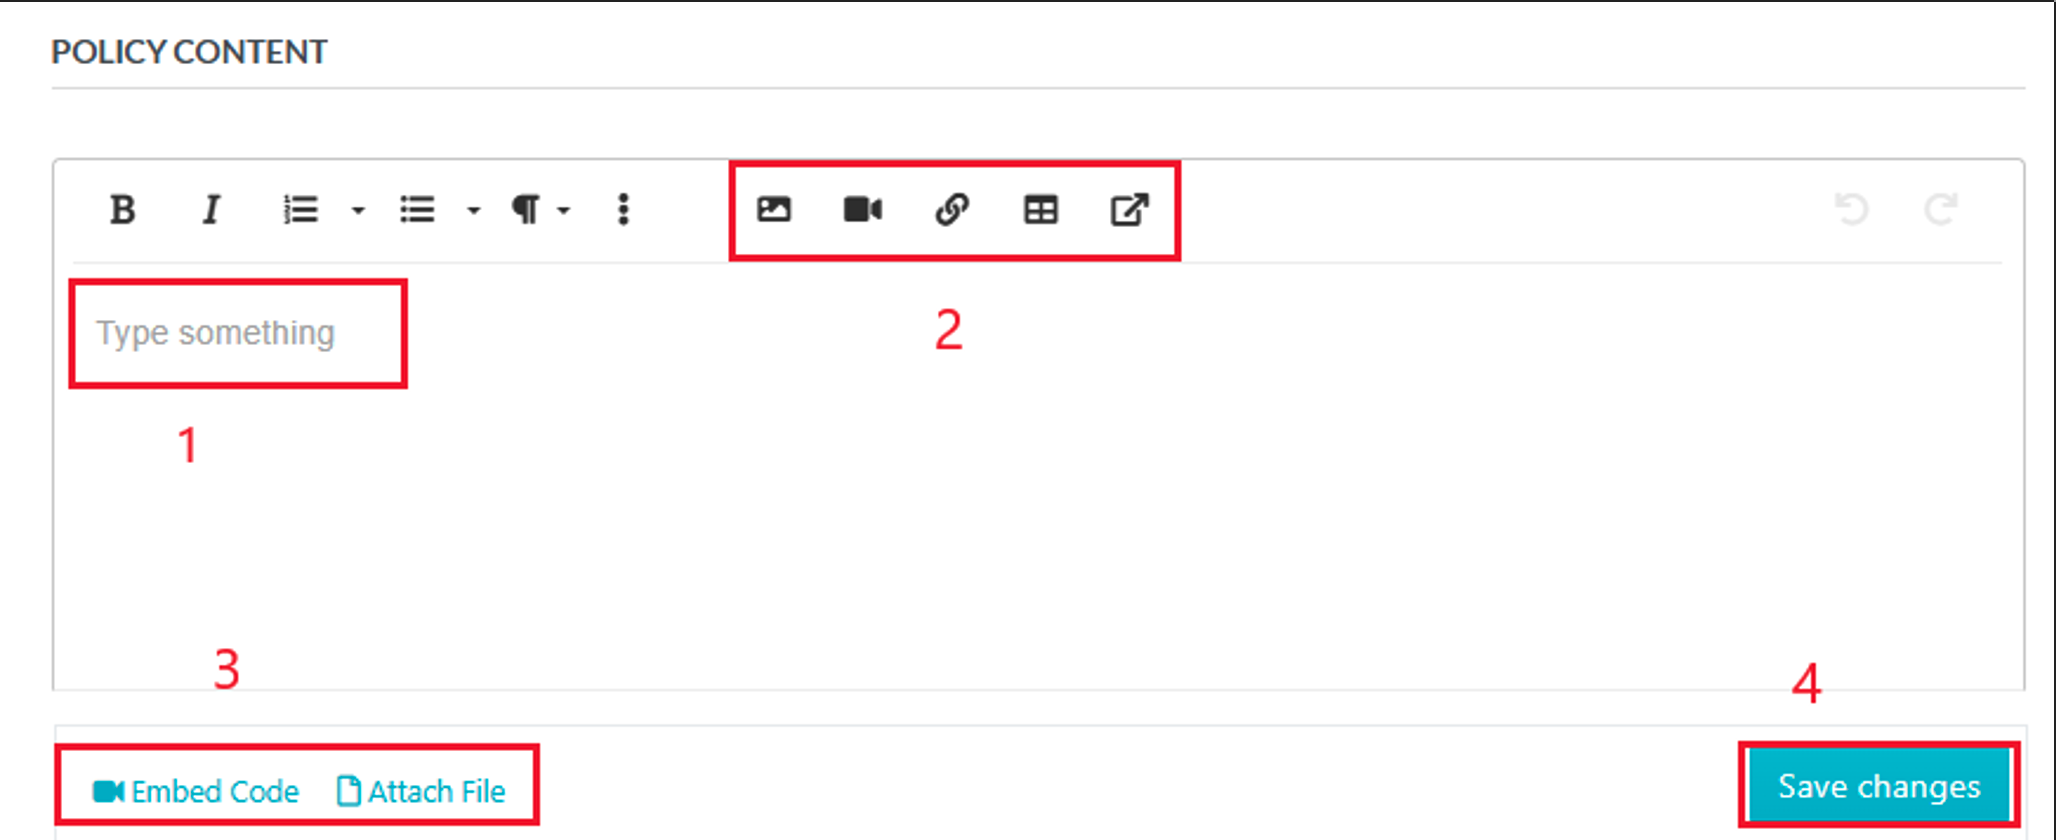
5. Proceed to create your policy content by clicking on “Click here to edit policy content.”
6. You can add text (1), links, pictures, and tables (2). You can also embed video or attach files if necessary (3). Then click on “Save changes” when you’re done (4).
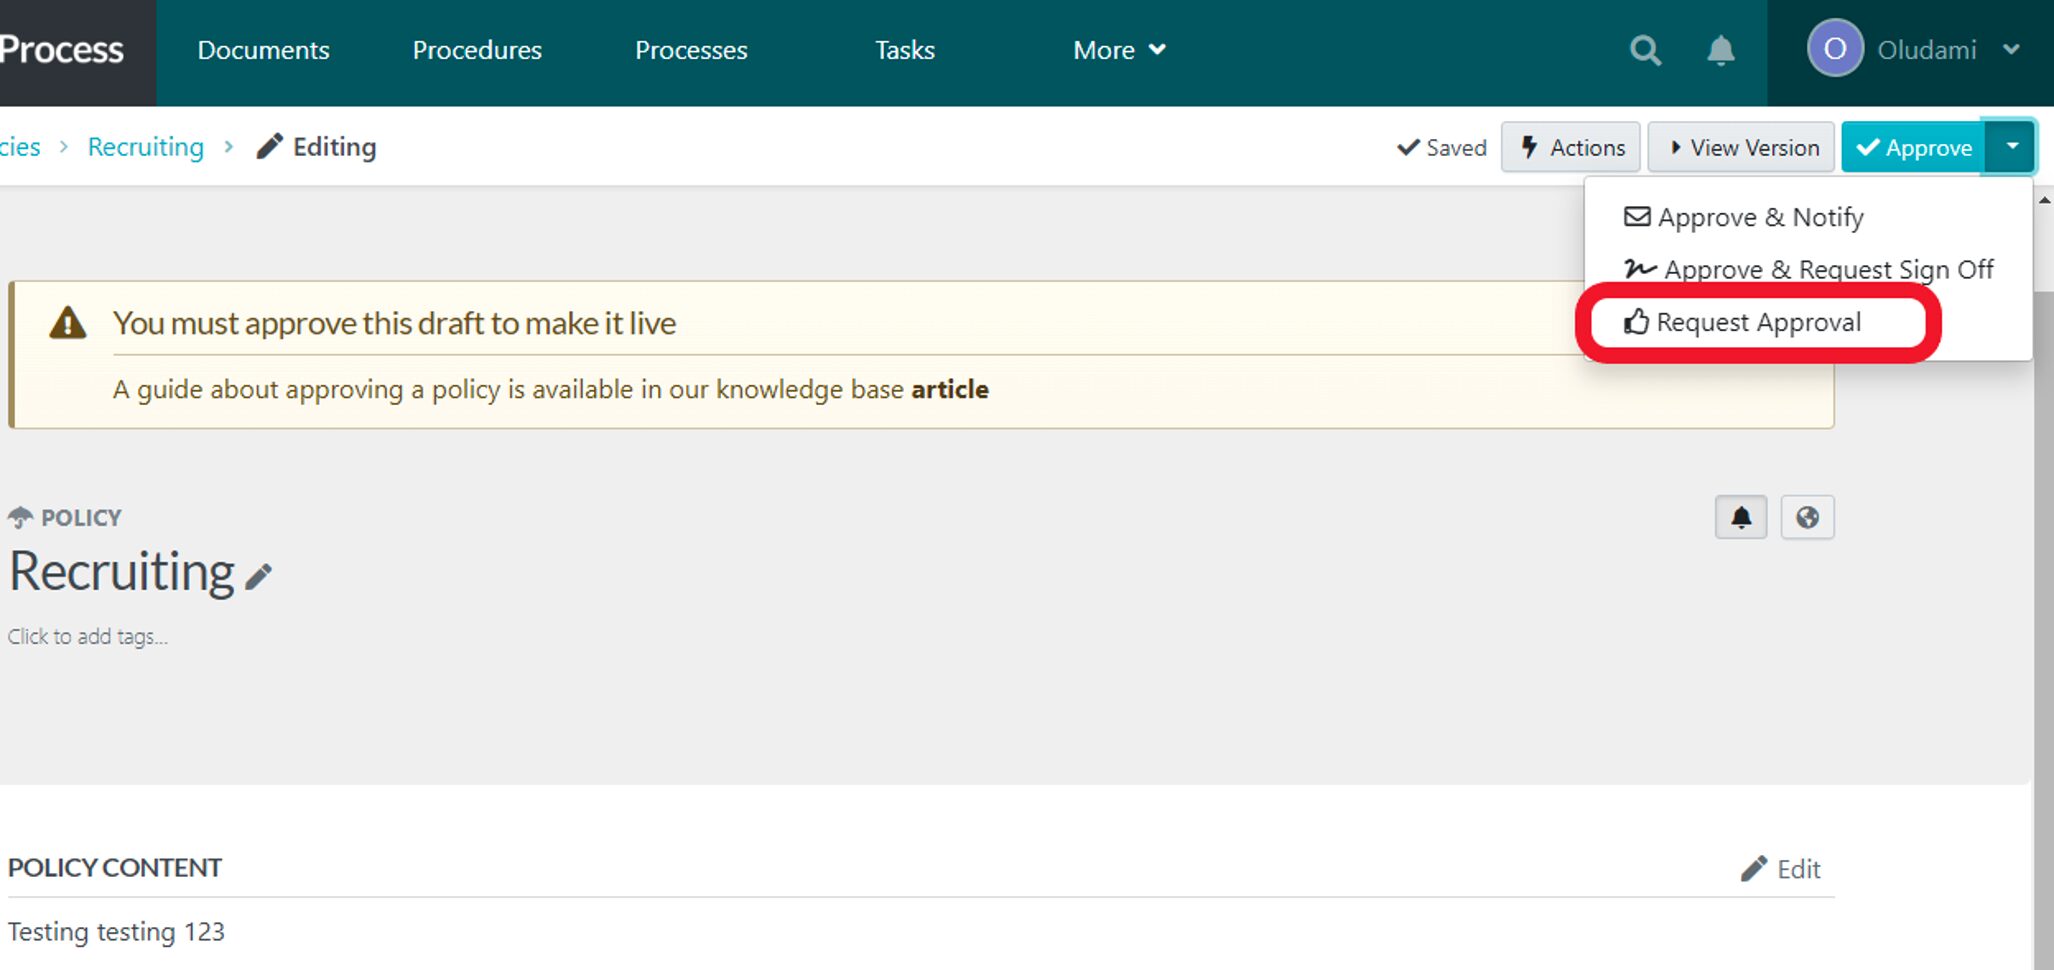
7. On the next page, click on “Approve” at the top-right corner of your screen (or request approval) to make your policy go live.
And just like that, you’ve successfully created a policy in SweetProcess.
How to Manage Policies in SweetProcess
Managing policies in SweetProcess has the same steps as managing processes and procedures discussed earlier. You either click the three dots beside a process to quickly manage it or open the process to get more management options.
The usefulness of SweetProcess goes beyond creating and managing procedures, processes, and policies.
This business process management software has several other features you should know about, including the knowledge base feature.
Create an External Knowledge Base for Your Clients

Whether you are a business owner, freelancer, founder, or even a CEO, you are also a client somewhere else. We all know how frustrating it is to endlessly wait for answers or repeatedly ask the same questions.
With SweetProcess, you can have a centralized knowledge base where clients and prospective clients can look up FAQs, guides, or troubleshooting tips to decrease your team workloads.
You can create both internal (for your team) and external knowledge bases with SweetProcess. By creating an external knowledge base in SweetProcess, you cut down on client inquiries. This gives your clients a sense of independence, making them feel more confident and satisfied.
The general strategy for creating an external knowledge base for client management revolves around the following steps:
Step 1: Identify common client inquiries. You can start by listing FAQs, guides, or troubleshooting tips your clients need based on your interaction with them.
Step 2: Organize related topics into categories for easier navigation.
Step 3: Leverage a client management software like SweetProcess to help professionally structure and manage your knowledge base.
Step 4: Customize your knowledge base to suit your business style with visuals and make it user-friendly for your clients.
Step 5: Publish and share with your clients.
Although SweetProcess is primarily designed for internal process management and employee onboarding, you can still utilize its process and procedure management feature to create an external client knowledge base.
Step-by-Step Guide on Creating an External Knowledge Base in SweetProcess
- The first step is to create an article for every knowledge base category. For example, FAQs, guides, and troubleshooting tips.
- These articles can be created inside SweetProcess as “Procedures” or “Policies” only.
- Next, begin creating your knowledge bases from already made procedures and policies.
Creating Knowledge Bases in SweetProcess
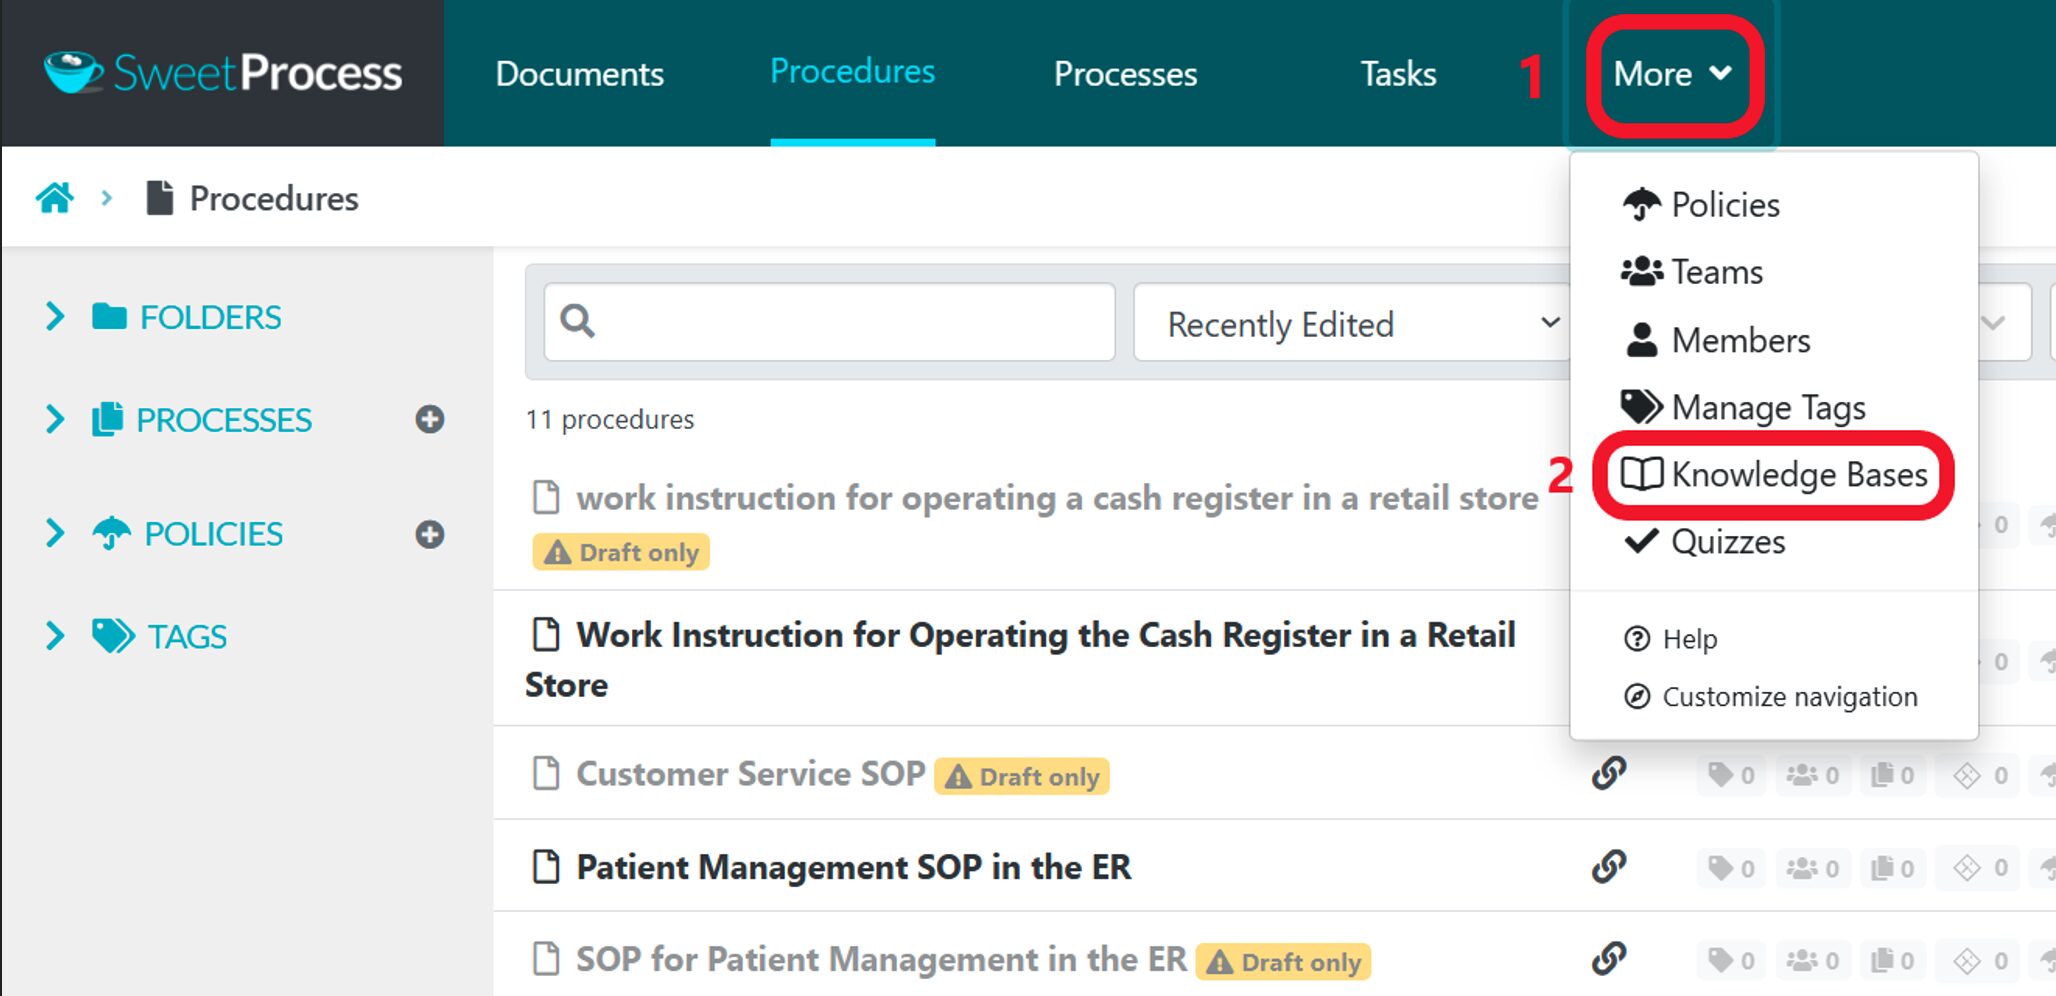
- From the home page, click on “More” and select “Knowledge Bases” from the dropdown menu.
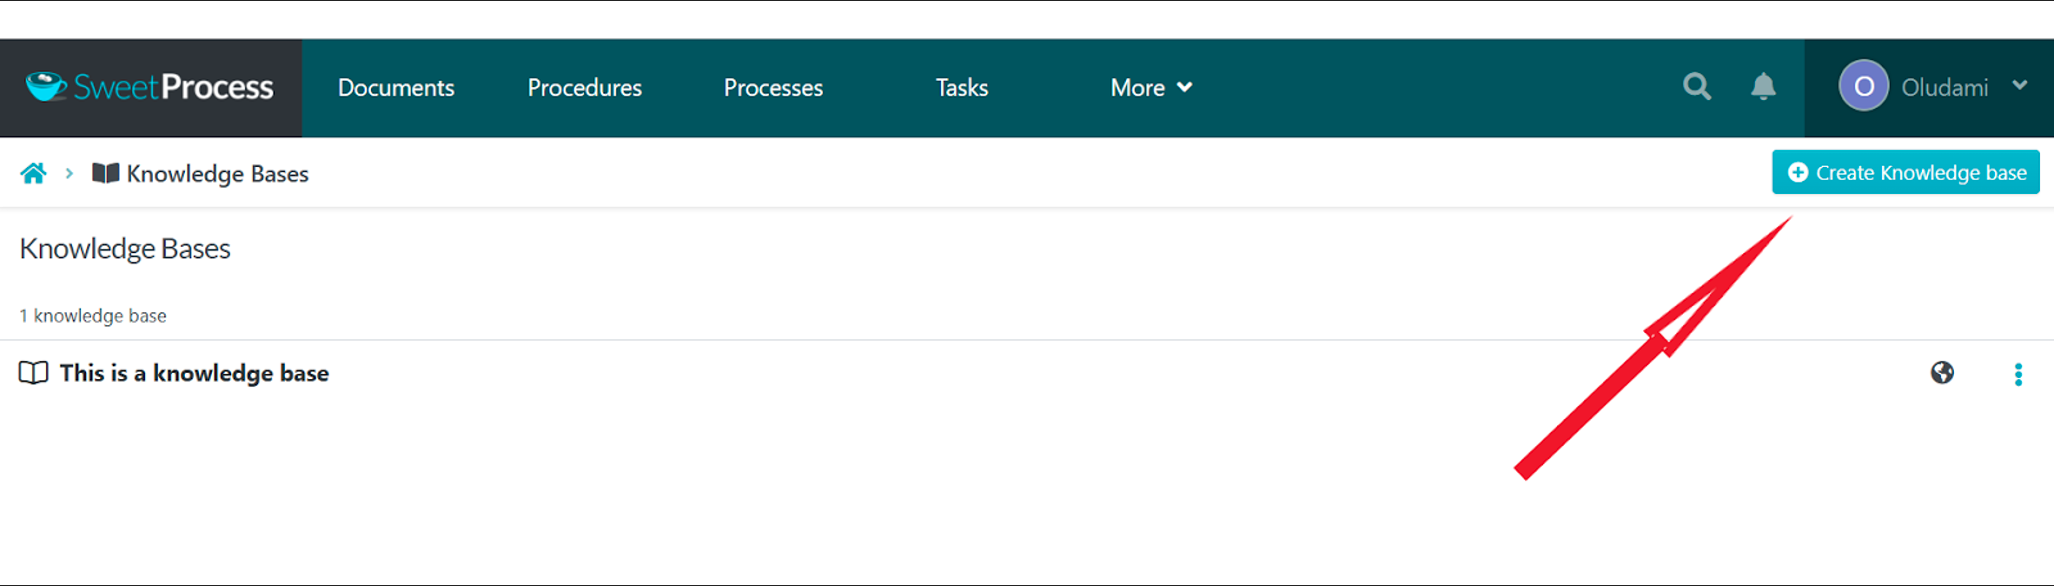
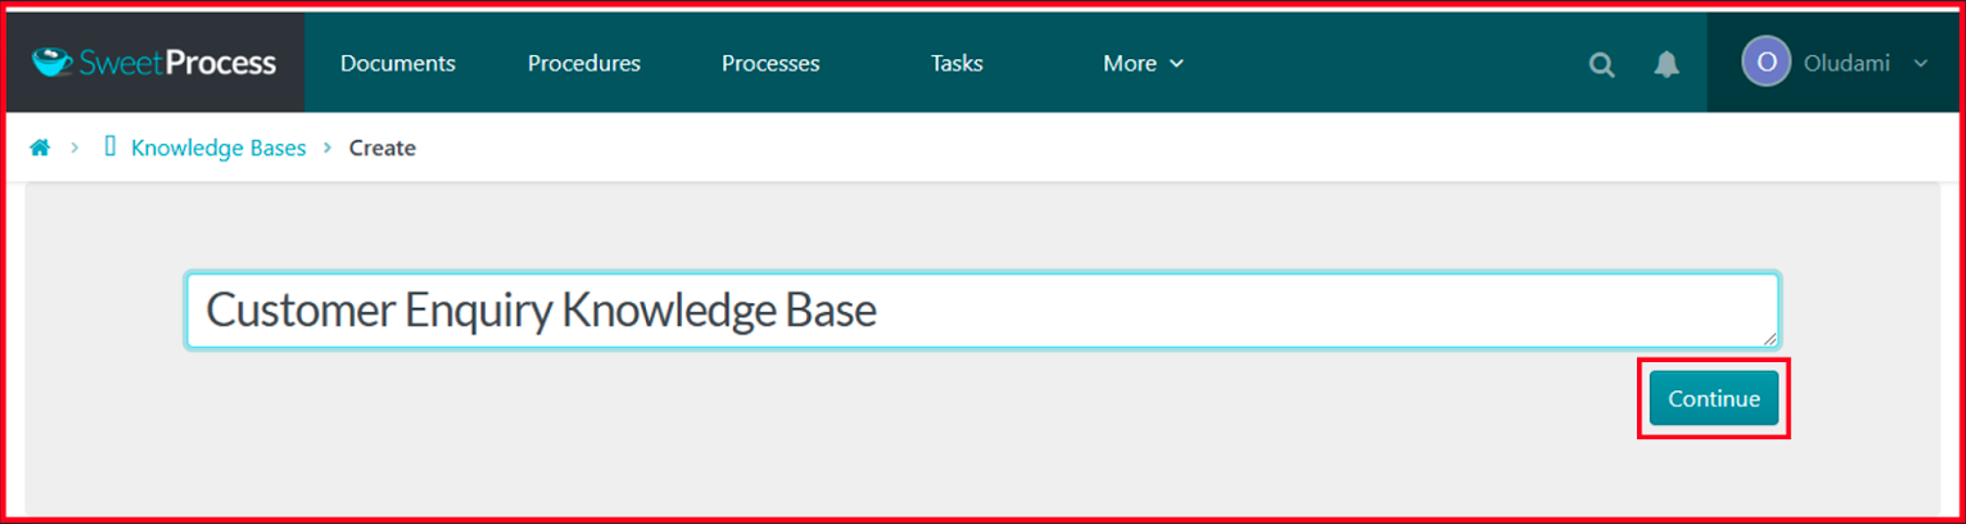
2. On the next page, click on “Create Knowledge Base” at the top-right corner of the page.
3. Next, enter your knowledge base title in the title bar and click on “Continue.”
4. The next page is where you get to customize your knowledge base to your preference. The first is the theme: here, you can select from the available themes.
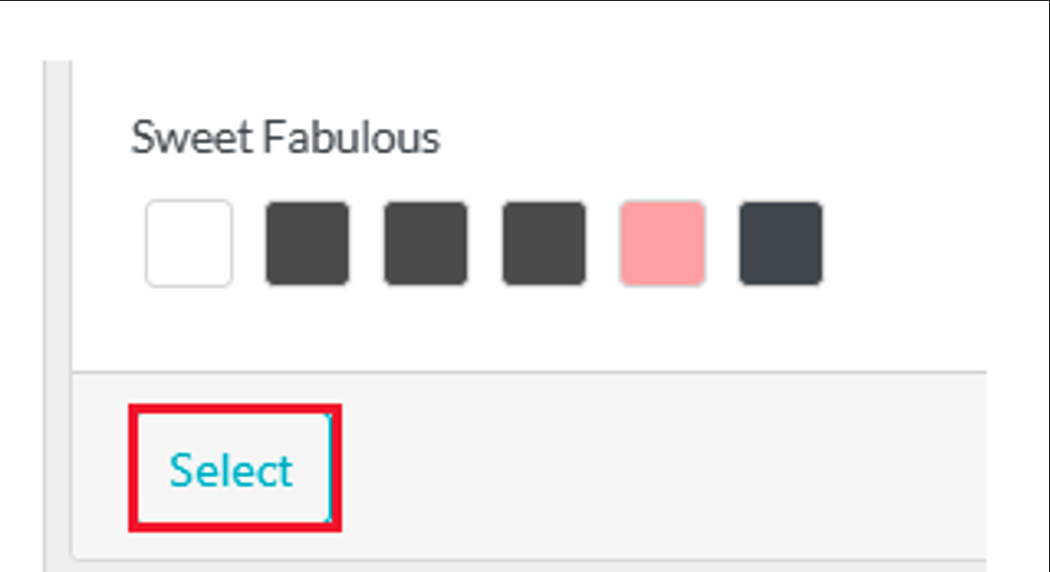
5. Or click on “Add New Theme” to personalize yours.

6. Click on “Save Theme” after personalization to save changes.

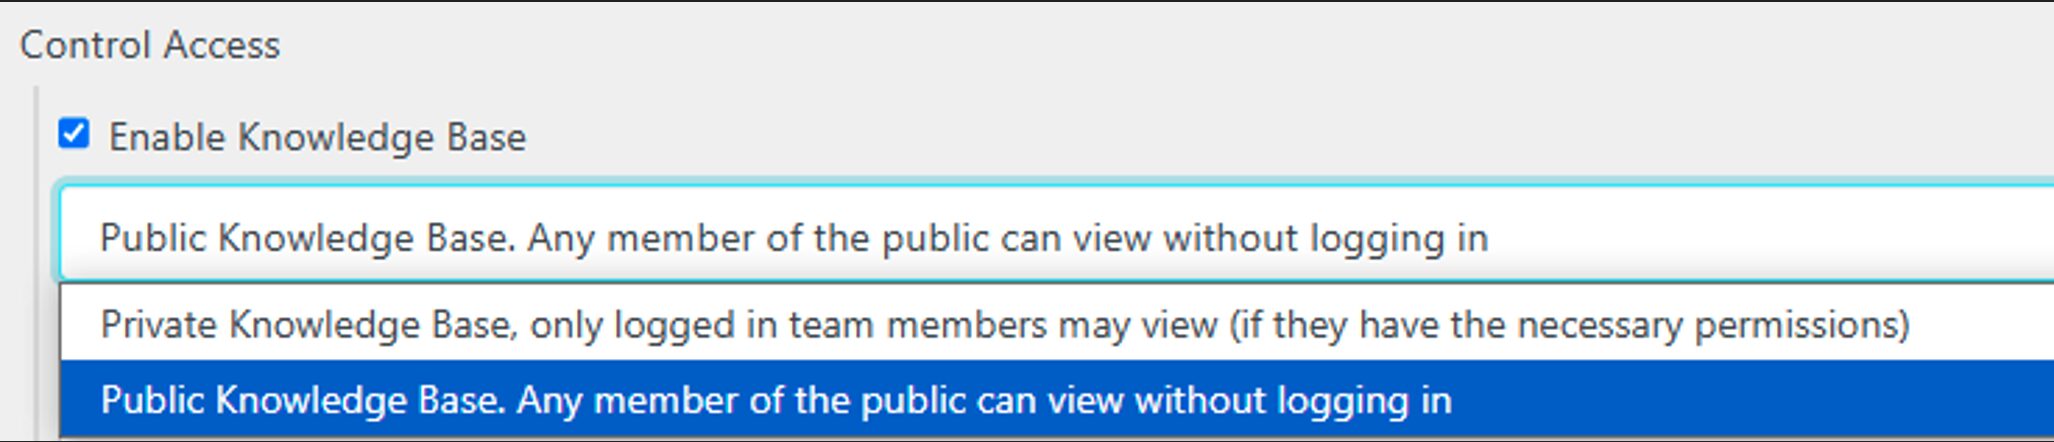
7. Next, set up the access control. This section is particularly important when it comes to external knowledge base. The only way it becomes external is if you set the access to “Public,” making it accessible to any member of the public without logging in.
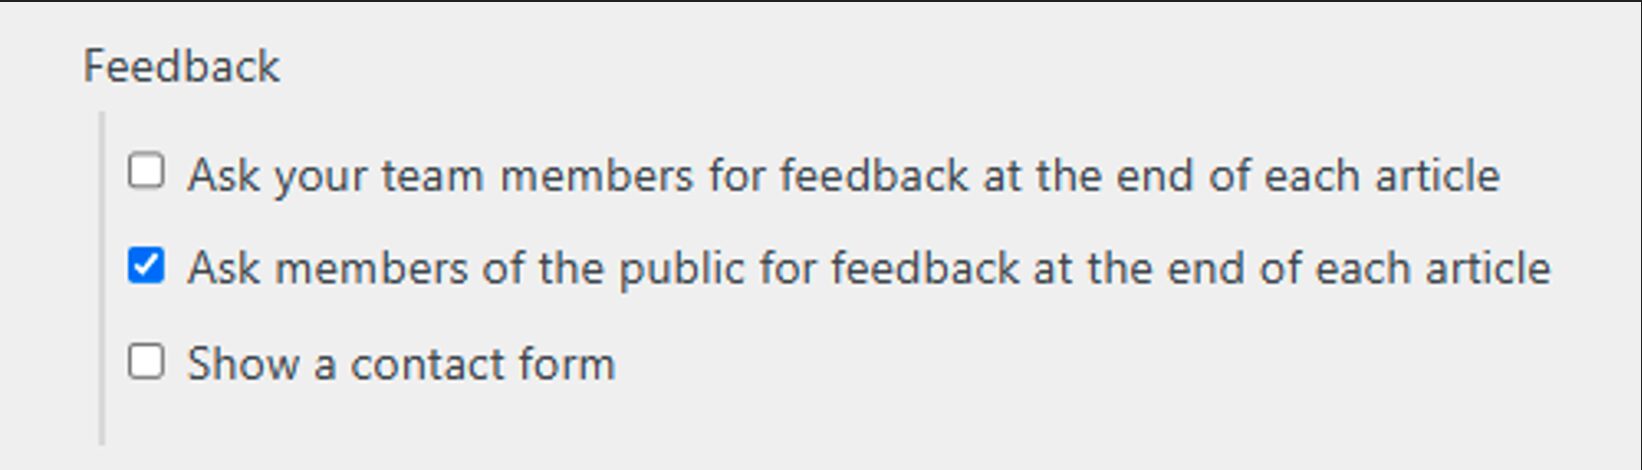
8. Next is “Feedback.” How would you like to receive feedback? Simply select your preferred option. For this external knowledge base, you can choose to either ask members of the public for feedback or show a contact form.
9. Then click “Save Changes.”

10. Now you move to setting up the structure of your knowledge base. This is where you get to create categories and attach articles to them. Basically, this is where the magic happens. Go ahead and start up your knowledge base by creating a category.
To create a category:
- Click on “Create Category” to add a category.
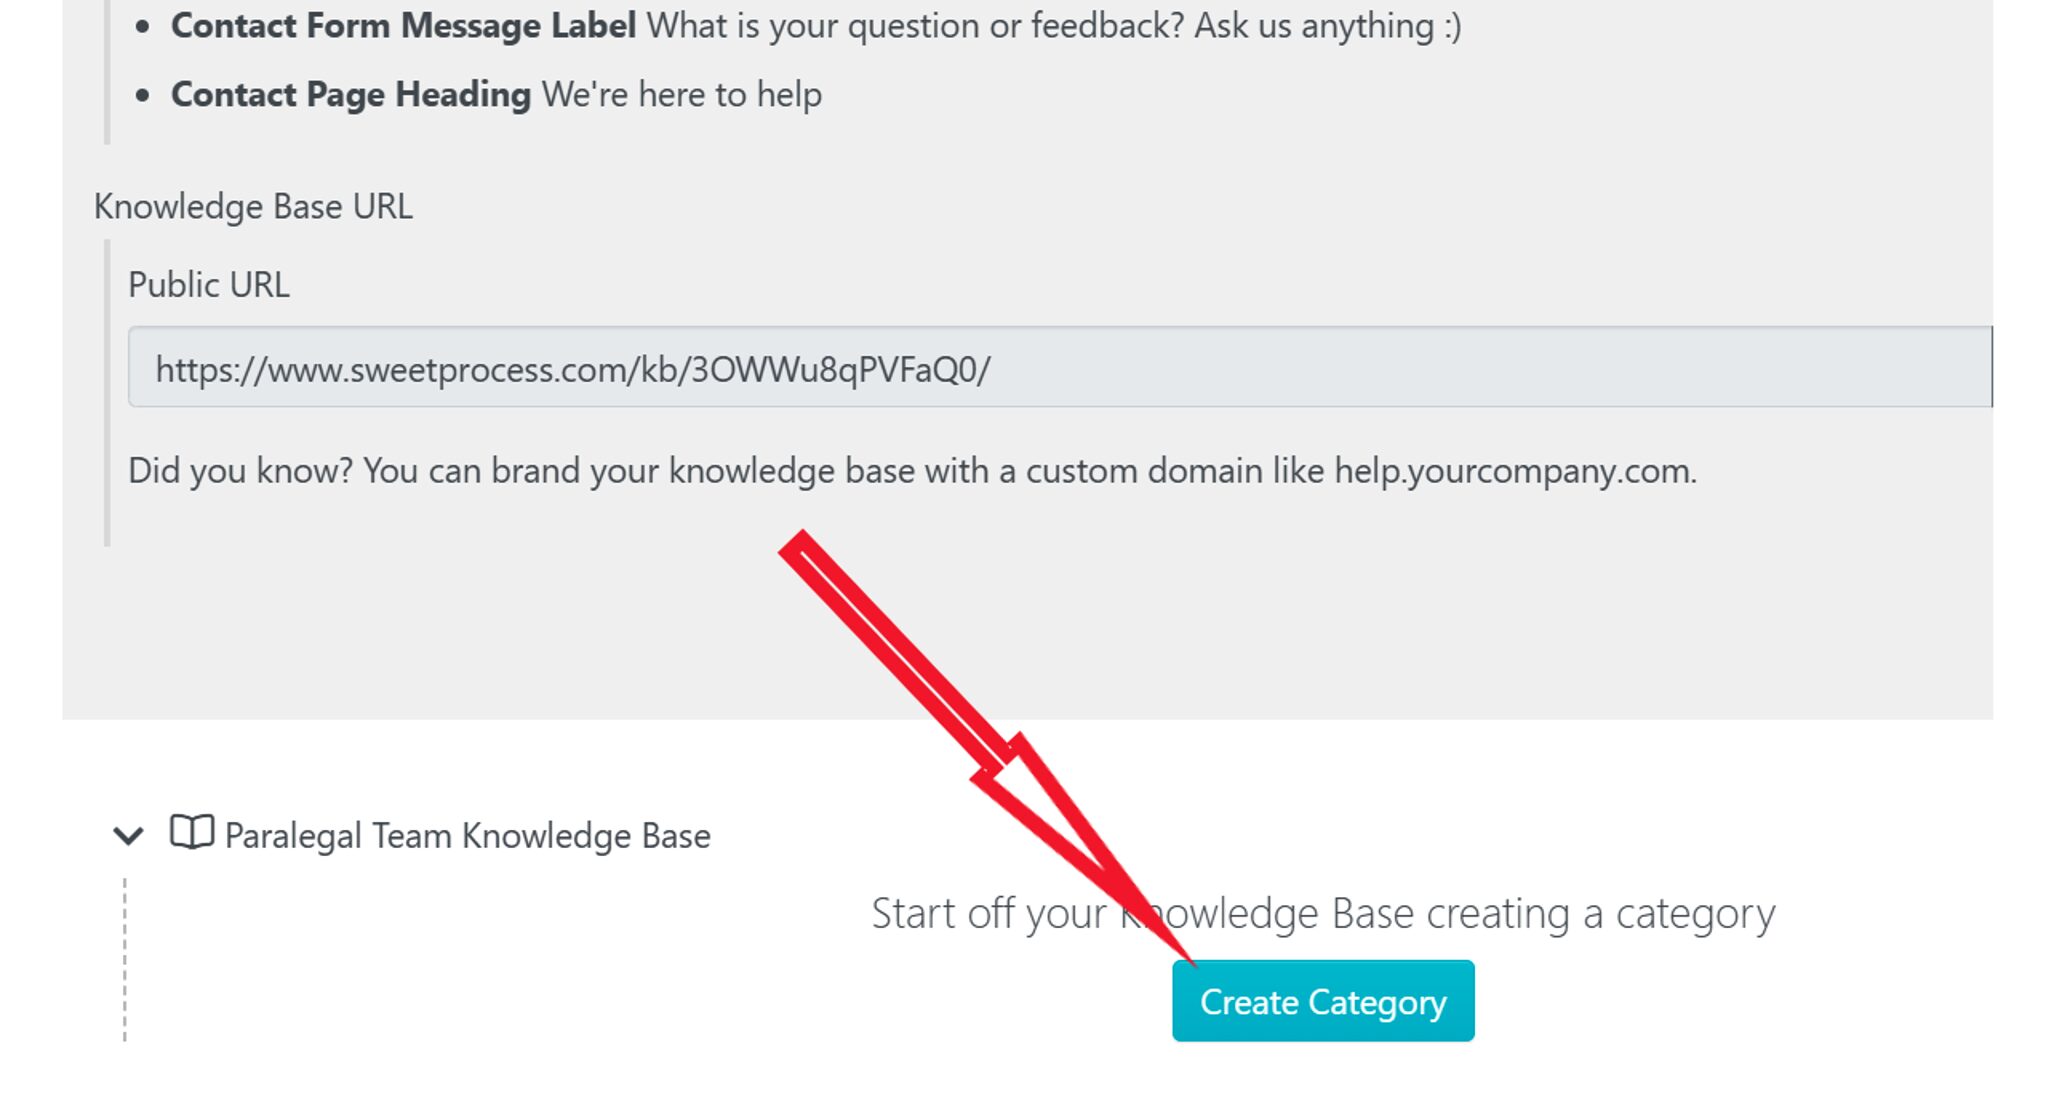
- Enter the name of the category.
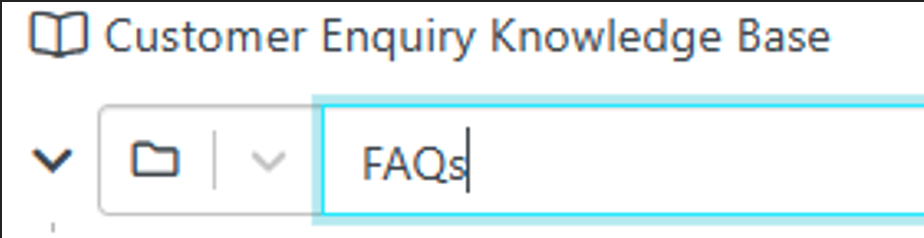
- Then click on the plus icon to “Add new Category.” You can add as many categories as you want for your knowledge base.
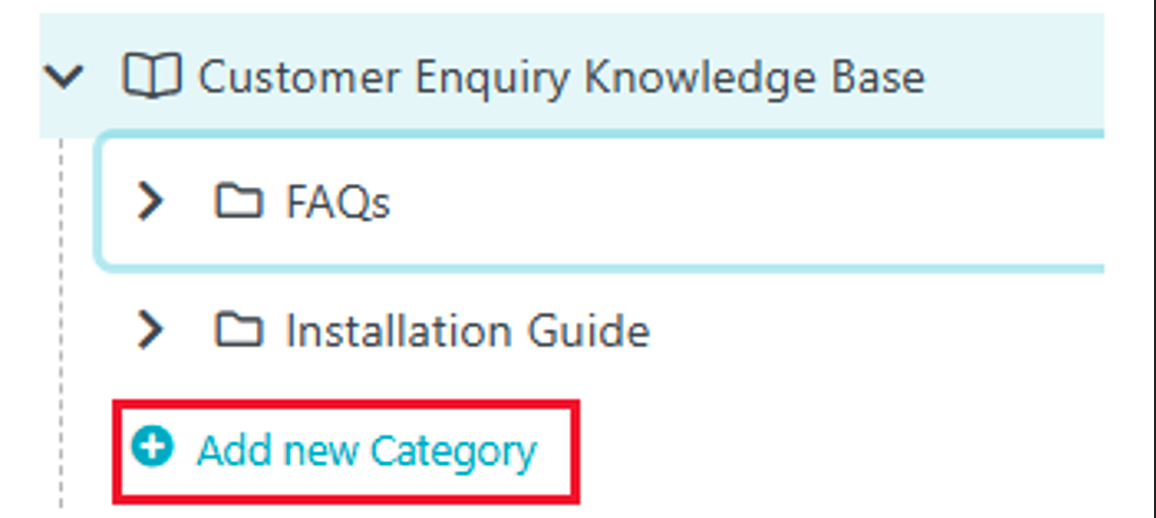
To edit a category:
- Click on the three dots at the extreme end of each category to view, edit, or delete.

To modify a category:
- Click on the arrow icon beside each category to add a new article or add a sub category.
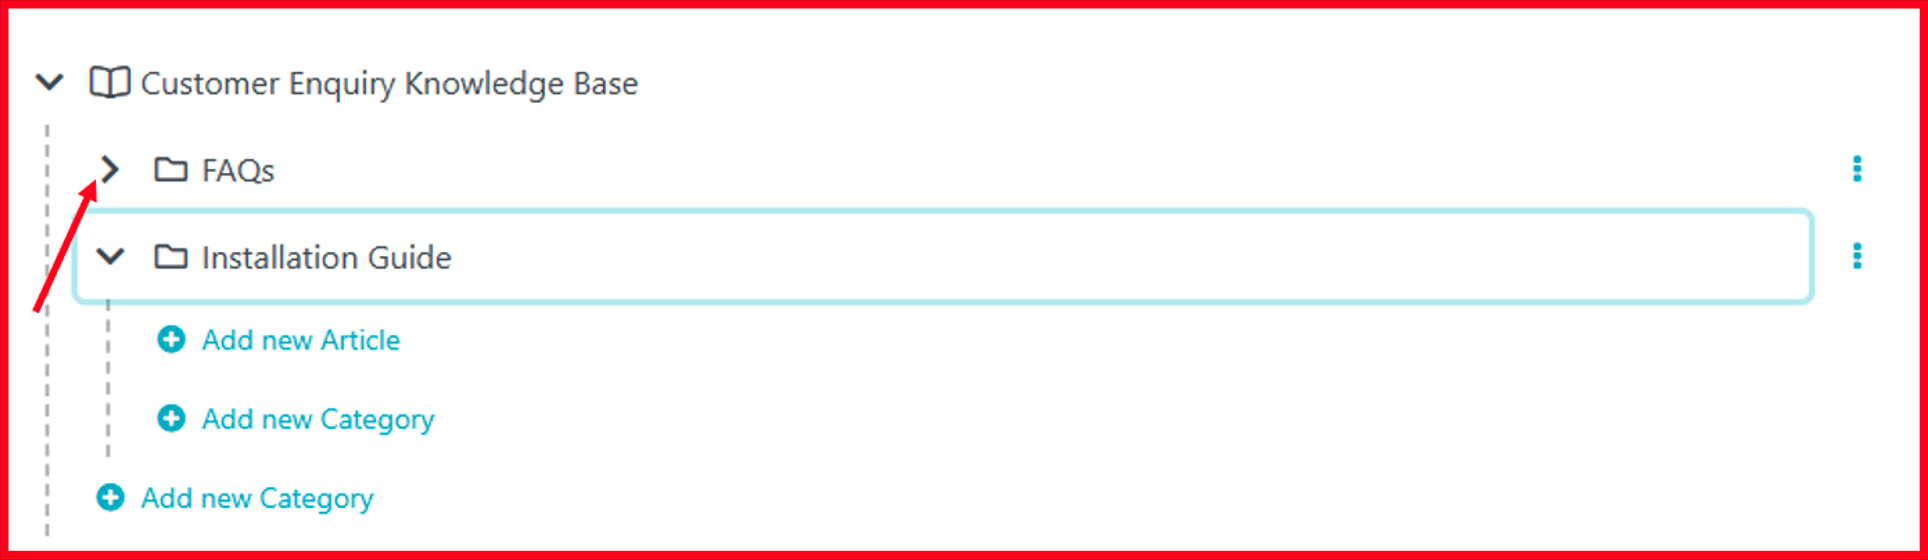
To add articles to a category:
- Next is to add articles to each category you’ve prepared by clicking on “Add new Article.”

- You can use the dropdown arrow to scroll through the procedures or policies or search directly by typing in the search bar. Then select the one you want to add to your knowledge base and click on the green checkmark on the far right of your selection.

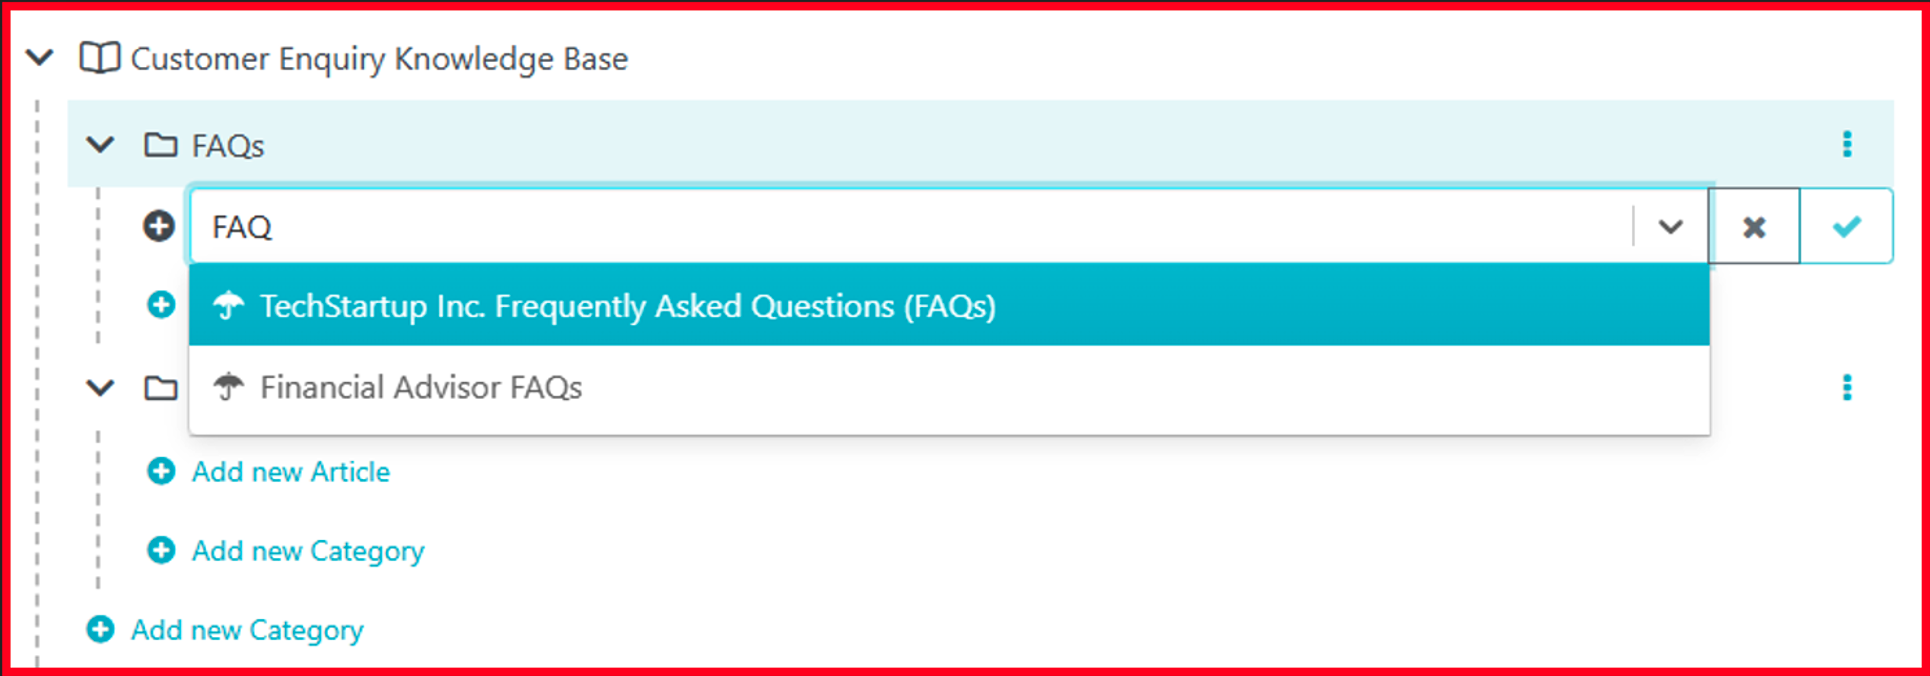
Now you’ve successfully attached articles to each category.
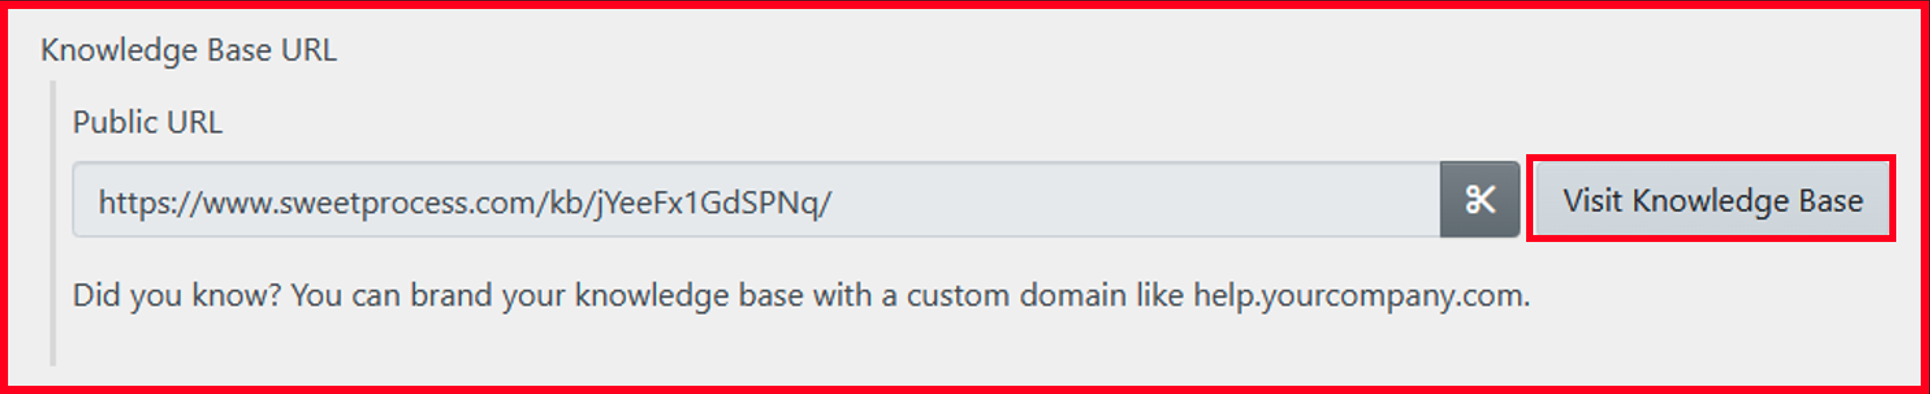
To preview the knowledge base:
- To view this knowledge base, click on “Visit Knowledge Base.”
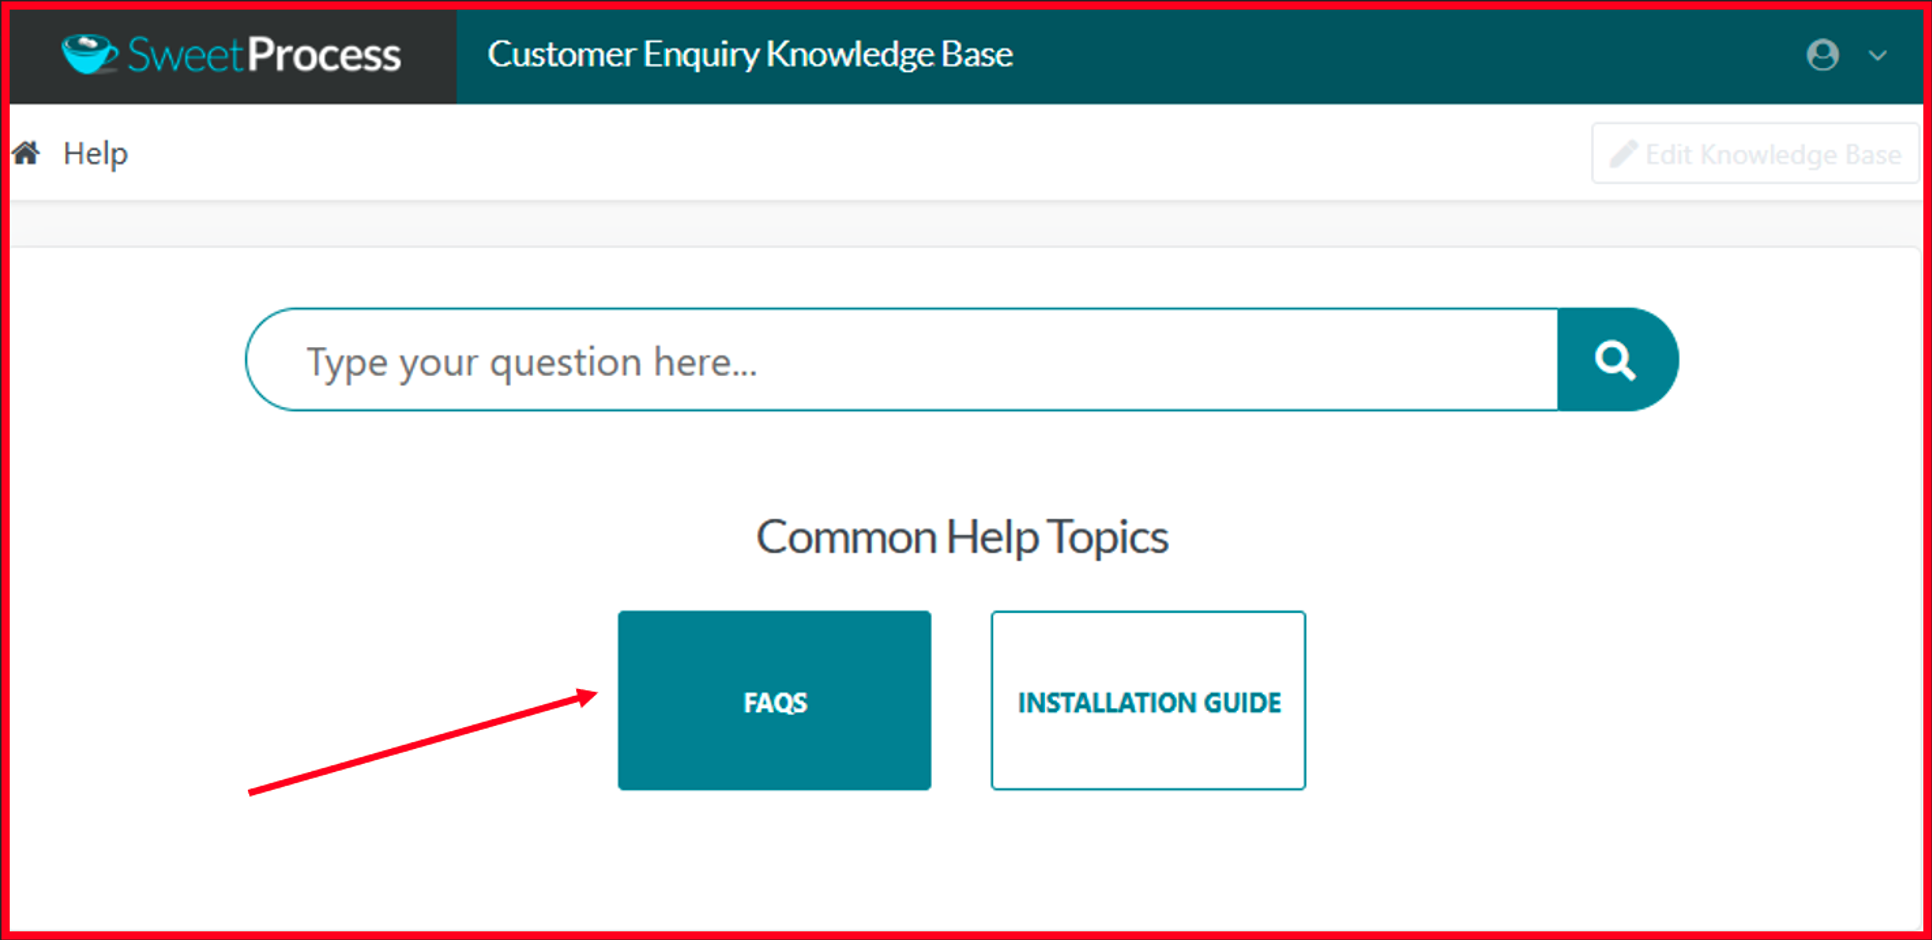
- Can you access the content of any category by clicking on it on the knowledge base page? You’ll see something like this:
- Also, you can check and read the articles in each category by clicking on the articles linked in.
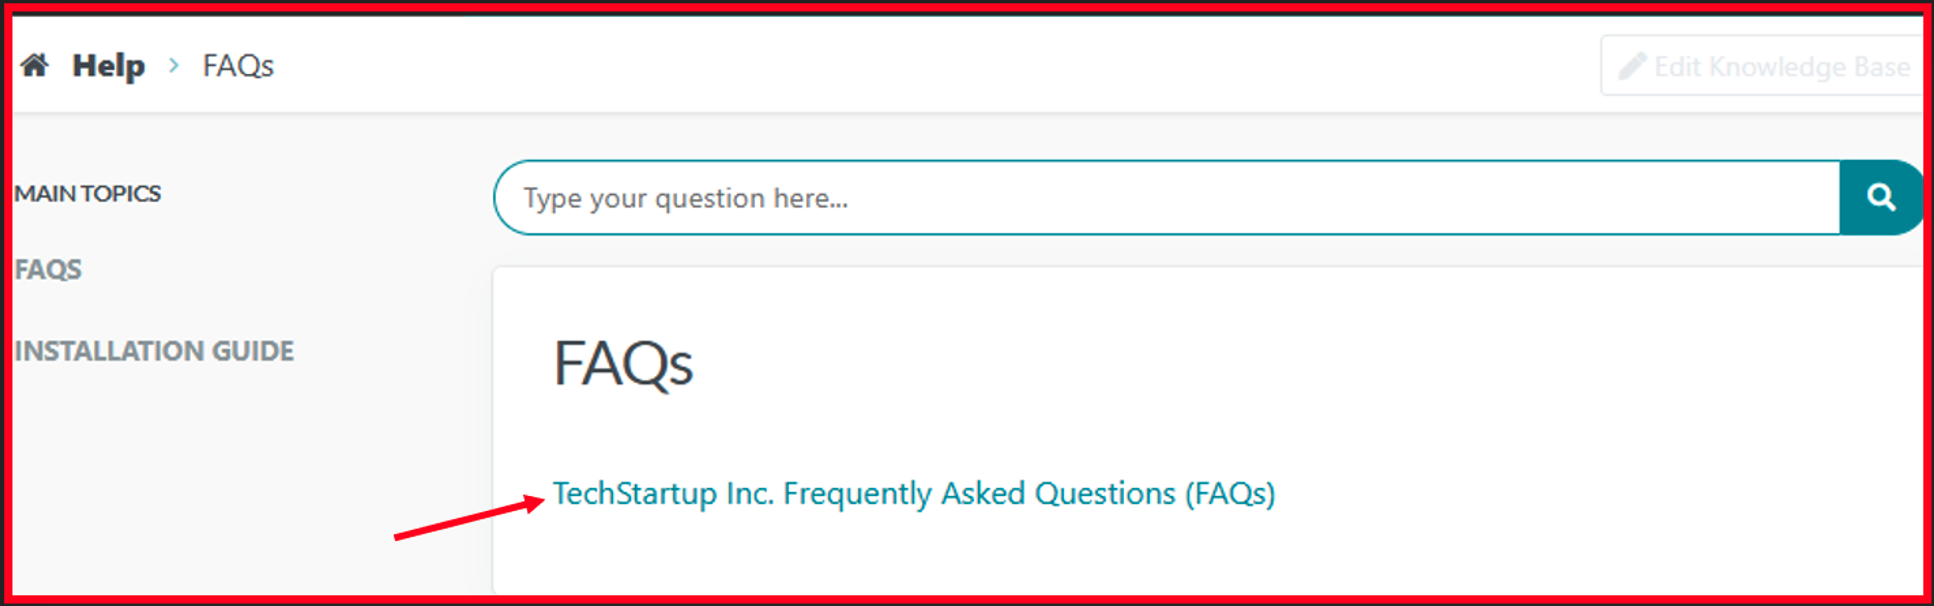
- Here’s what the knowledge base article will look like:
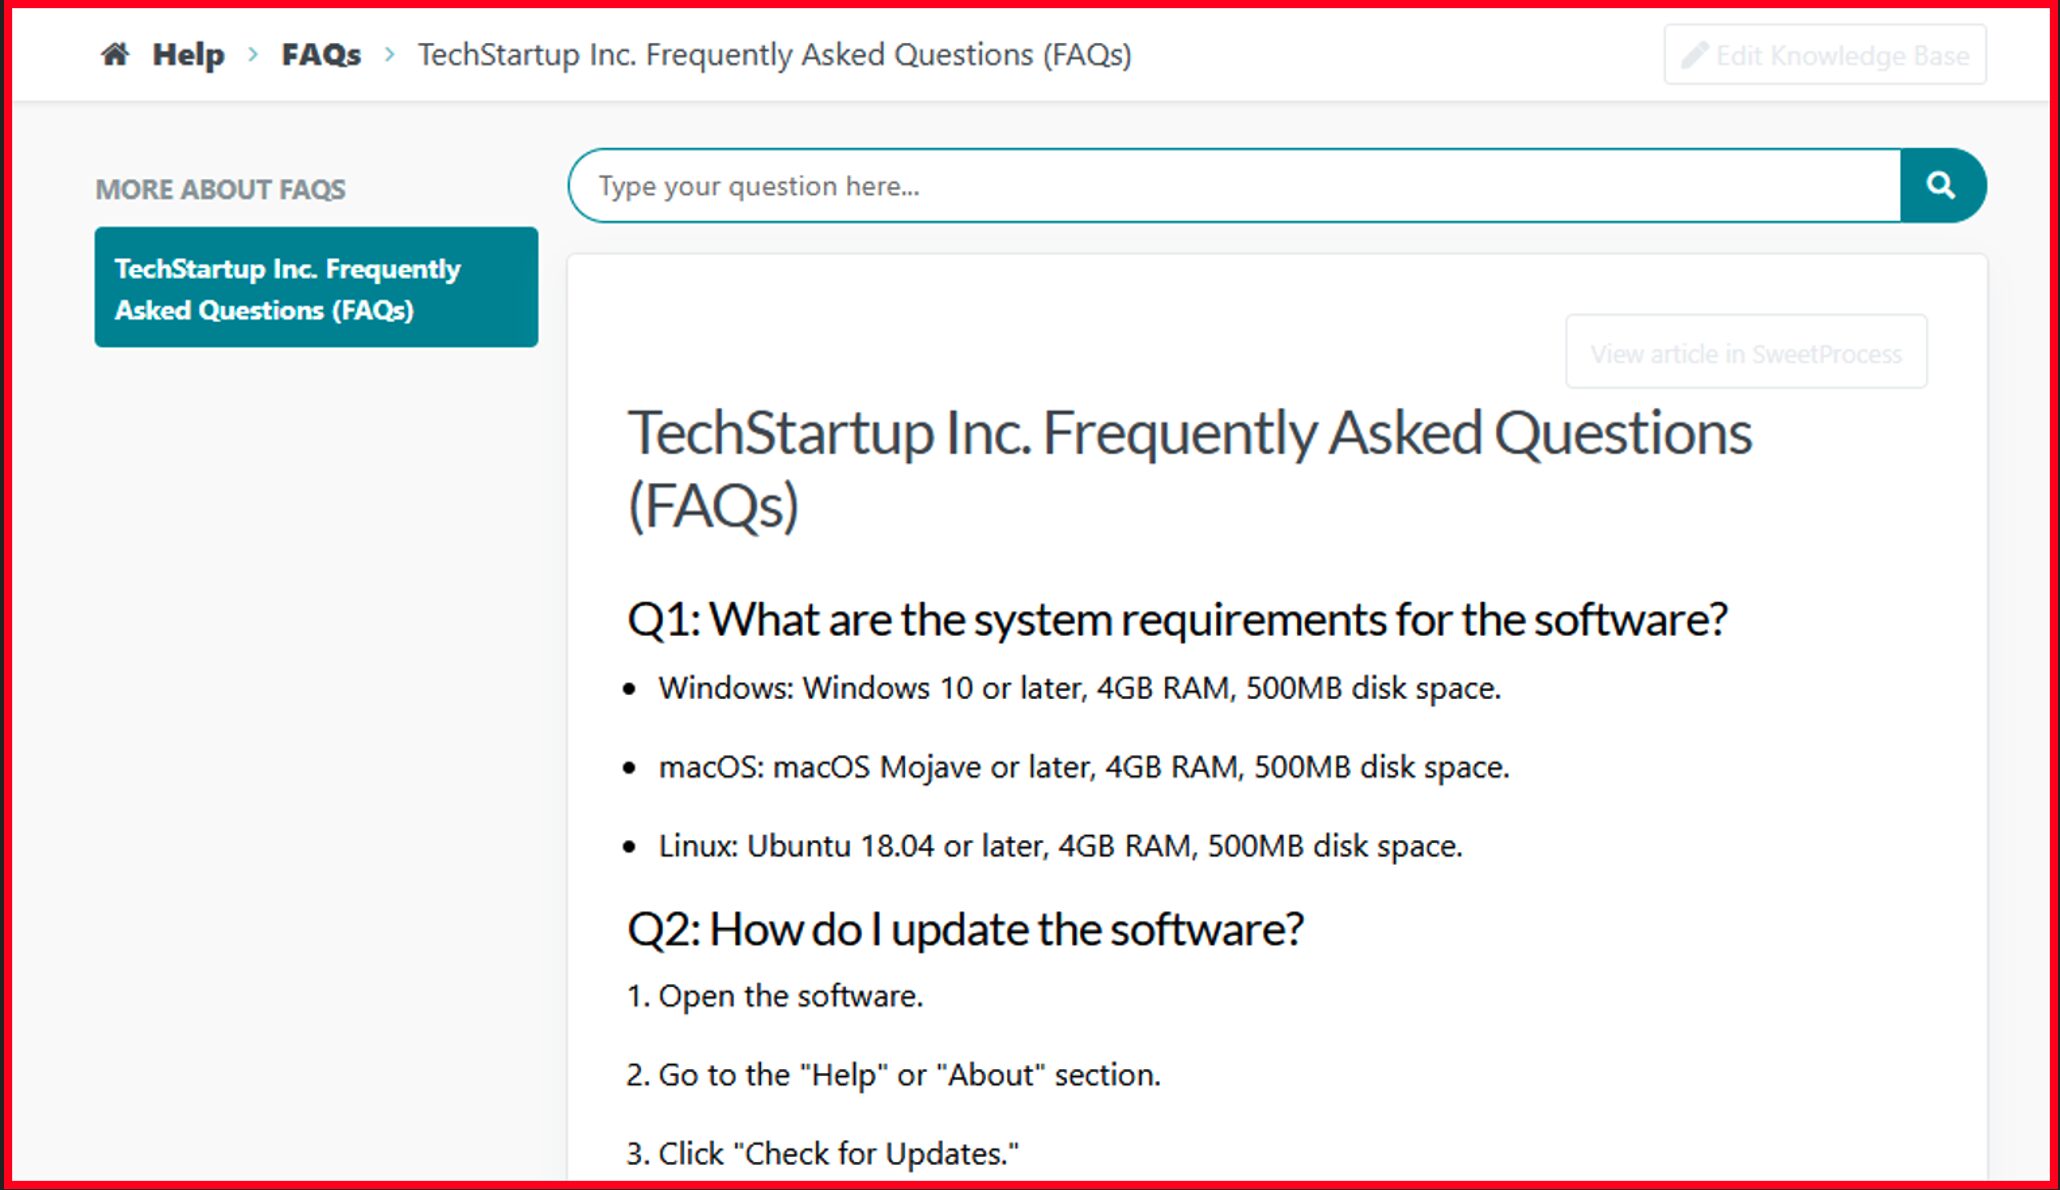
And that’s how to successfully create an external knowledge base inside SweetProcess that serves as your client’s information repository.
How else can you effectively manage your client with SweetProcess?
Build a Quiz to Align Expectations With Clients
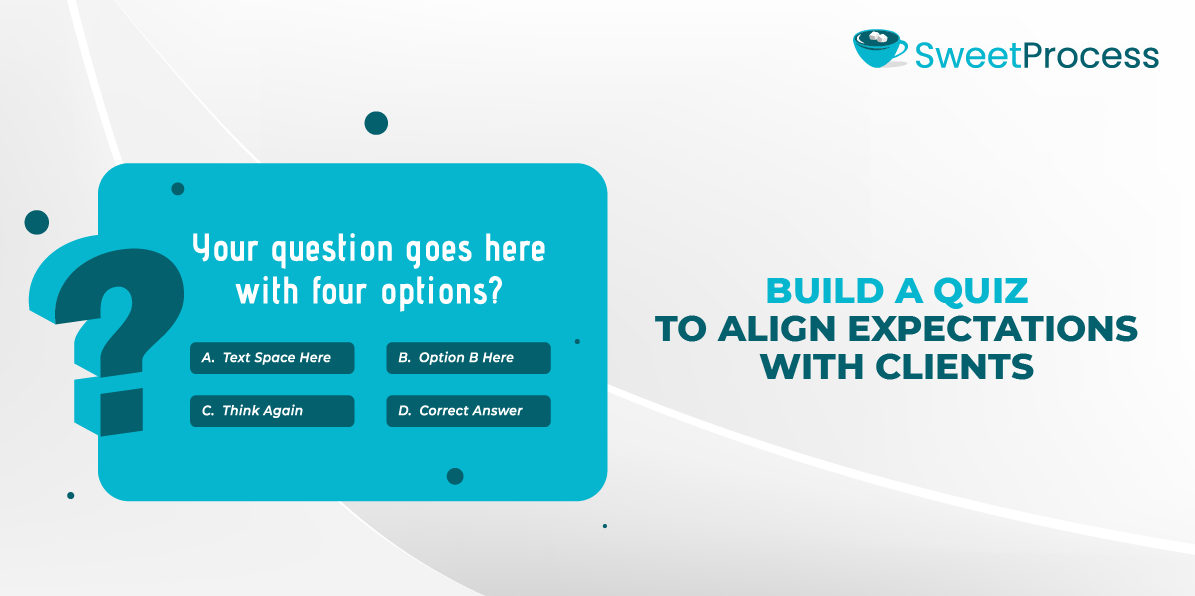
Without clear expectations, clients may end up disappointed when things don’t go as they imagined. Miscommunication at the outset can lead to confusion and frustration later. That’s where SweetProcess comes in. SweetProcess allows you to create simple quizzes to help align your clients’ expectations with yours. With this, you can ask them key questions about their goals, preferences, and what success looks like to them. Understanding what your clients want will enhance an effective client management process.
How to Build a Quiz With SweetProcess
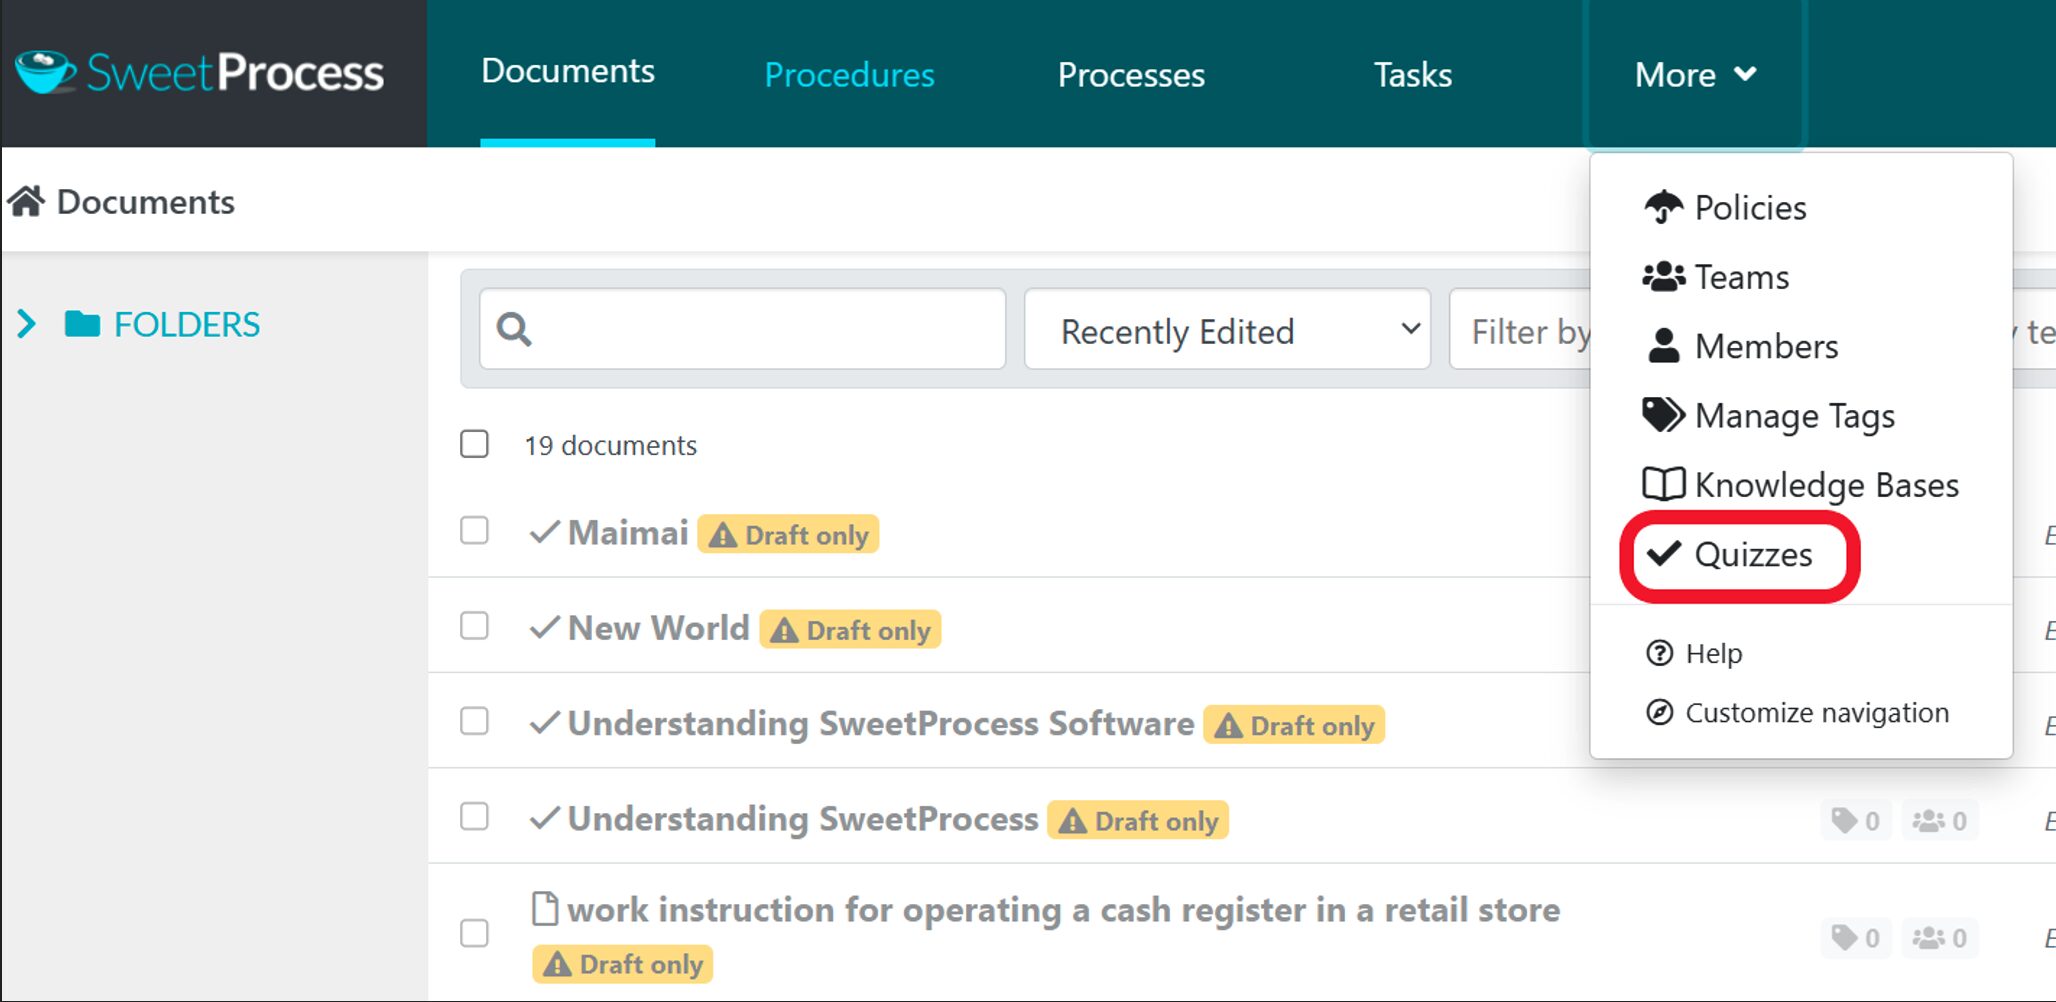
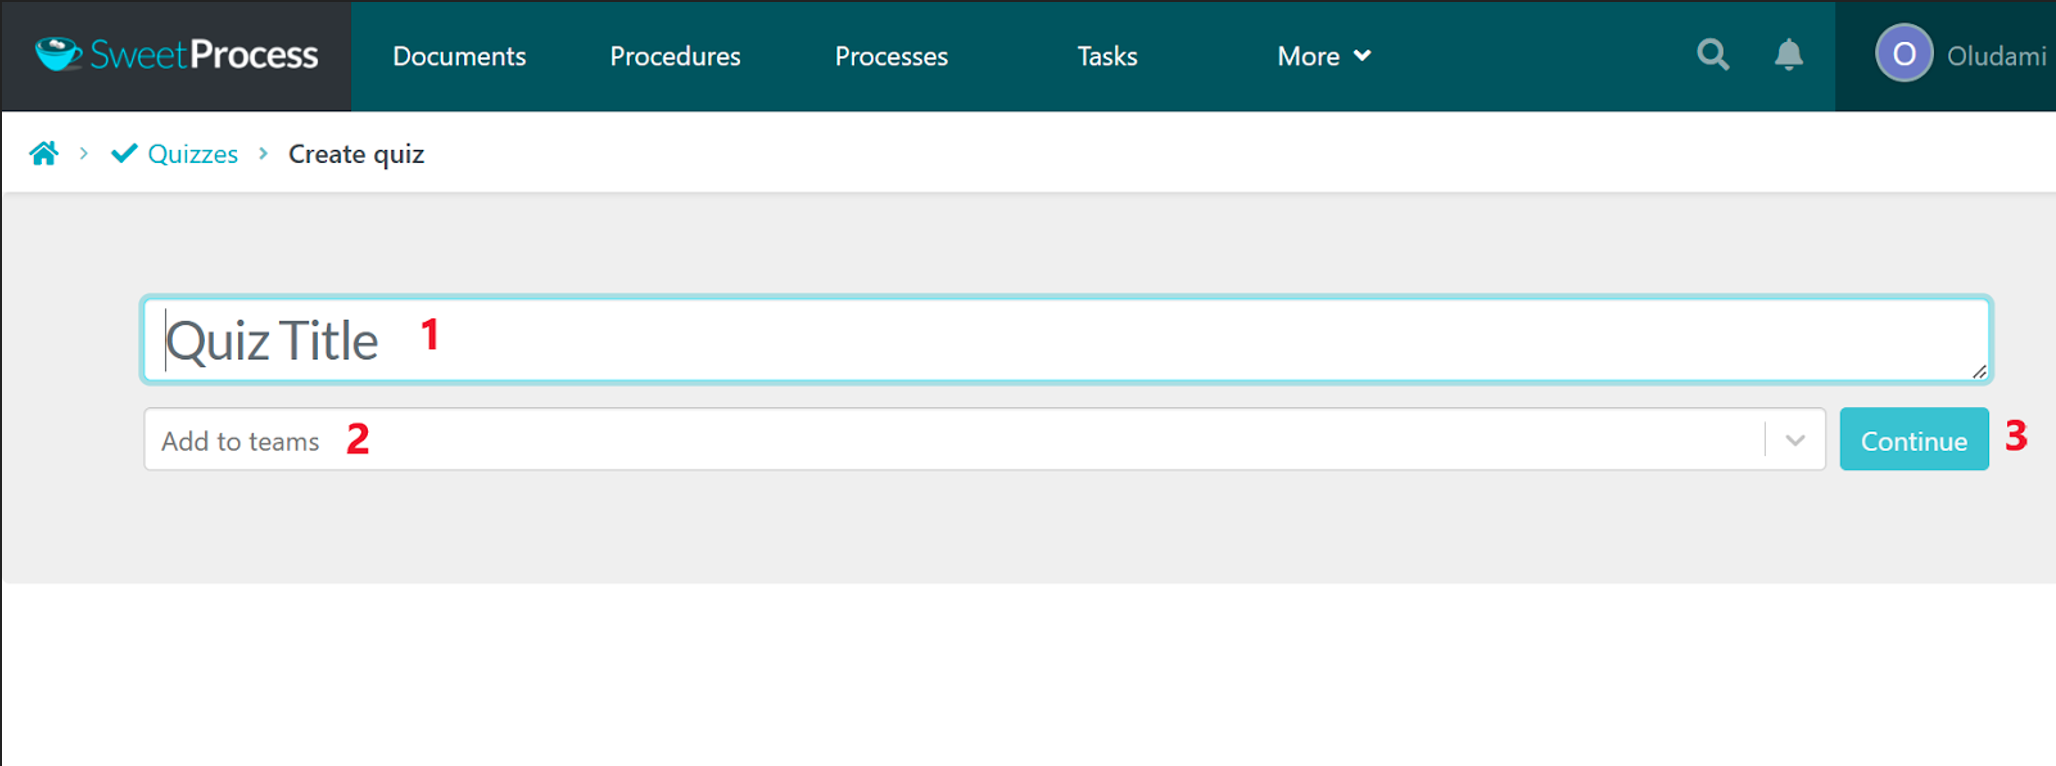
- Click on “More” from the SweetProcess home page and select “Quizzes” from the dropdown list.
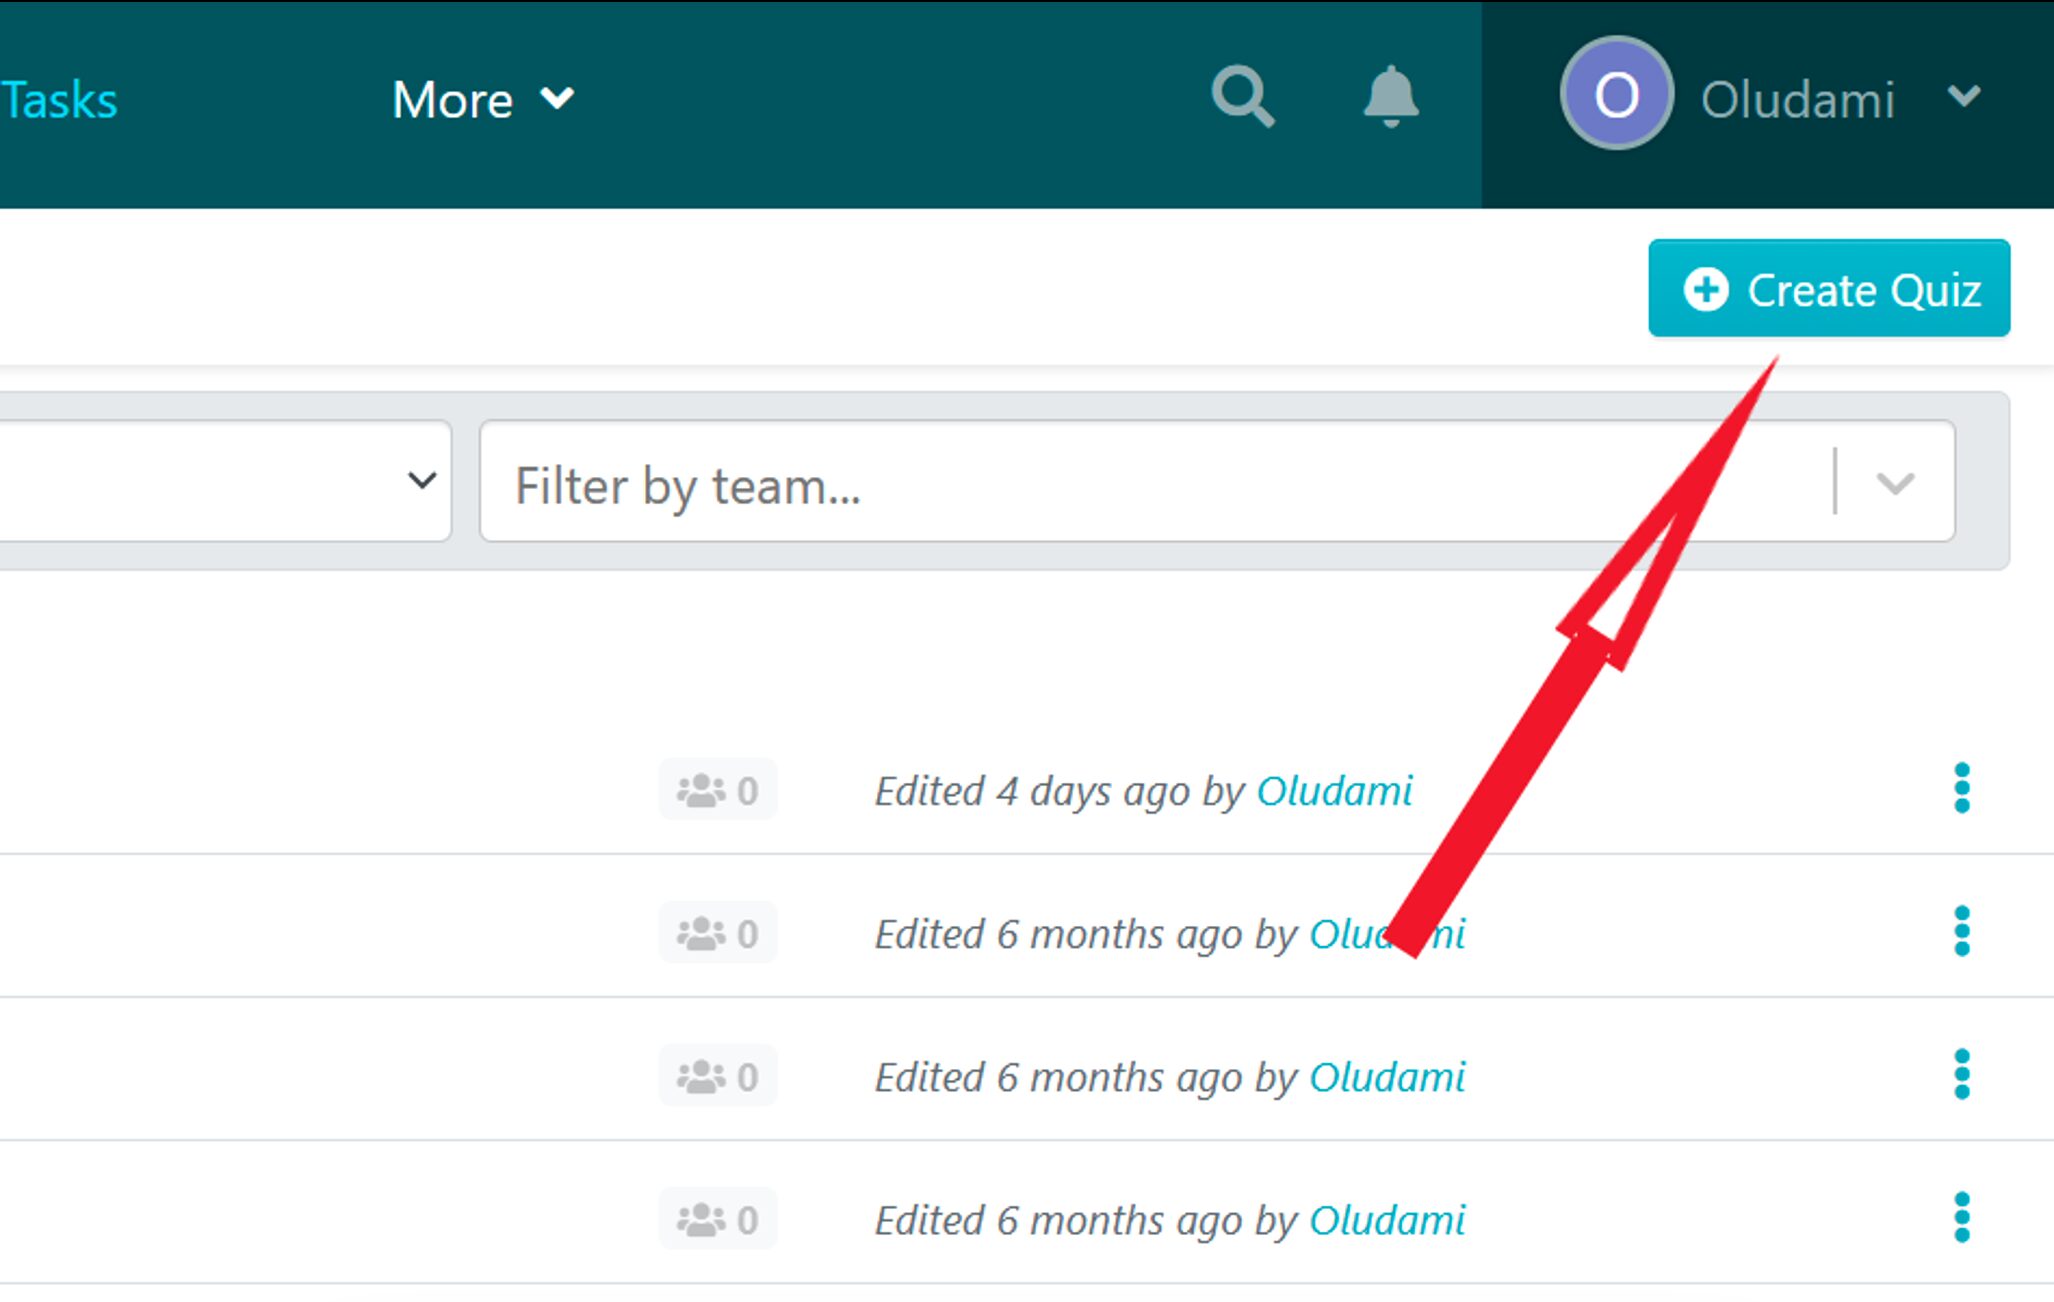
2. Next, select “Create Quiz.”
3. On the next page, enter your quiz title, assign to a team by clicking “Add to teams,” then click on “Continue.”
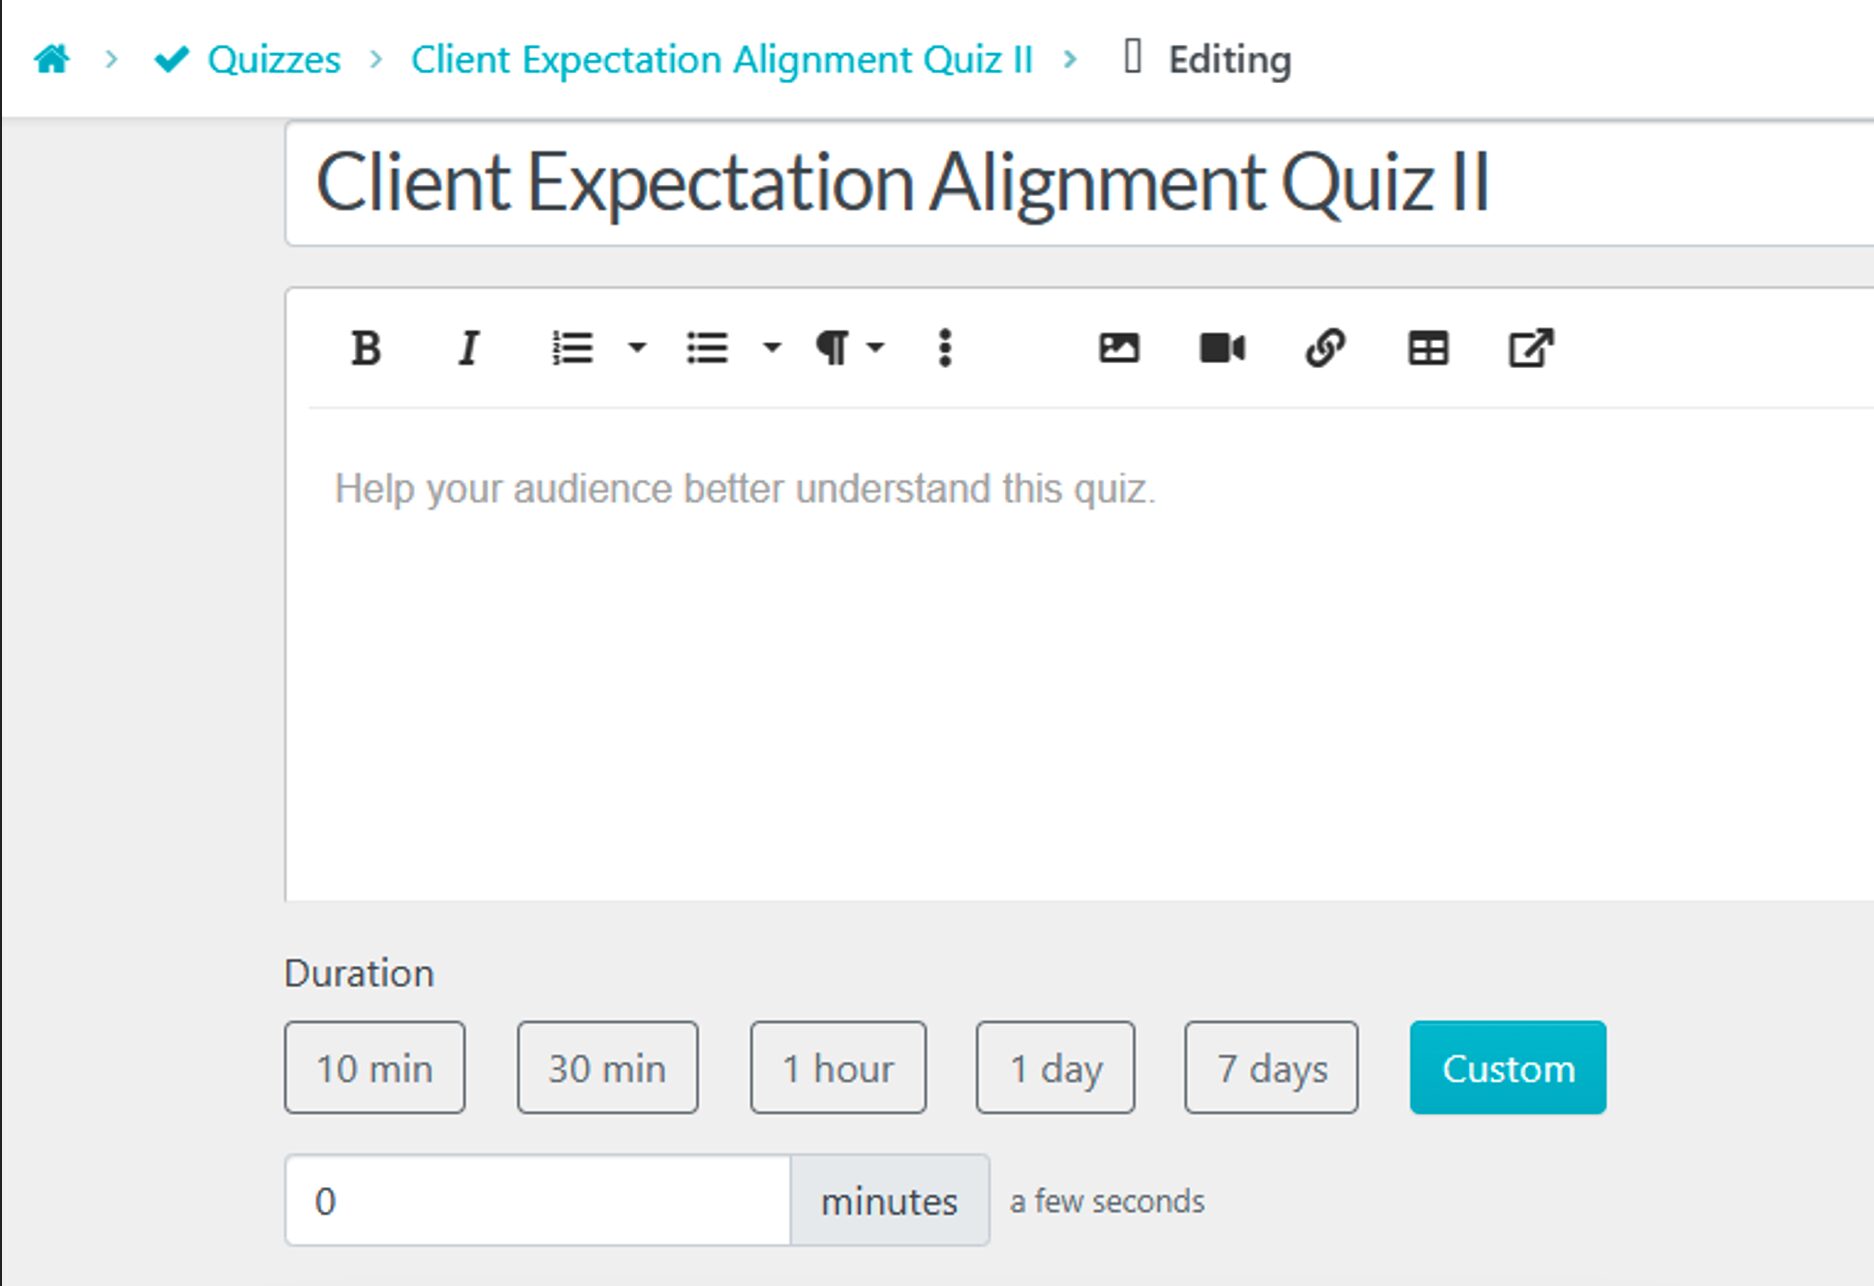
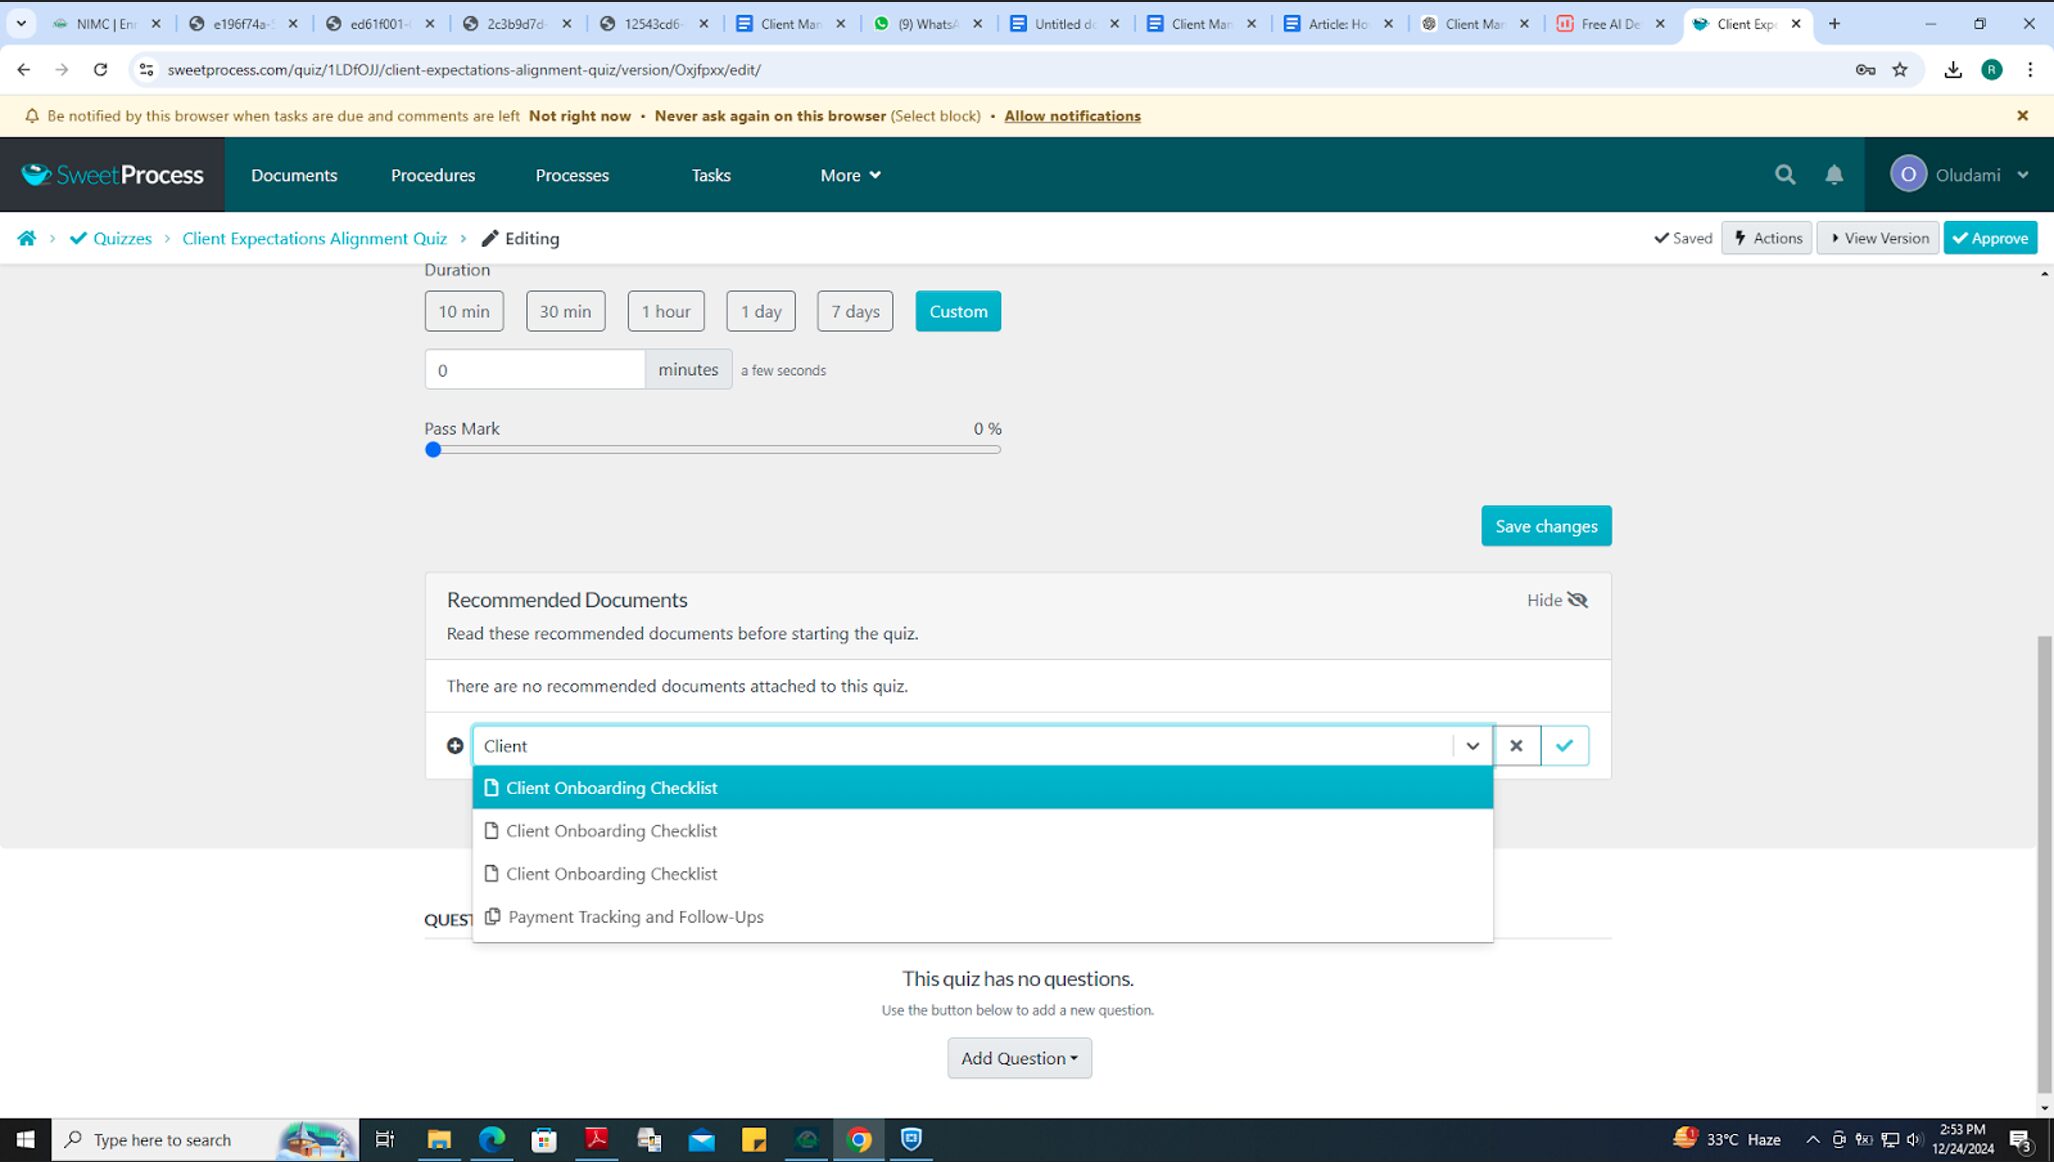
4. You’ll be directed to the page for your new quiz. Here, you can modify the quiz setup, customize the title, add descriptions, and also set the duration and pass mark. Click on “Save Changes” when you are done editing.
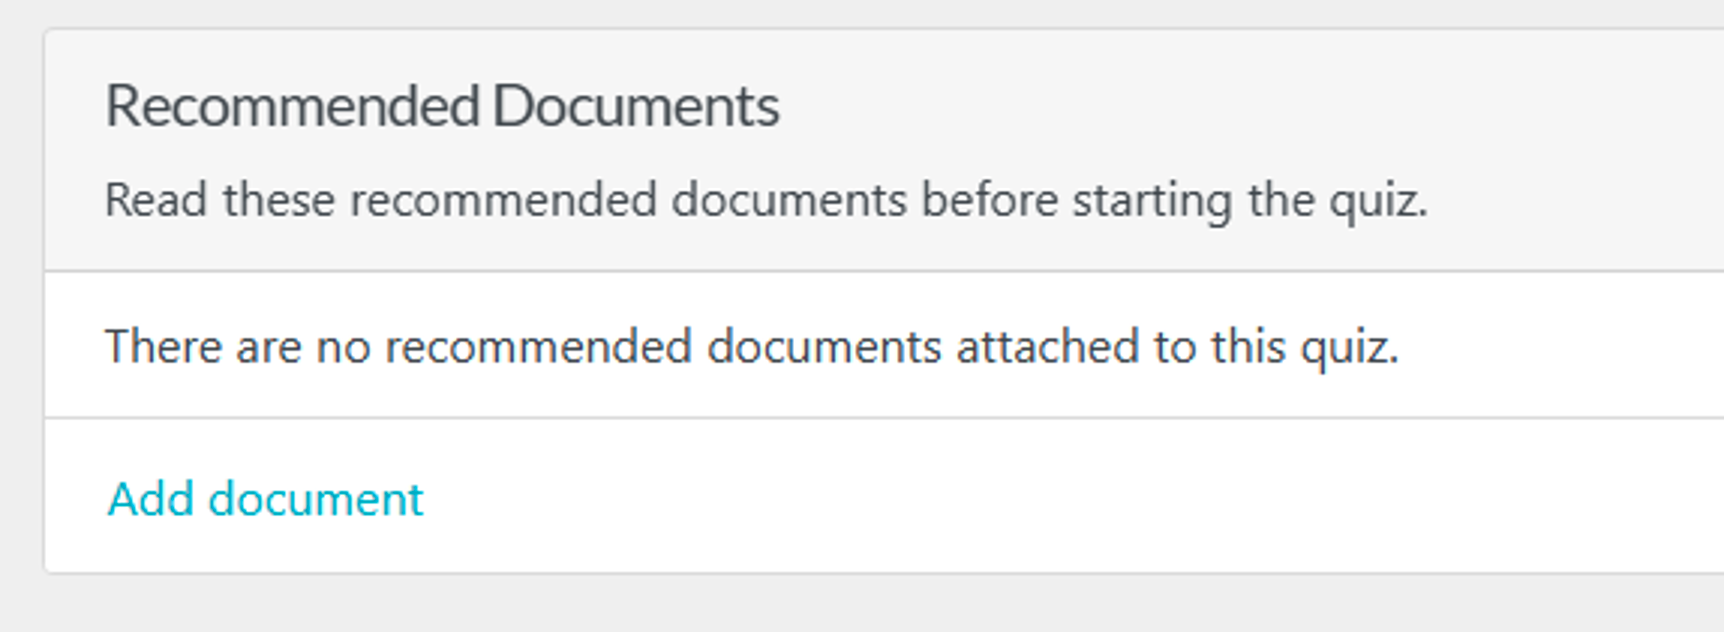
5. You’ll also be able to attach documents like procedure, process, or policy to the quiz by clicking “Add Document.”
6. Scroll through the list or search by document name.
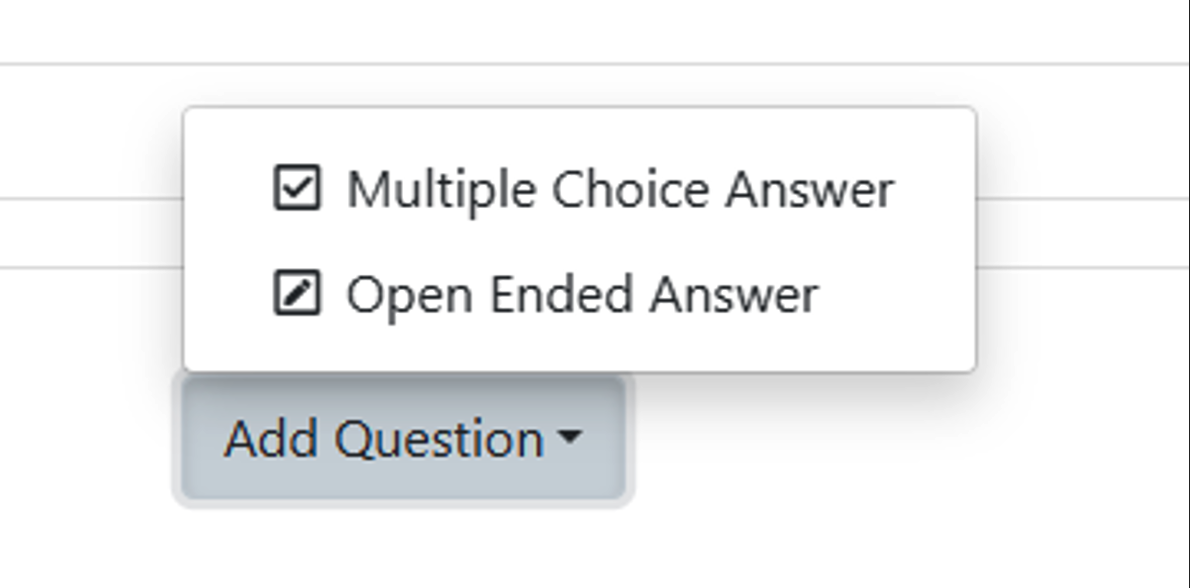
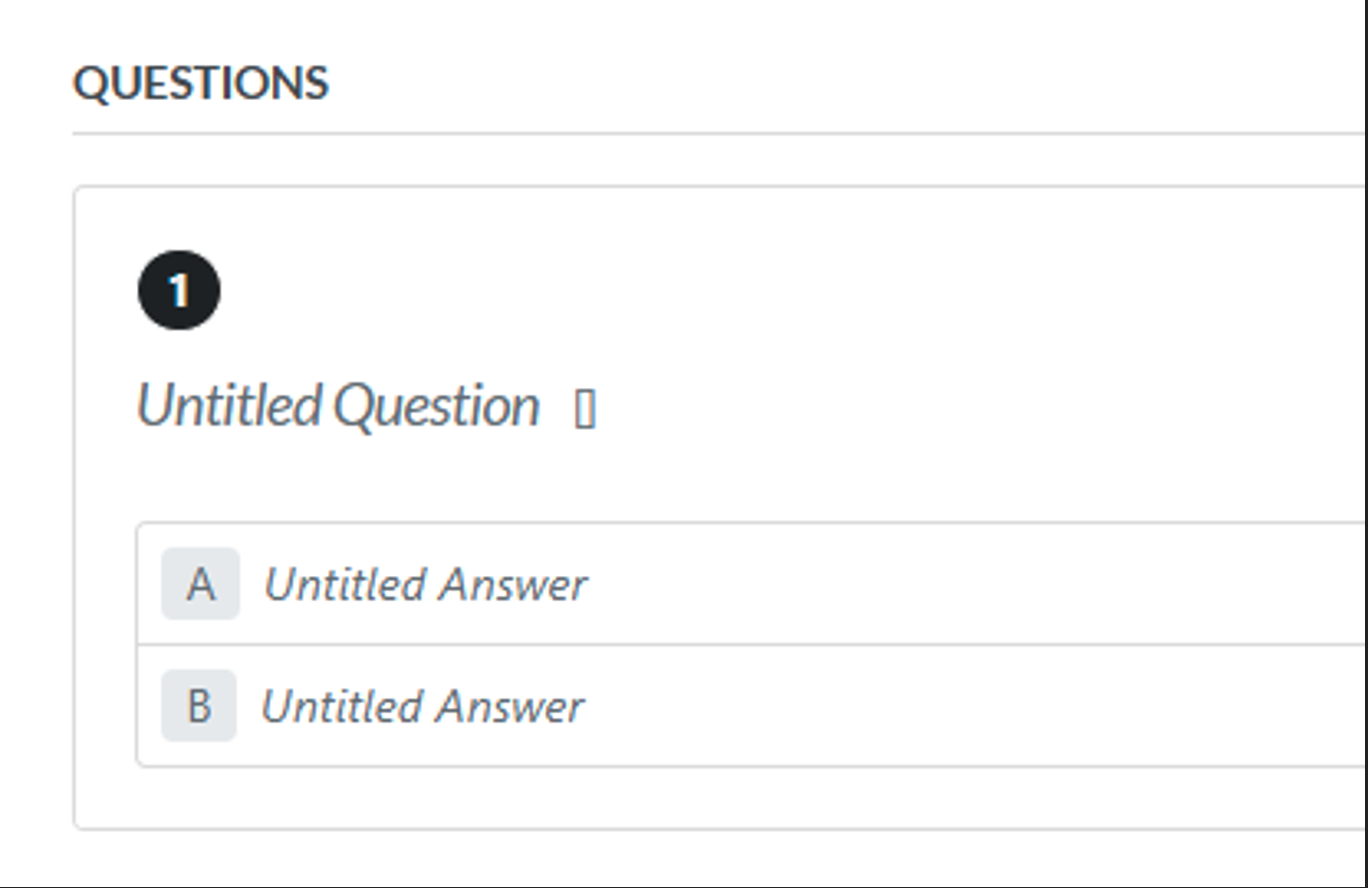
7. Scroll down to set up your questions by clicking on “Add Question.”
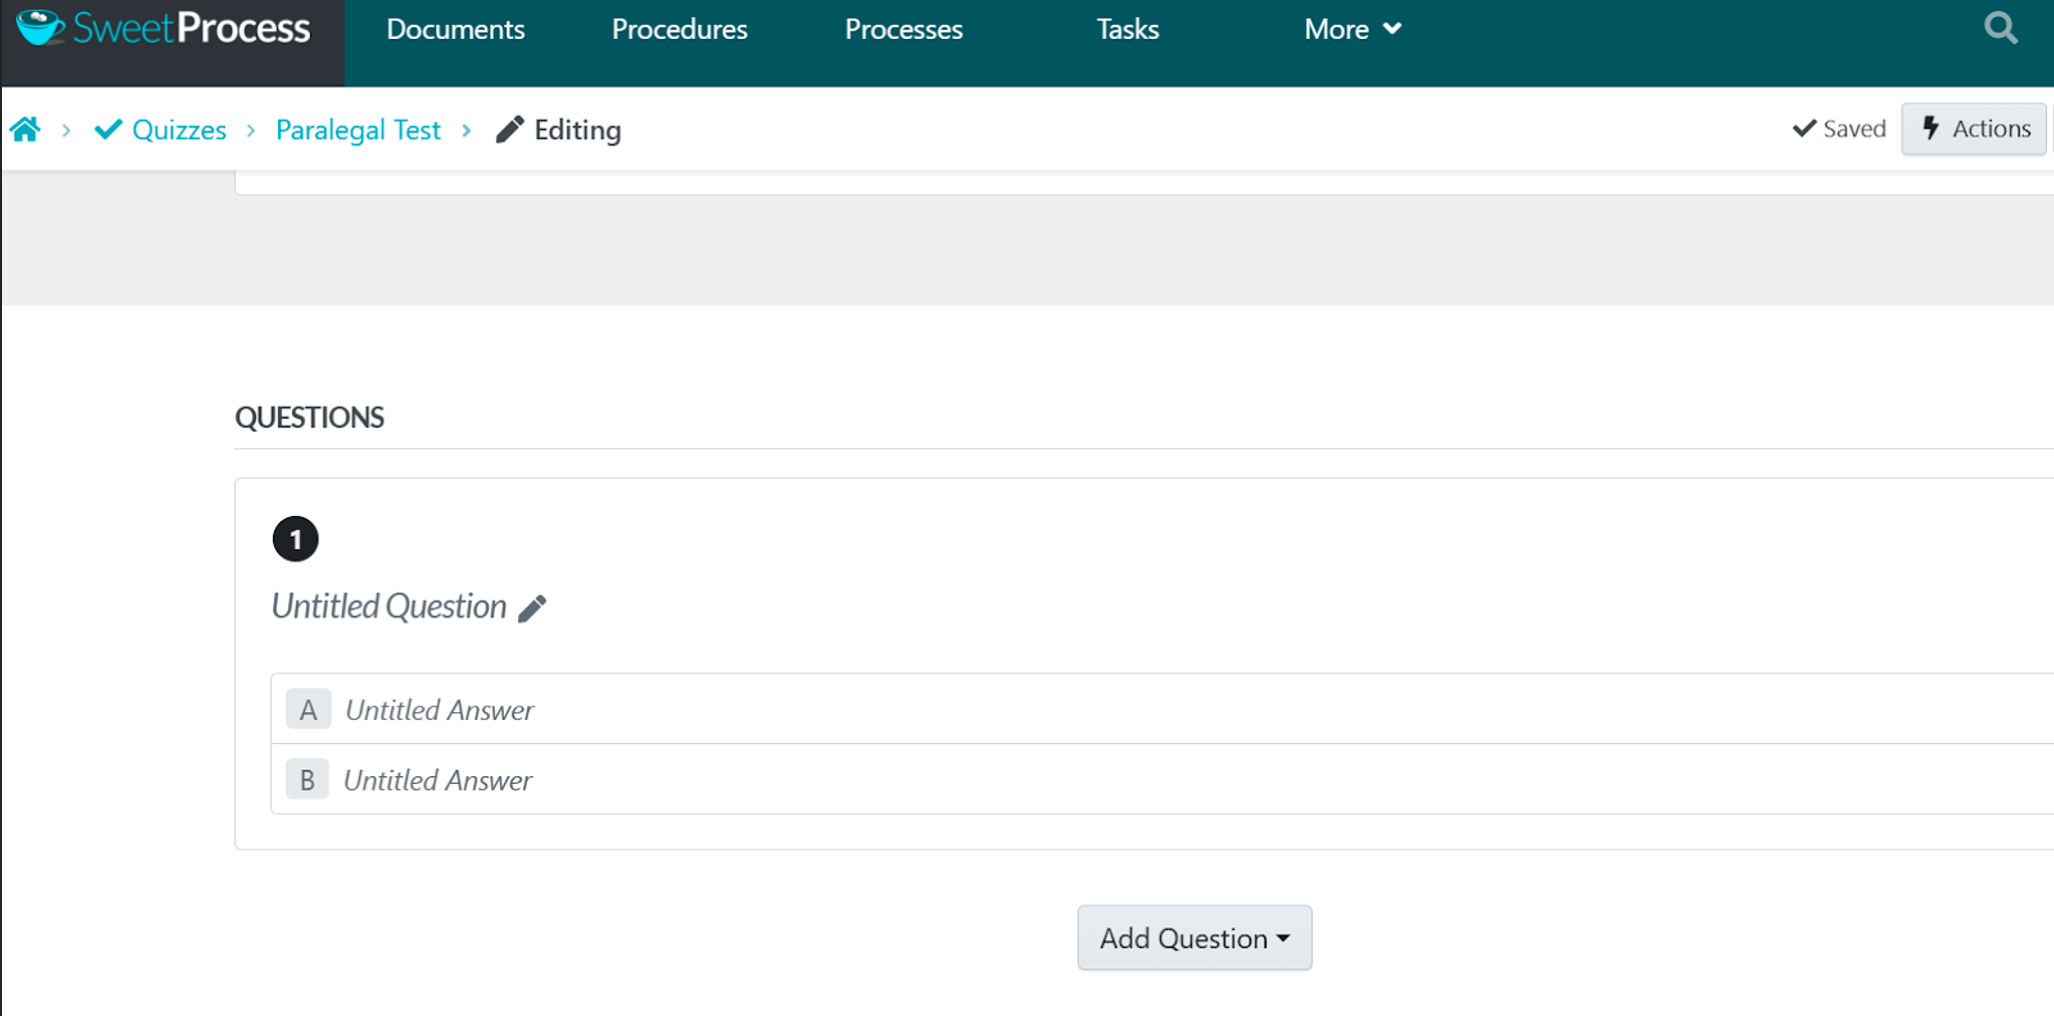
Here, you can choose the type of questions you want, either multiple choice or open-ended.
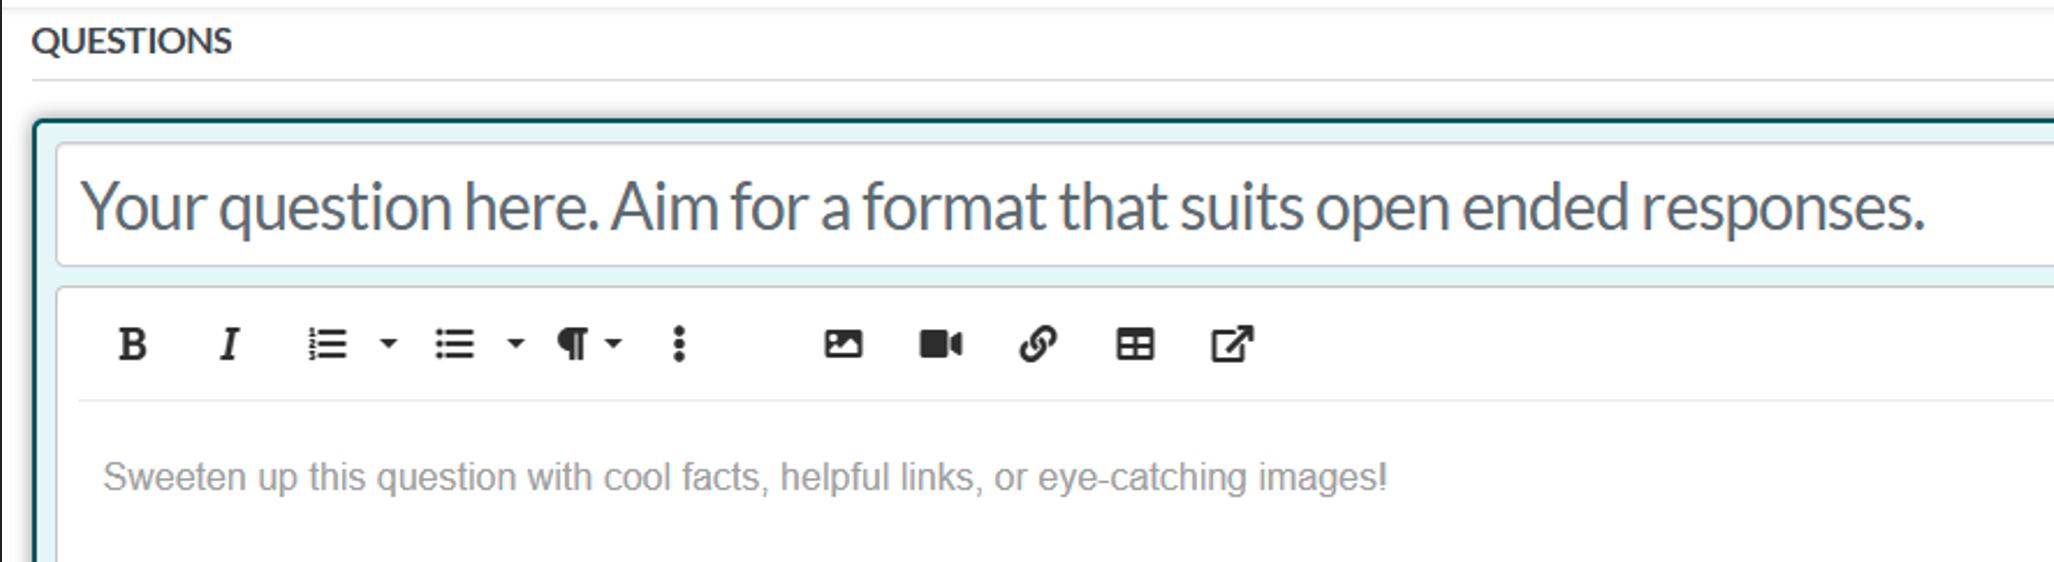
For Open-Ended Answers
- Click on “Untitled Question.”

- Next, edit your questions and input the answers in the appropriate spaces.
For Multiple-Choice Answers
- Click on “Untitled Question.”
- Type and edit your questions.
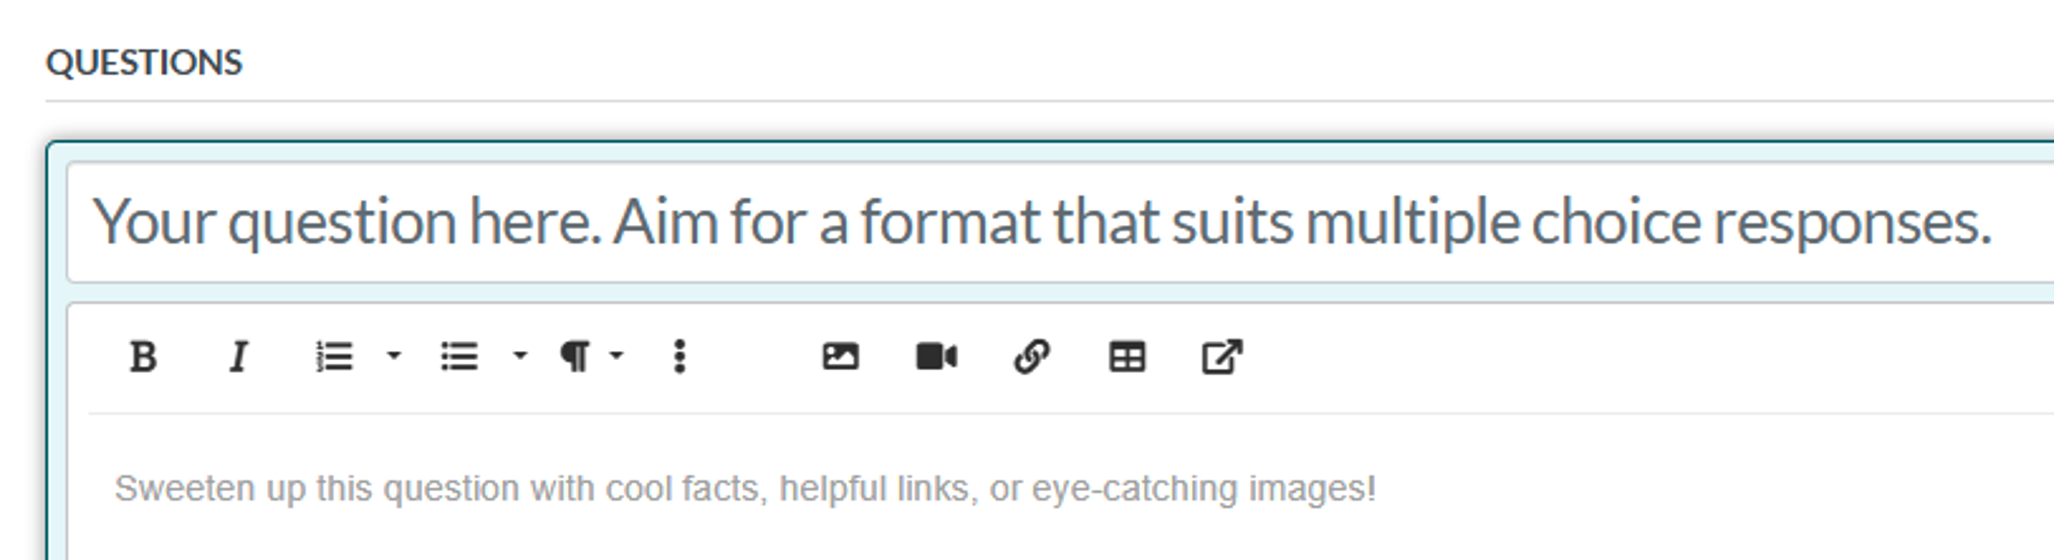
- Next, enter your answers in the answer field provided. Click on “Add Answer” to add more options. Then check the box for the right answer among the options. Finally, click on “Finished Editing” to save your changes.

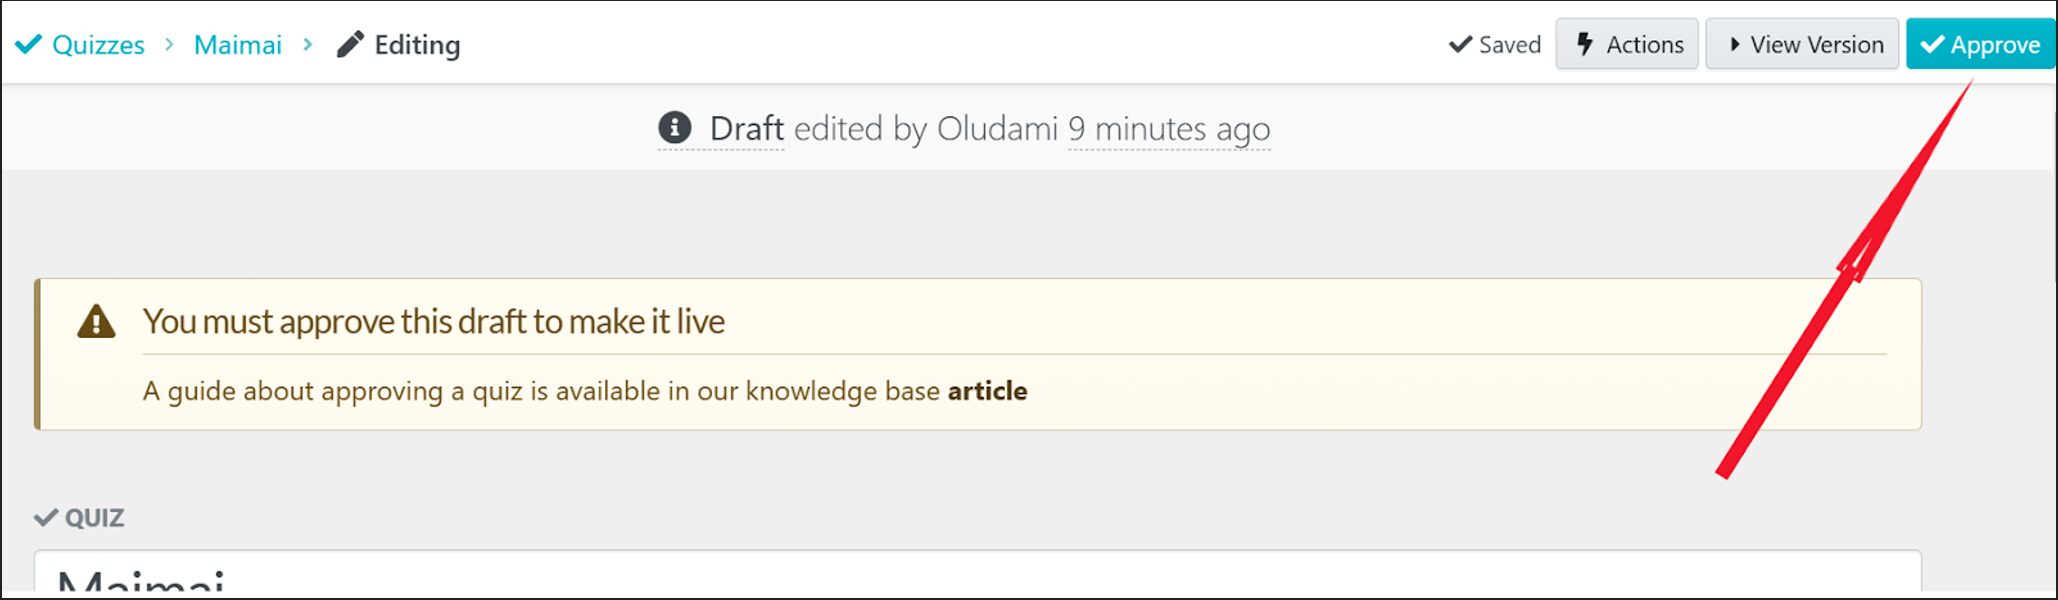
8. When you are done setting up your quiz, click on “Approve” at the top-right corner of the page to make it live.
And that’s how easy it is to build a quiz in SweetProcess.
Streamlining your client management process with SweetProcess means greater efficiency, less stress, and happier clients overall. Organizing your processes, sharing your knowledge base, and setting clear expectations make work much easier for everyone. SweetProcess takes the stress out of client management and allows you to focus on building strong relationships.
Provide Restricted Access to Clients and Collaborate Seamlessly With Them
Collaborating with your clients can get messy, especially when they don’t have access to the right information.
With SweetProcess, not only can you give your clients access to the right information, you get to set your client’s access level, giving them only what they need.
How to Provide Restricted Access on SweetProcess
Here’s the step-by-step process to provide restricted access inside SweetProcess:
Add as a Member on Your SweetProcess Account
The first step is to add your client as a member to your SweetProcess account.
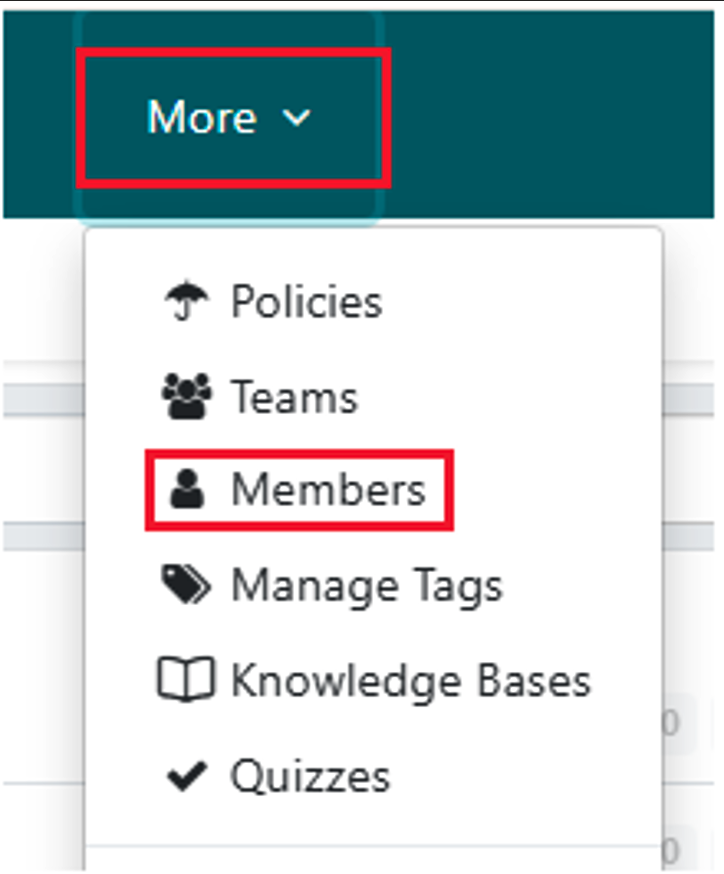
1) From the home page, Click on “More” and select “Members” from the dropdown menu.
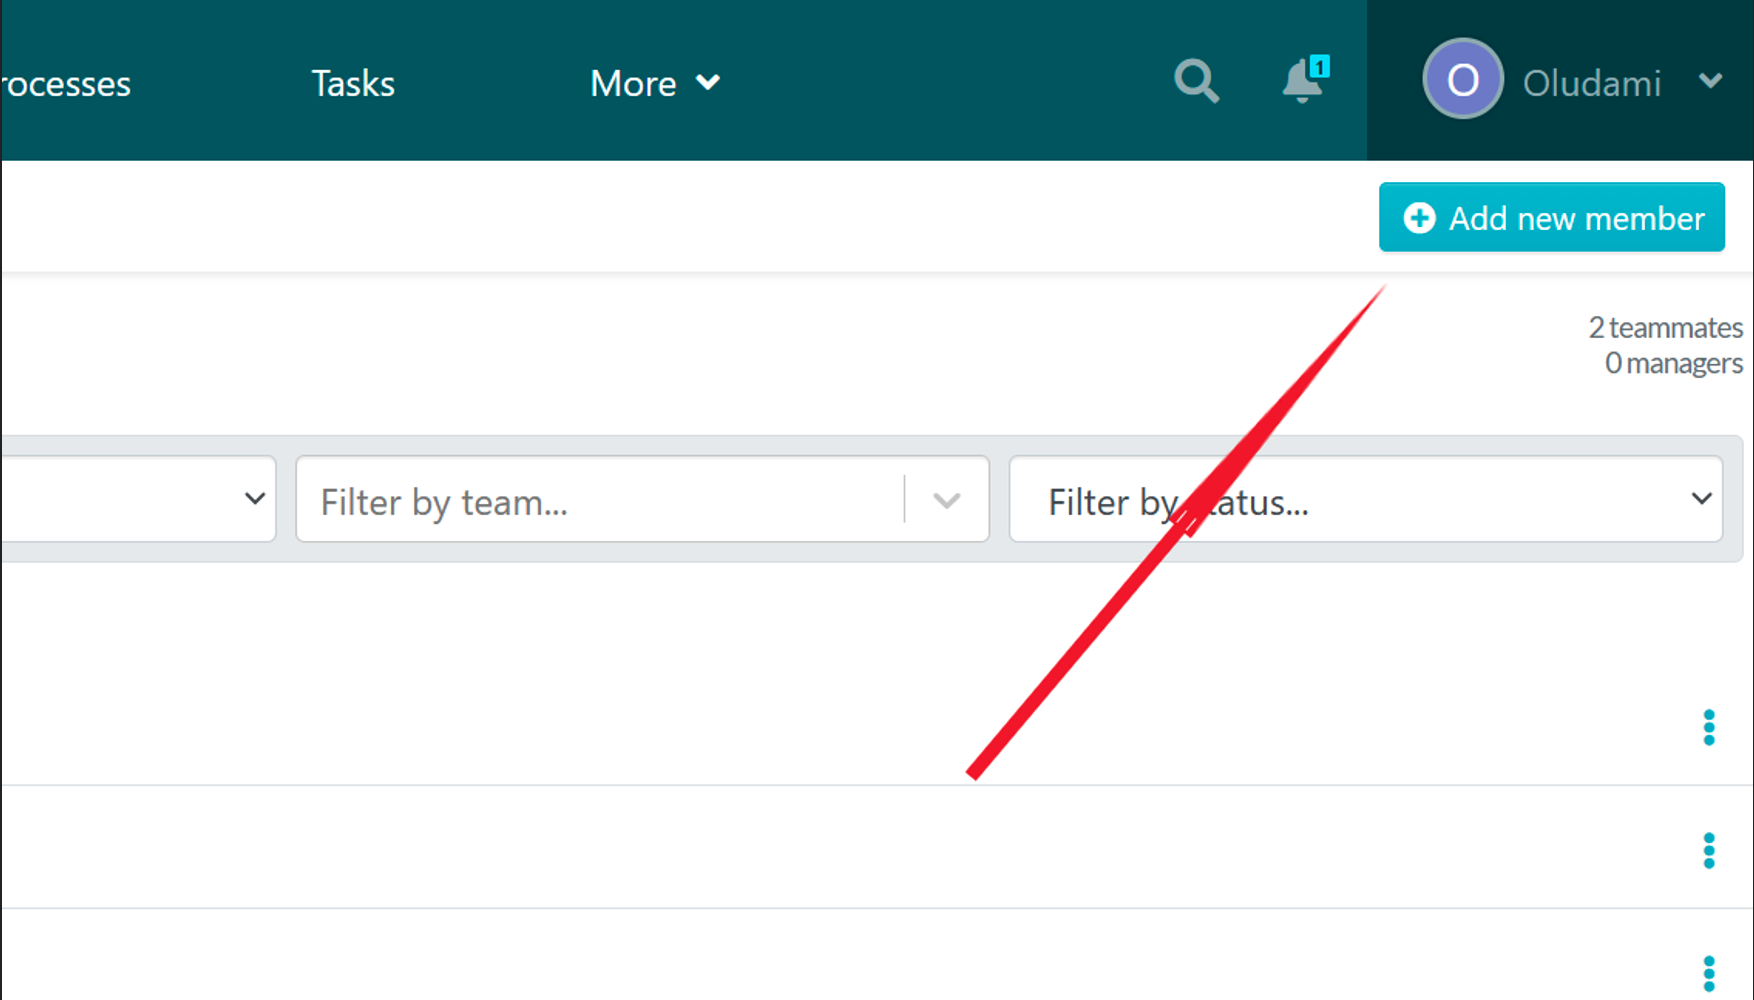
2) On the next page, click on “Add new member” at the top-right corner of your screen.
3) On the next page input new member’s information:
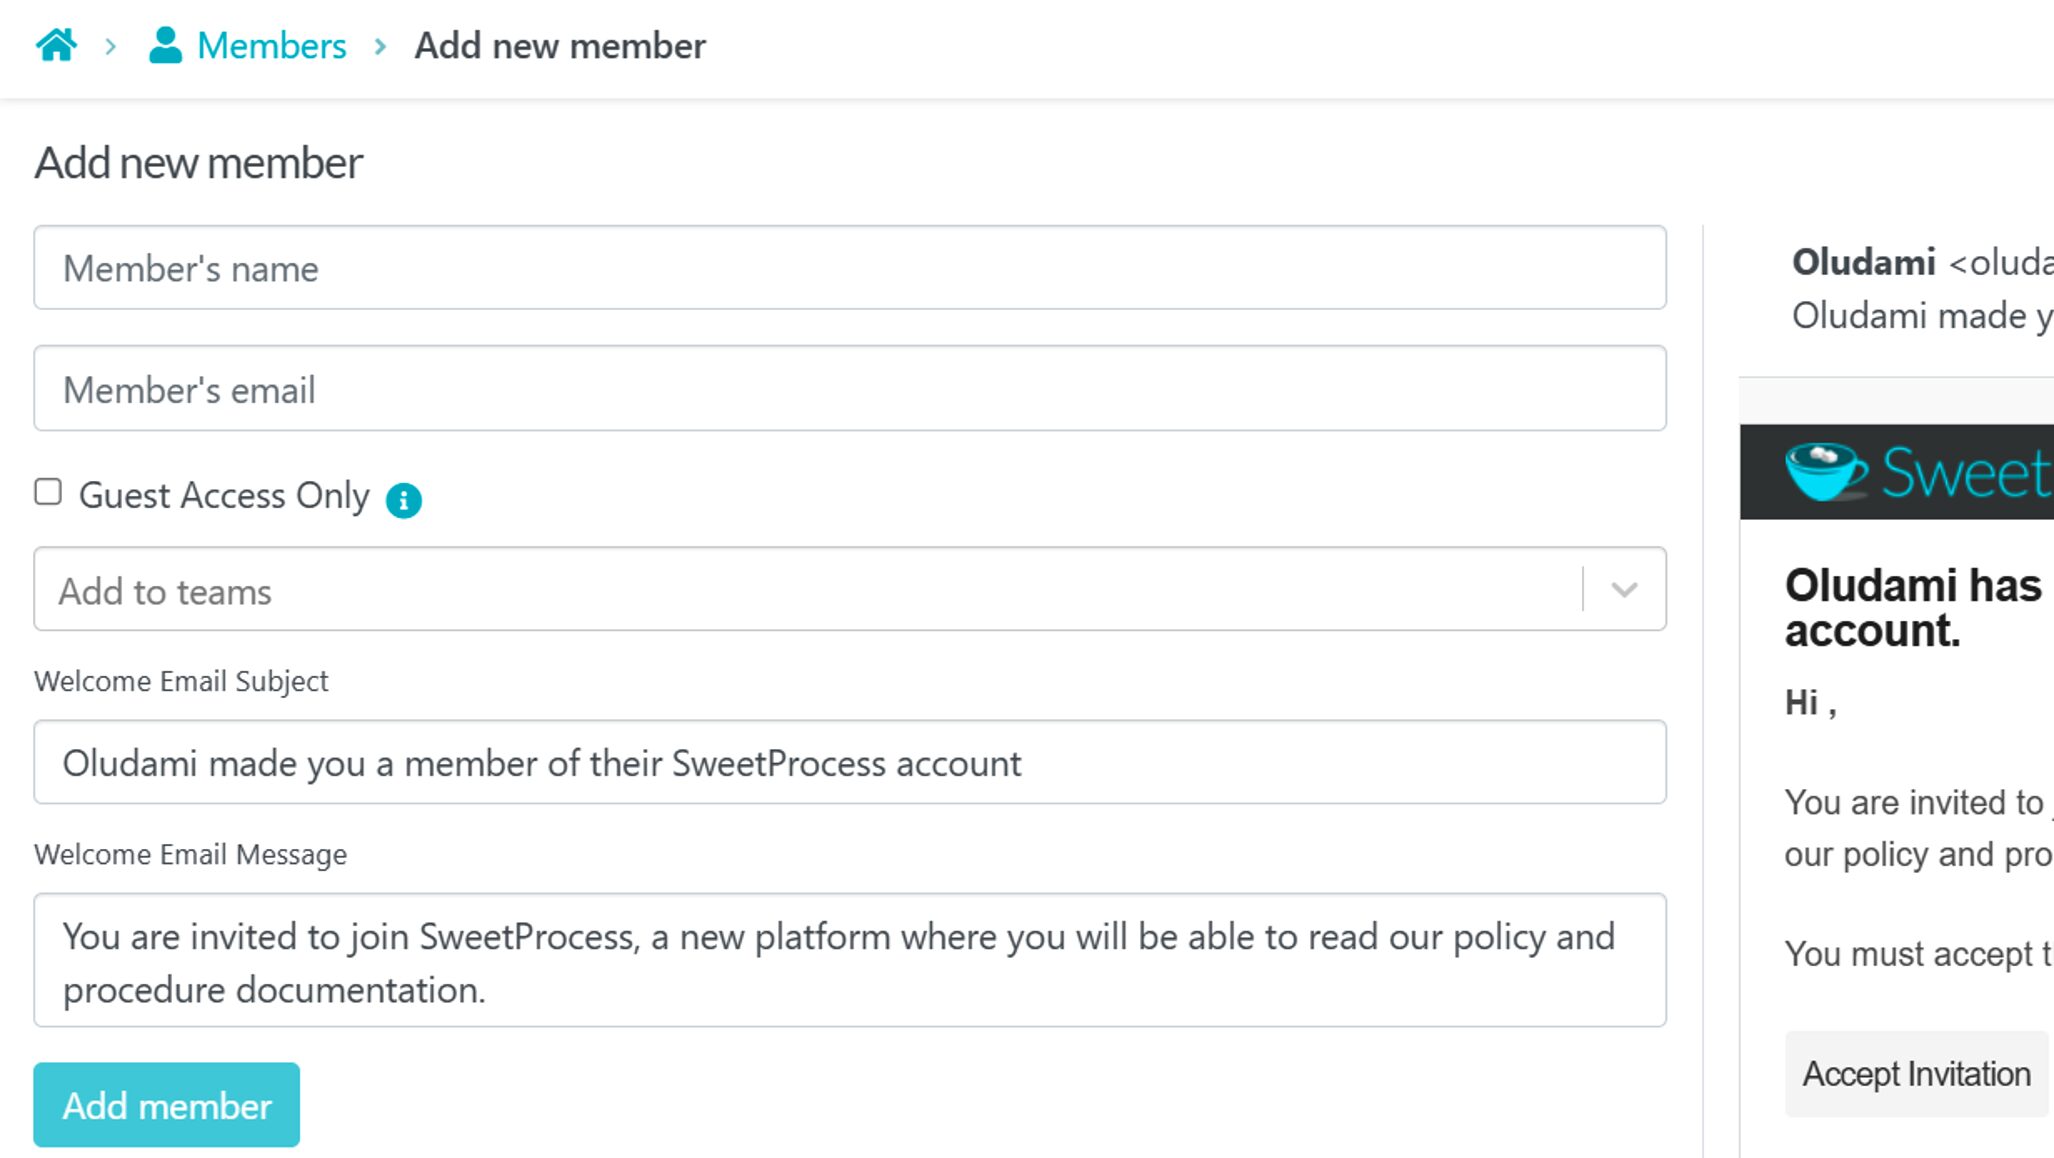
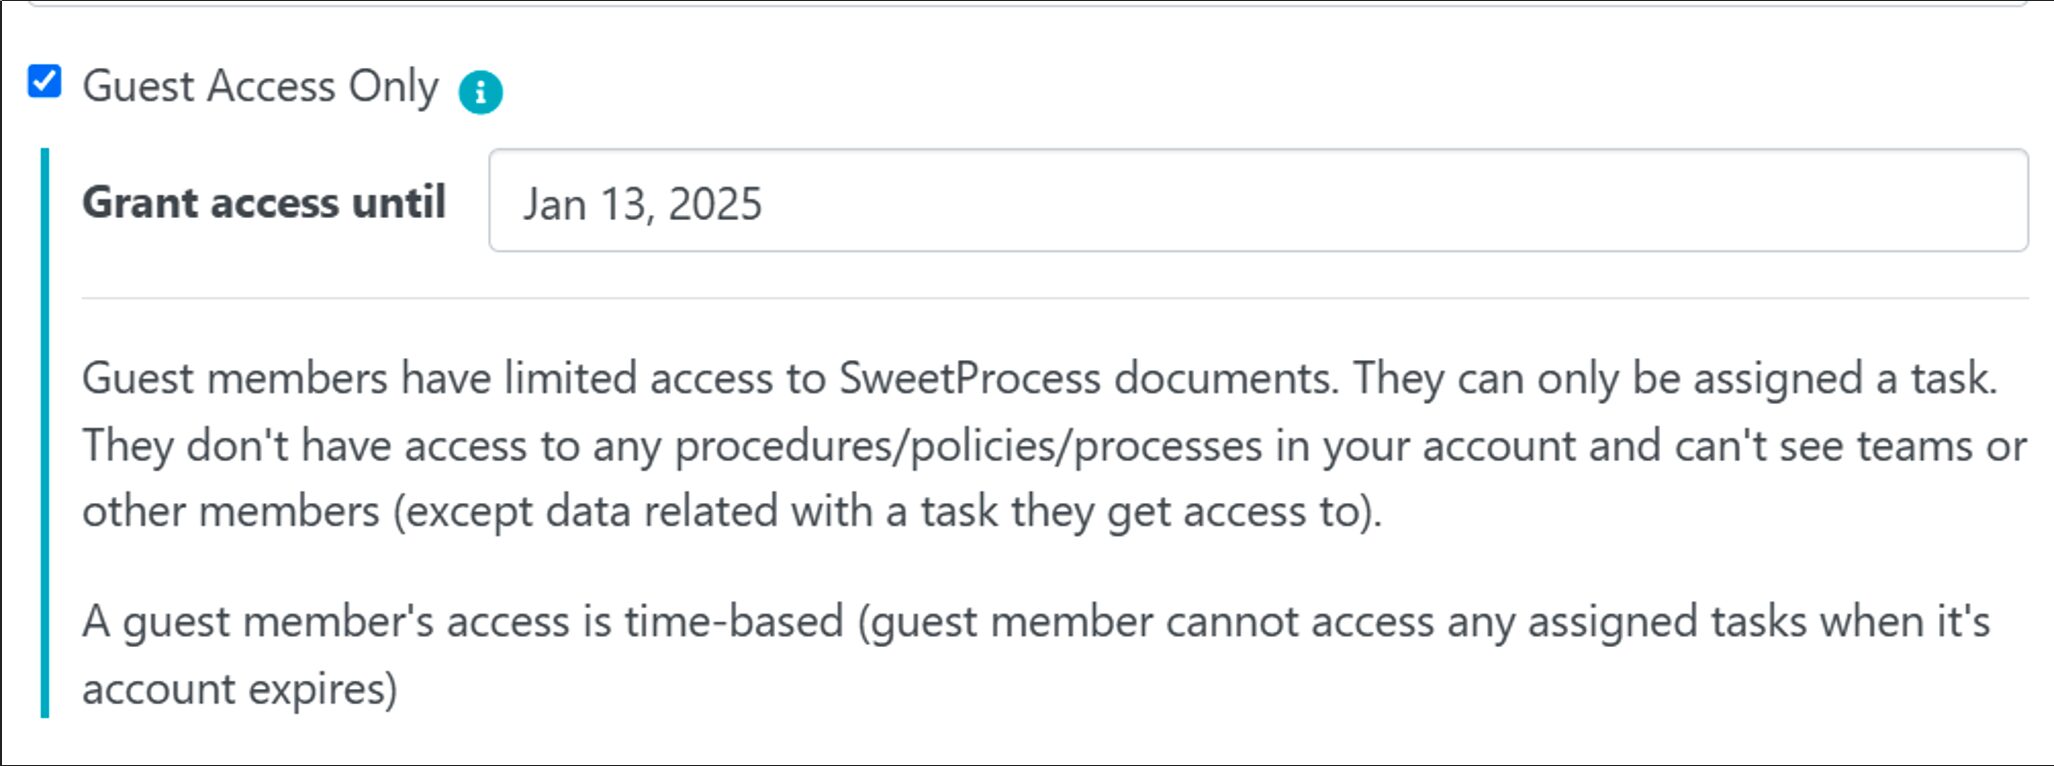
4) Check the “Guest Access Only” checkbox to restrict access.

5) This will also allow you to set access period:
6) Moving downward, you can also customize a welcome email (subject and message) for your client.

7) Click on “Add Guest” after setup is complete.

8) The email preview is displayed on the right half of the screen.
You’ve just successfully added a new member to your SweetProcess account. Now you can assign them tasks.
How to Assign Tasks to Members in SweetProcess

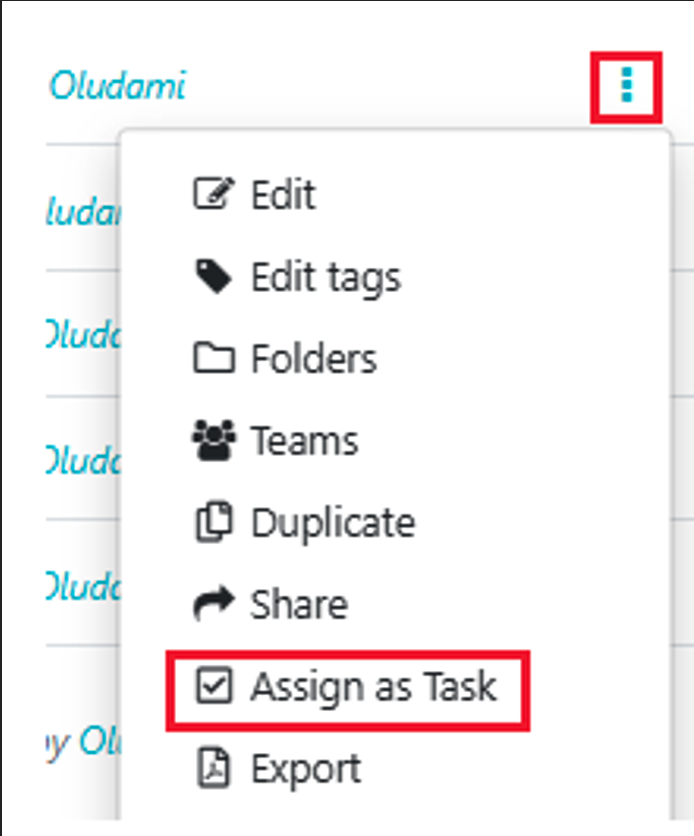
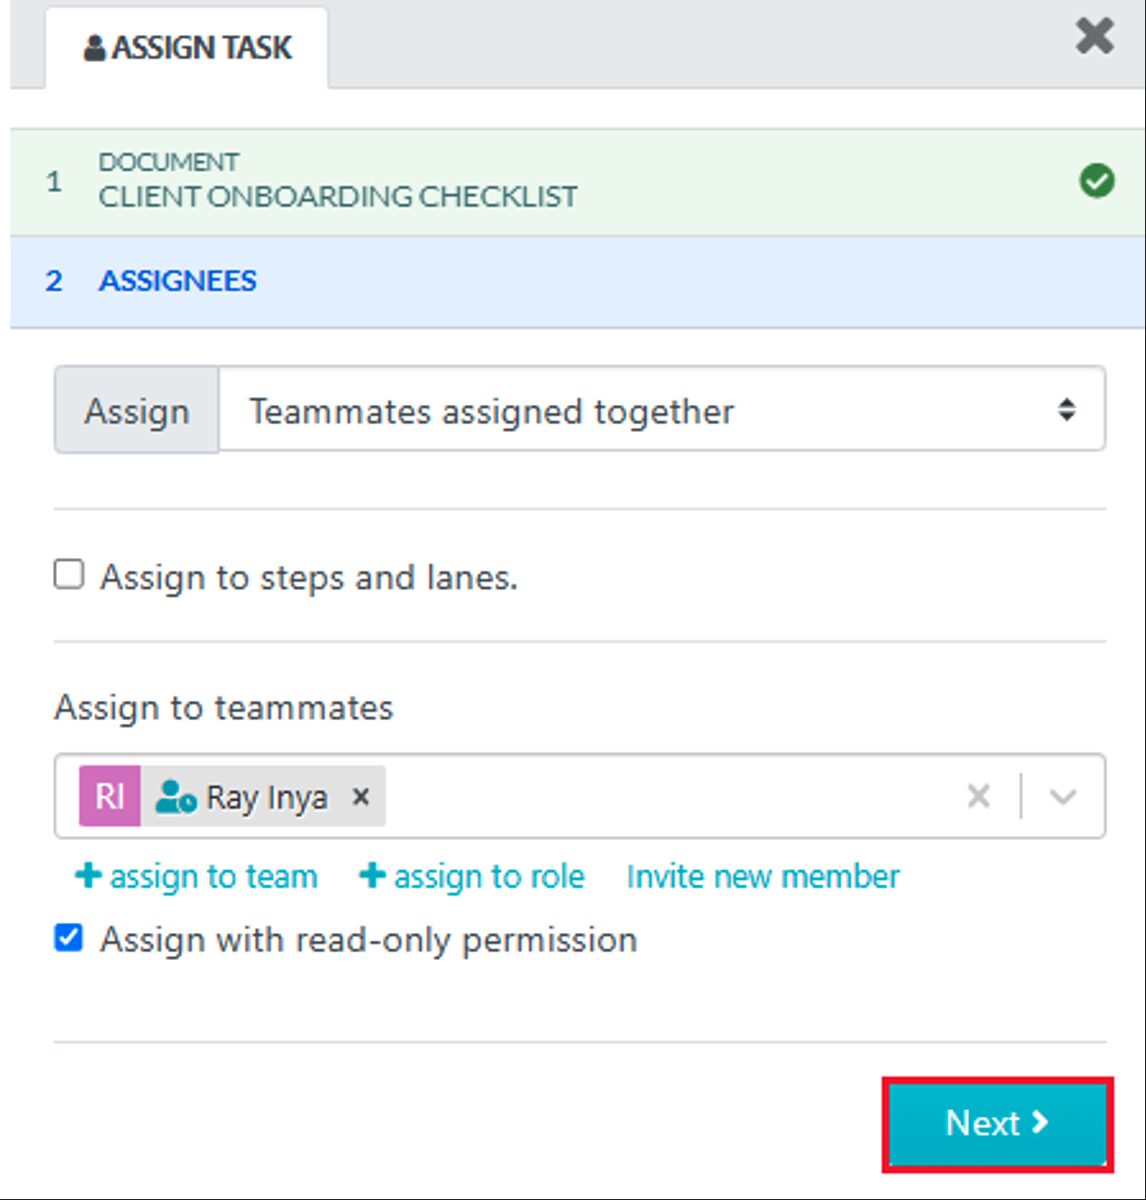
1) First, locate the task to be assigned which can be an already (or newly) created process, procedure, or policy, depending on what you want from your client. Click on the three dots at the extreme right of the document and select “Assign as Task” from the dropdown list.
2) The “Assign Task” dialogue box pops up for you to set up. To assign this task to an outside client who is the guest member, go down to “Assign to teammates” and select the member. Then click on “Next.”
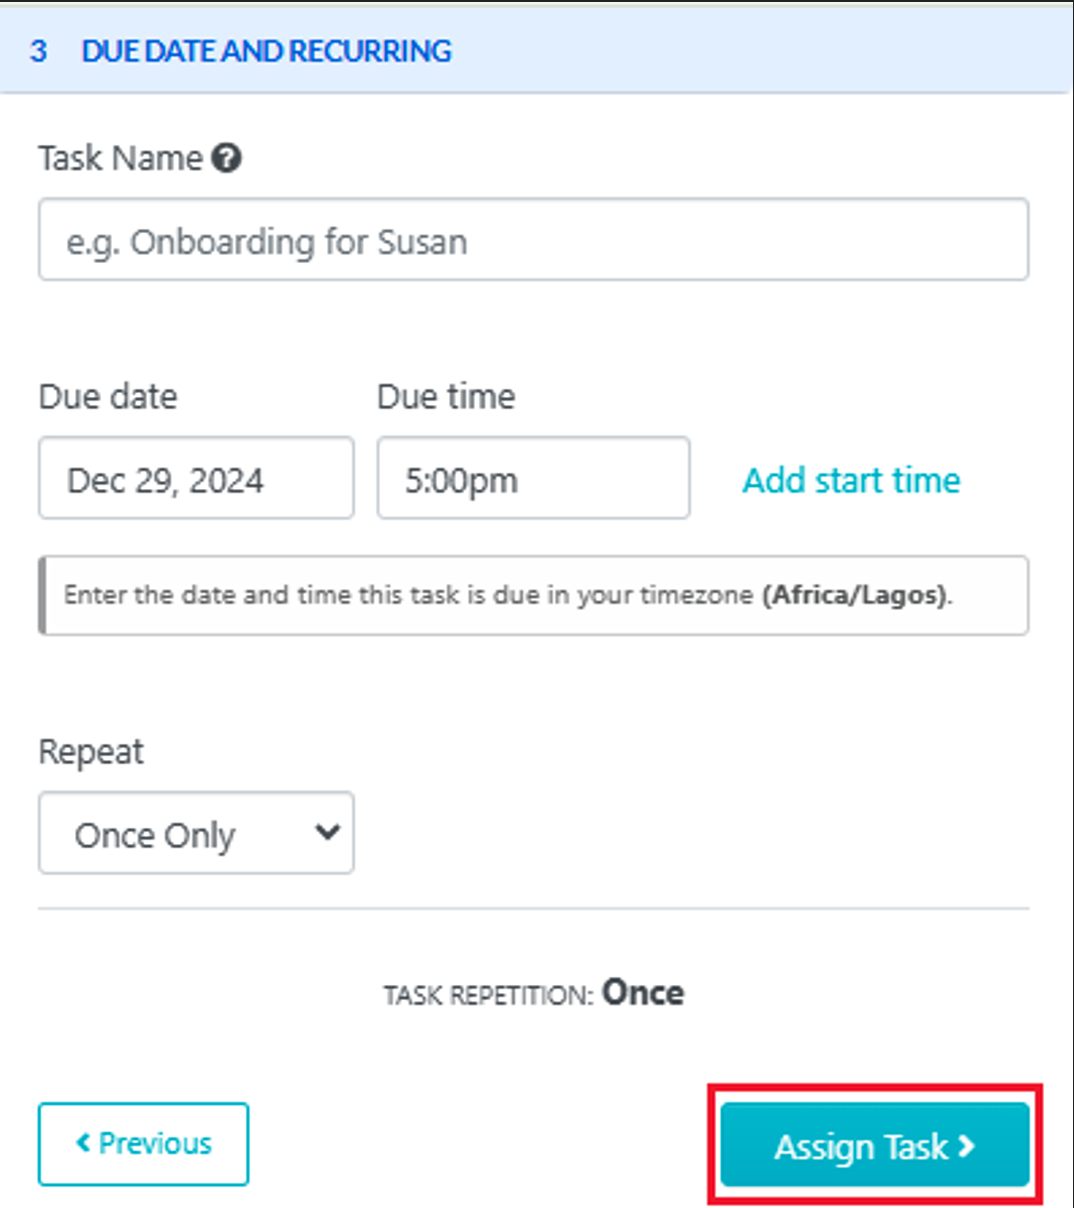
3) Format the task name, due date, due time, and how often it should be repeated. Then click on “Assign Task.”
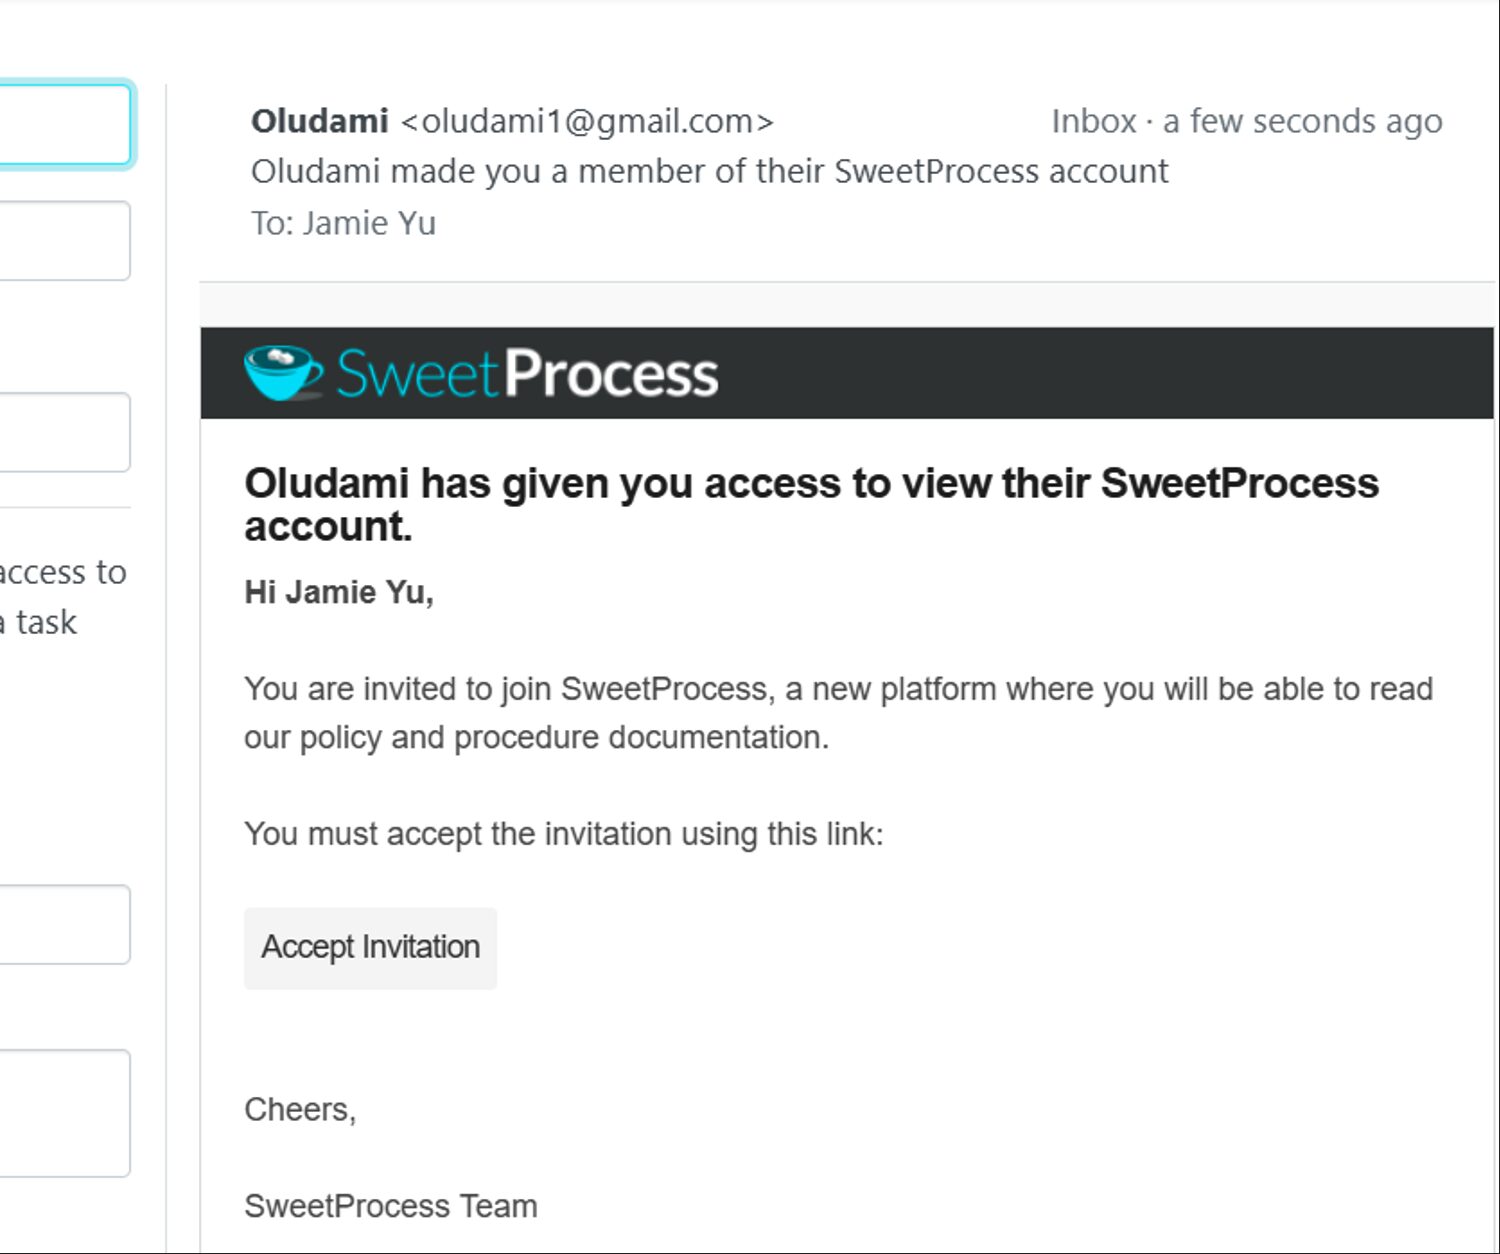
4) The second you hit the “Assign Task” tab, your client receives an email. Talk about real-time management; that’s SweetProcess!
Now, here’s how your client receives the email:
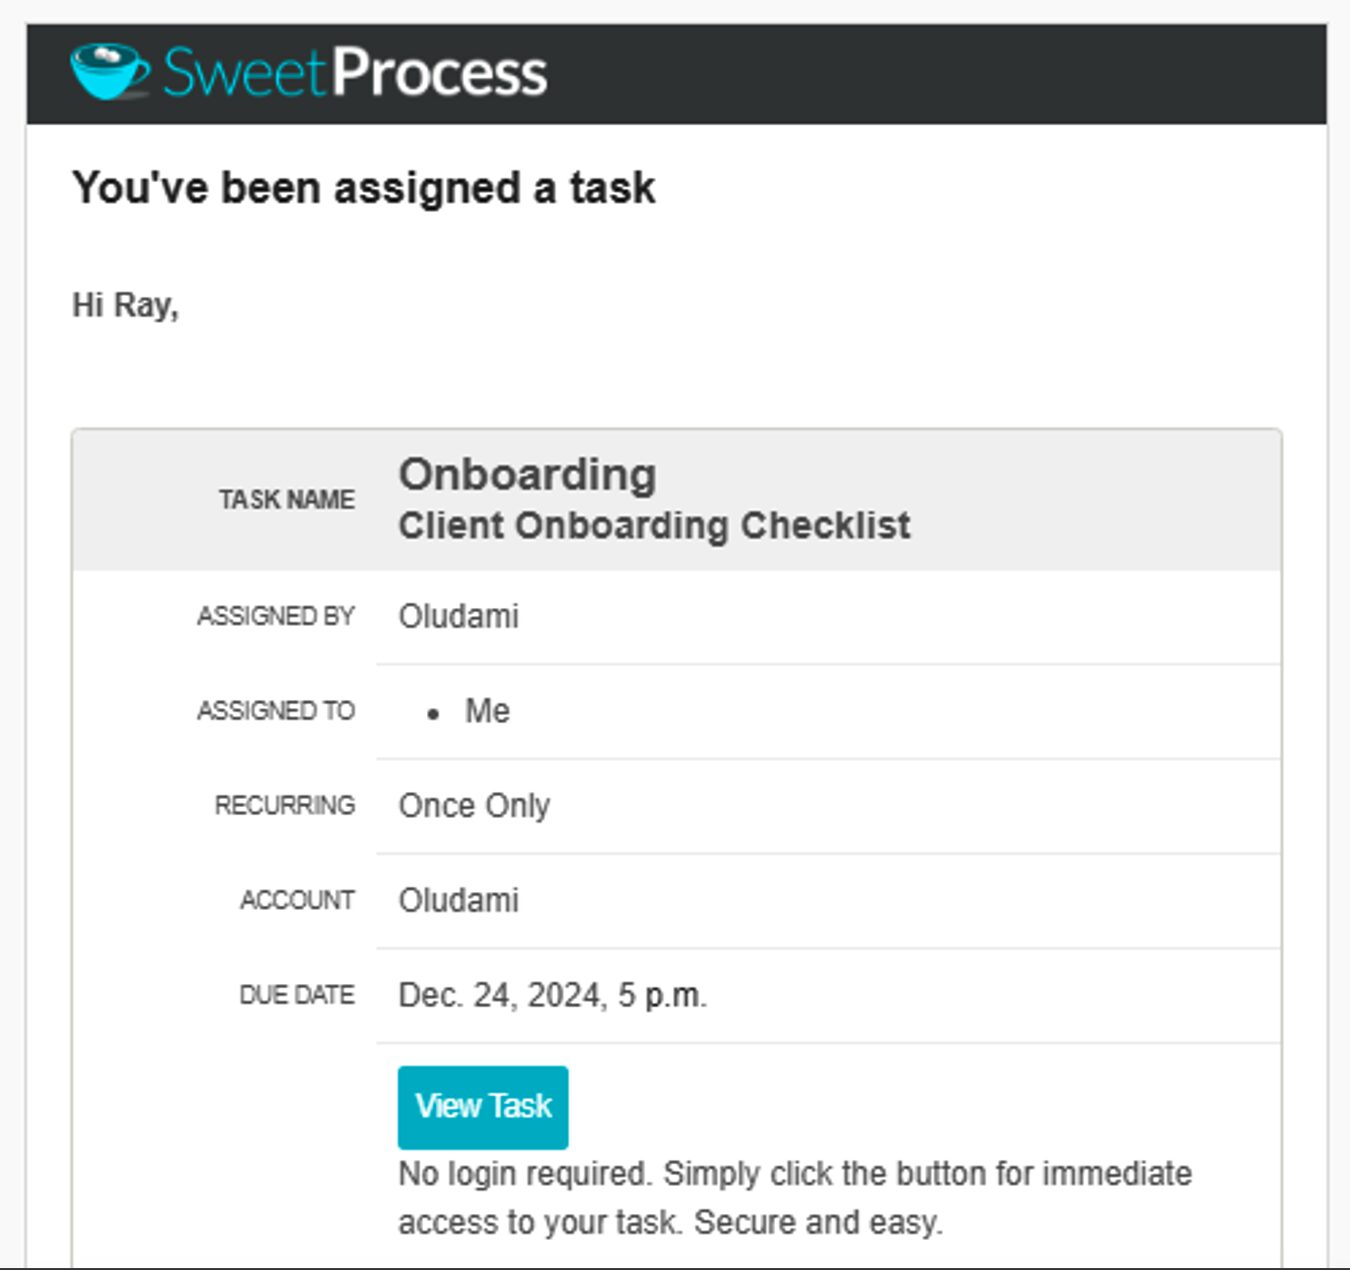
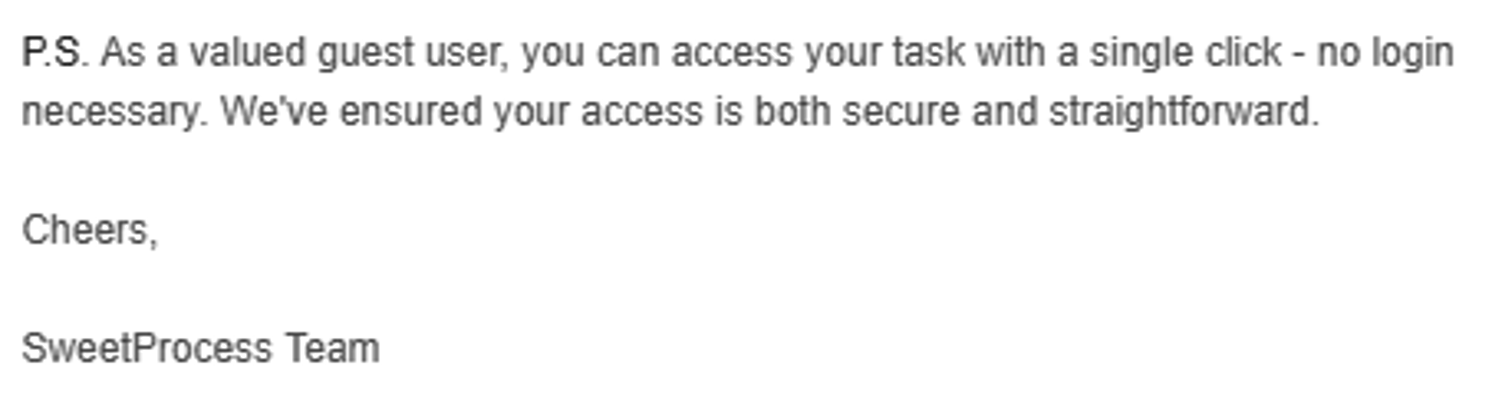
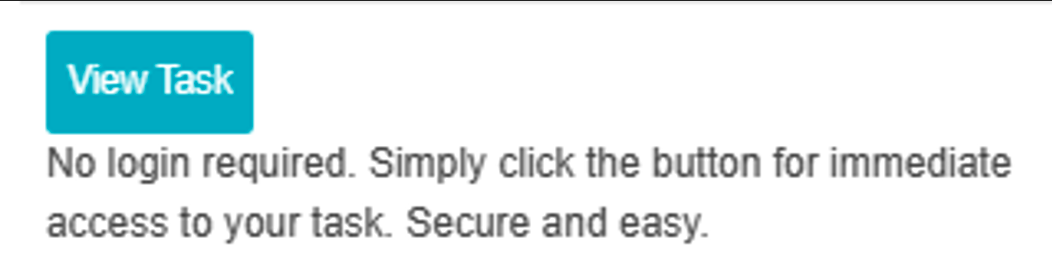
Just below this is a note further explaining what their access entails.
5) Now, all your client needs to do is click on “View Task” and carry on with the task in the SweetProcess page.
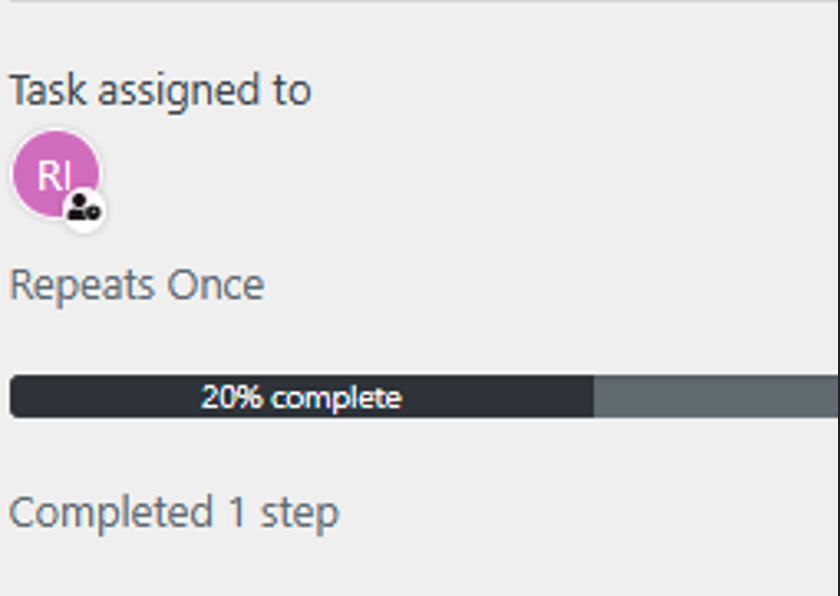
6) If it’s a procedure, for example, as they execute the task and check the boxes, the progress shows in percentage, 100% being a completed task.
And when your client completes the task, you get an email notification that looks like this:
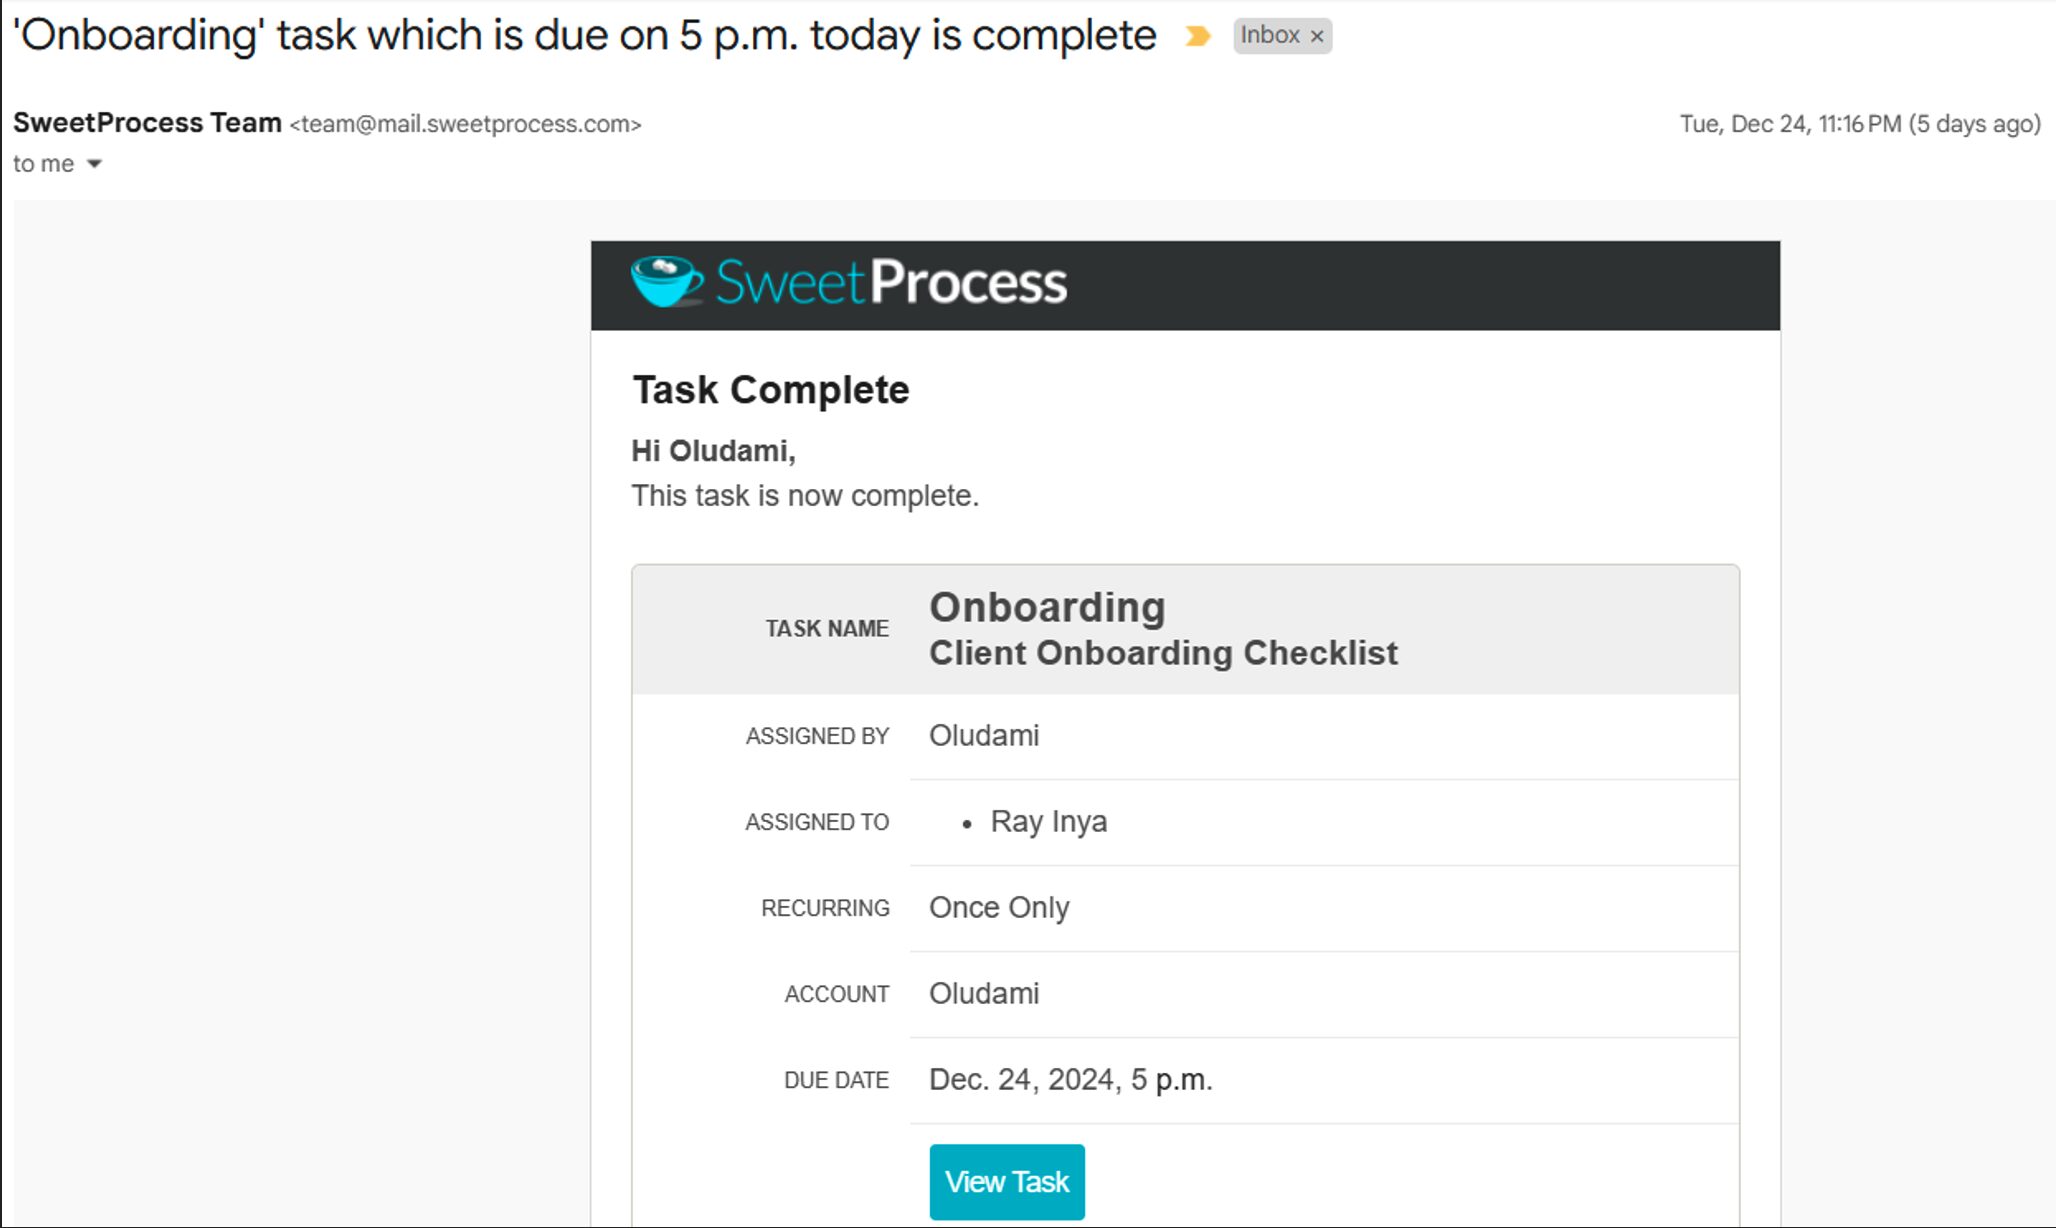
You can click on “View Task” to see what your client has done. And that’s how you provide restricted access to your client inside SweetProcess.
How to Collaborate Seamlessly With Clients on a Task Using SweetProcess
- You can view a client’s progress on a task from your dashboard as an admin.
- Click on the “Task” menu, then click on “All Tasks.”
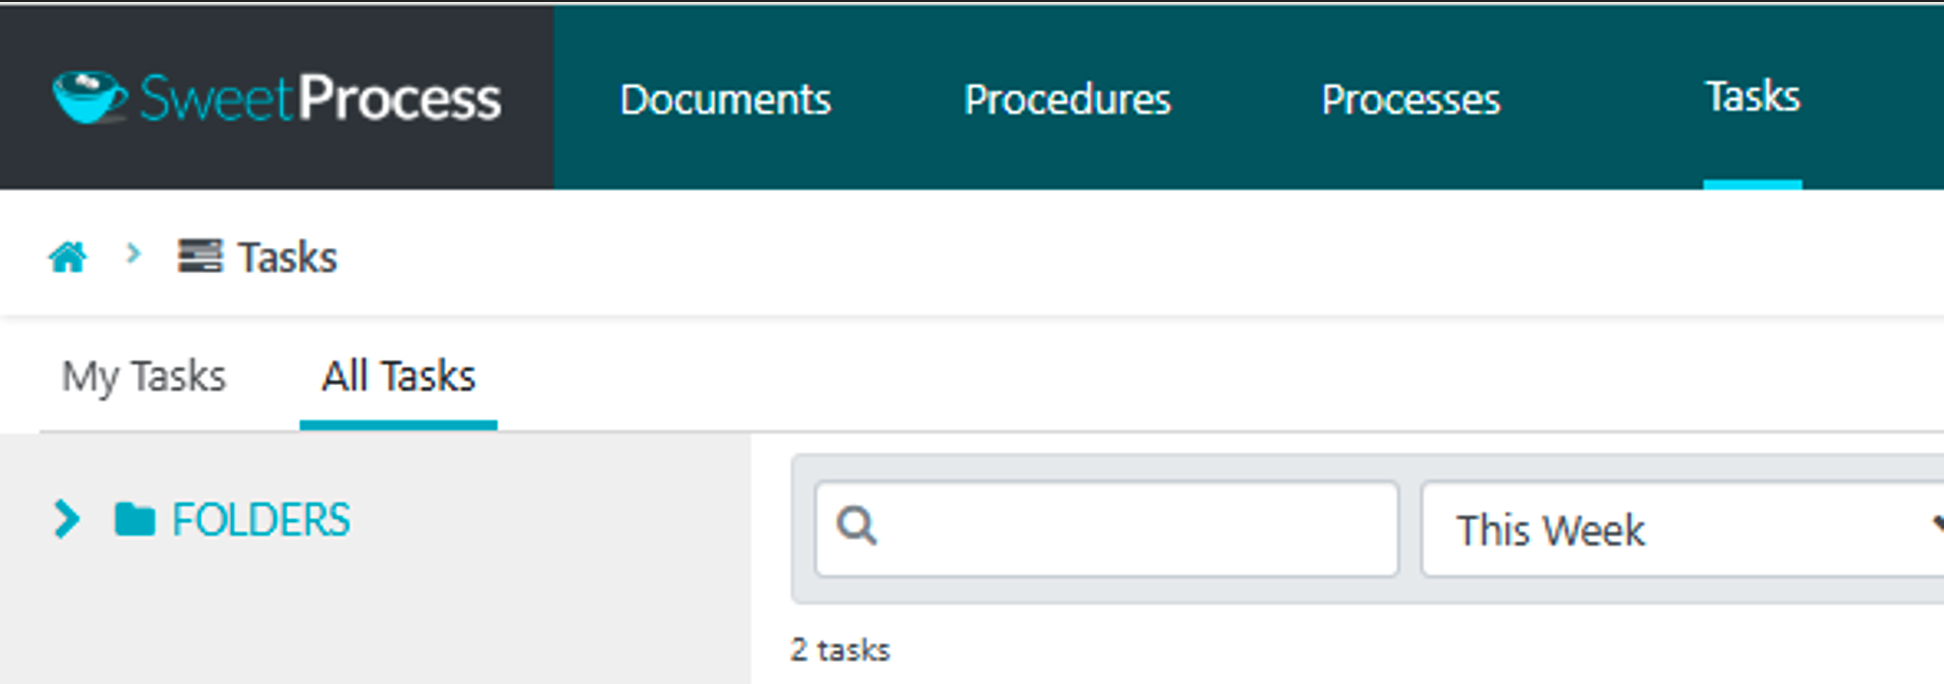
3) And you’ll be able to see how far your clients have gone on their tasks.
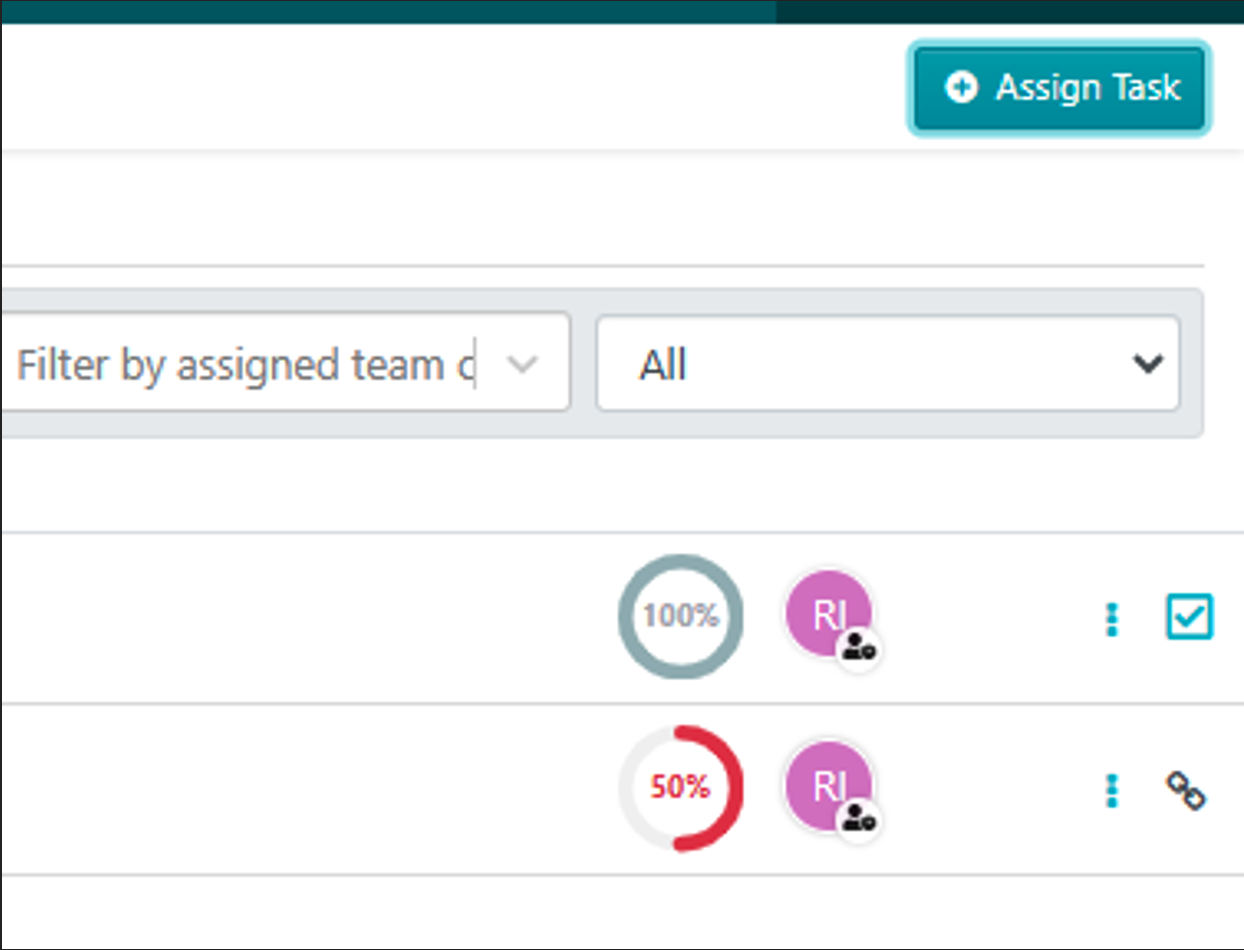
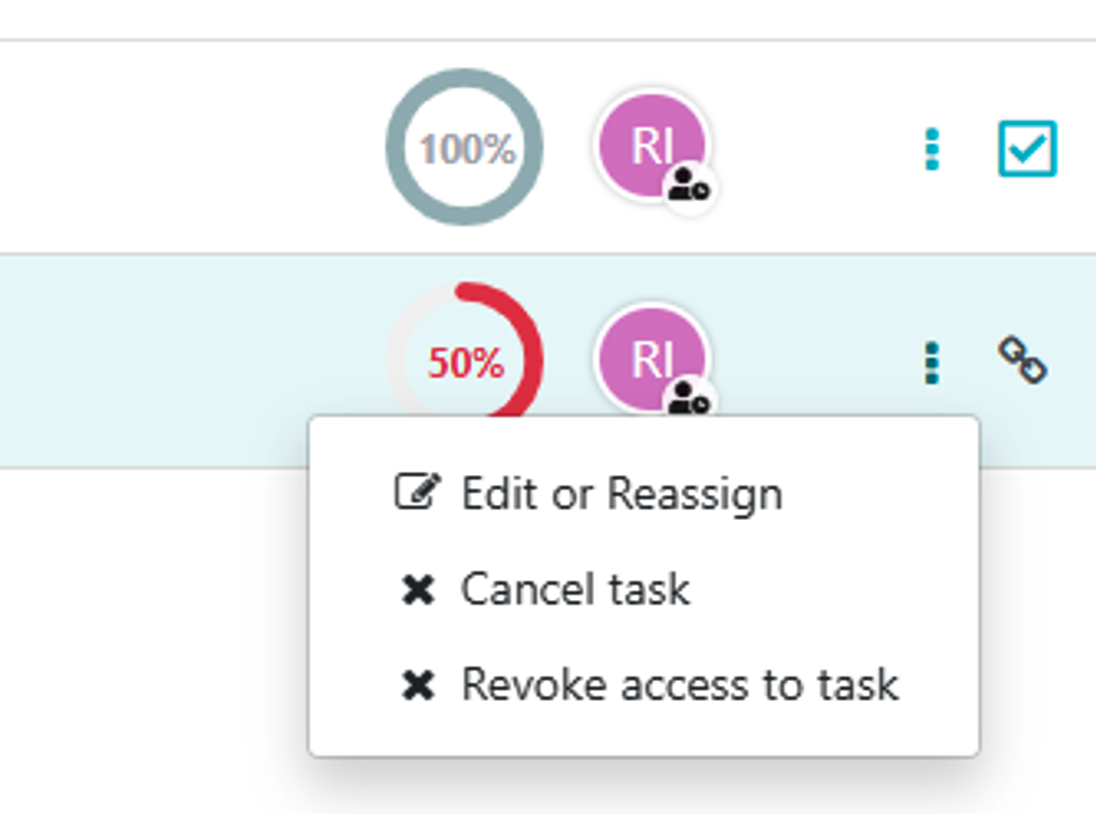
4) You can also modify the task by clicking on the three dots at the extreme end of the task to either cancel, edit, reassign, or revoke access.
5) Once a task is completed, you immediately get a notification. Click on the notification icon to view.
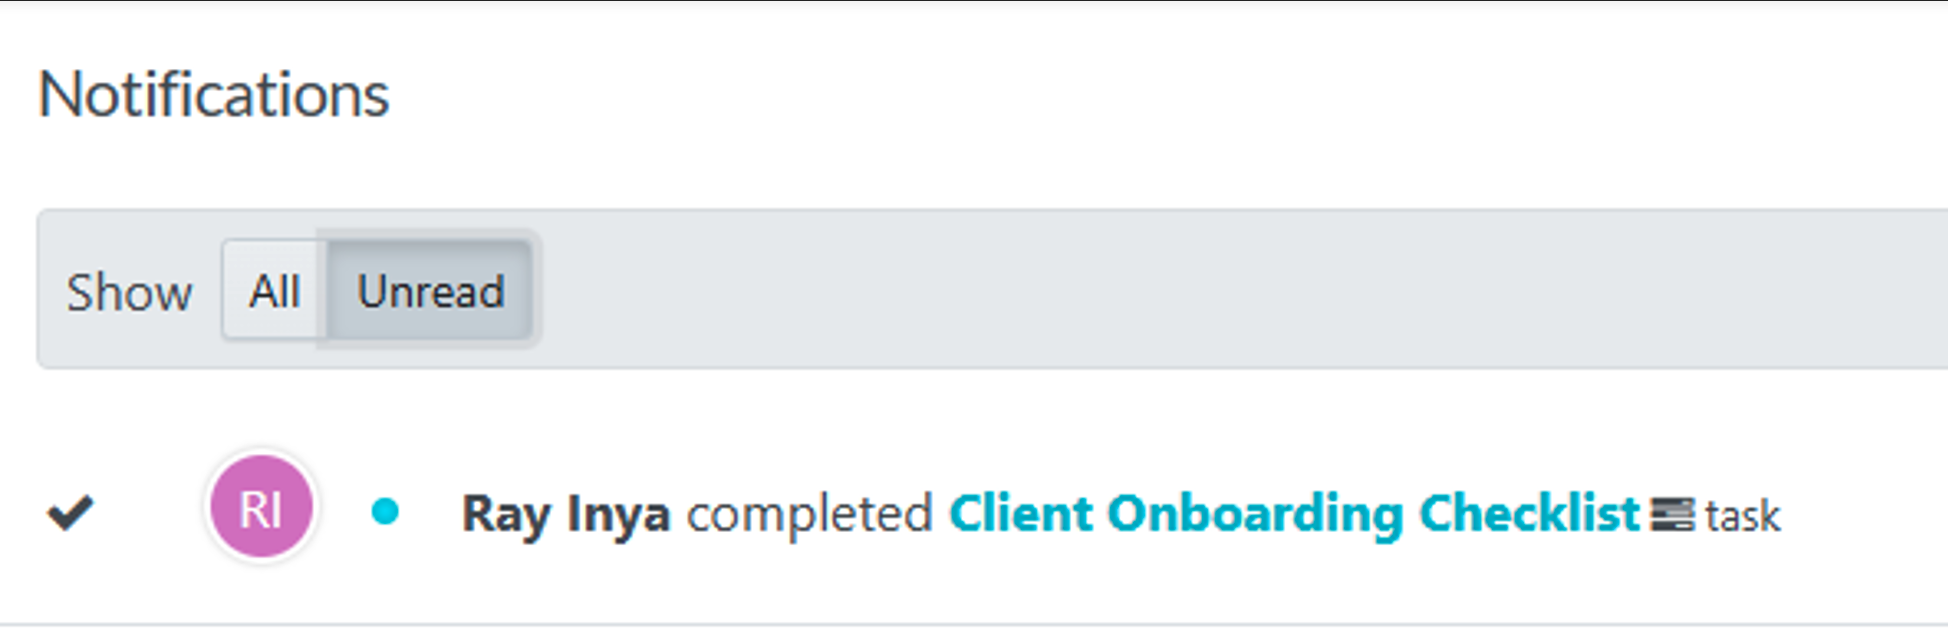
6) Open the task and check the red box as completed.

The key to effective client management through access restrictions and collaboration is balance—giving the right people access at the right time. Using SweetProcess fosters trust and efficiency by letting your clients stay involved where it counts.
Client Management Tips & Best Practices From Successful Freelancers, Consultants, and Agency Owners
Delivering quality client experience is key to building a loyal client base, driving repeated business and also enhancing long-term relationships for eventual success.
Below we share a few insights and actionable advice to help you sharpen your client management skills and improve client relationships. We also reached out to a few successful freelancers, consultants, and agency owners to get their insights on how they manage their clients and included some of their words in this section.
1. Use Templates to Onboard New Clients
The client onboarding process is repetitive, especially for a fast-growing business, and it’s important to get it right. That’s why you need templates. They help you stay on track and ensure important information is collected correctly and without errors. Here are some benefits of using templates to onboard new clients:
- Consistency: Using templates ensures clients receive the same onboarding experience regardless of who is assigned to onboard new clients.
- Efficiency: Templates save time and also reduce the burden associated with new client onboarding.
- Accuracy: Templates ensure all necessary information related to new client onboarding is collected, and this reduces errors or omissions.
- Professionalism: Templates help you create a professional onboarding experience with your new clients, enhancing your business reputation and building trust.
- Scalability: As your business grows in size, the use of templates in onboarding new clients makes it easy to scale up your client onboarding process.
By using templates to onboard new clients, you can streamline your process, reduce errors, and create a positive experience for your clients.
Ernesto Pramasetya, co-founder of GiantFocal, a leading HubSpot agency specializing in B2B marketing, with expertise in client management and streamlined operations, in sharing his insights, told SweetProcess:
“Successful client management depends on every team member understanding and following the same company procedures. Process maps (flowcharts) show every step, from start to finish, emphasizing key steps that can’t be missed at all costs. To help with this, we’ve developed step-by-step playbooks covering these key steps. A detailed process map ensures a consistently reliable client experience from start to finish. This method guarantees reliable, repeatable, and accurate results every time.”
2. Communicate Clearly and Consistently
Clear and consistent communication helps to ensure your clients feel valued, informed, and understood. Here’s what you stand to achieve when you do this:
- Avoid Misunderstandings: By keeping communications simple, transparent, and consistent, you avoid getting your clients confused or frustrated.
- Build Trust: Consistent and transparent communication shows your clients you are reliable, committed to their needs, and can be trusted.
- Set Expectations: With clear and consistent communication, your clients know what to expect, and nobody is disappointed.
- Resolve Issues: When there’s consistency in your communications with your clients, issues get resolved promptly, and this reduces the risk of escalation.
- Enhance Client Experience: Clear and consistent communication creates a positive client experience, leading to increased satisfaction and loyalty.
While setting expectations from the onset is important, you also must be flexible enough to bend and stretch to accommodate the changes that come.
According to Wayne Brown, CEO of Coaching 4 Companies,
“Business needs evolve, priorities shift, and what seemed reasonable on day one can quickly become outdated. So, instead of rigidly sticking to initial plans, I make ongoing adjustments a part of the process. It’s not just about managing expectations; it’s about managing realities. Don’t treat that initial agreement as written in stone. Instead, build flexibility into your process. When you do, you’ll create deeper, more lasting client relationships and better results for everyone involved.”
3. Use Custom Fields to Reduce the Number of Calls and Emails
Custom fields are like extra boxes you include in your client management system during data collection that help you collect specific information that’s important to you and your client.
- Helps Streamline Communications: Collecting all the important client information during onboarding saves you and your client time and reduces the stress of multiple follow-up calls or emails.
- Reduces Errors: Custom fields ensure all the important client information is collected. No more errors or mistakes during data collection.
- Saves Time: Automating your data collection with custom fields means no manual input. You can focus on other business tasks.
- Enhance Client Experience: With custom fields, you can personalize your services based on your client’s unique needs, making them feel valued and satisfied. You can also customize even automated communication to clients.
Client Management Pitfalls To Avoid
As you keep on striving to build a strong relationship with your clients, it is important to take note of common client management mistakes that can lead to frustration, loss of business, and even a stain on your reputation.
Below are common client management pitfalls you should avoid (and solutions):
1. Neglecting Existing Clients
It’s a good thing to strive to acquire new clients or win over a potential client. However, that shouldn’t be your only focus. You risk not just losing your existing clients when you take them for granted but face other dangers like:
- Loss of Loyalty: Ignoring your existing clients makes them feel unappreciated and causes them to lose loyalty and take their business elsewhere.
- Negative Word-of-mouth: The last thing you want as a business owner is for clients to share disappointing experiences with others. It’s a potential recipe for business failure.
- Decreased Retention Rates: If you don’t take care of your current clients, with time you’ll have to keep finding new ones to replace them. This makes it harder to grow your business and keep it stable.
- Missed Opportunities: If you don’t pay attention to your current clients, you might lose chances to sell them more products or services, get referrals to new clients, or receive great testimonials to boost your business.
The best way to avoid this is by prioritizing your existing clients. Here’s how:
- Schedule regular check-ins to stay updated with your clients’ needs and concerns.
- Show appreciation through personalized messages, discounts, or loyalty rewards.
- Monitor feedback from existing clients and also respond promptly to their concerns. This shows your commitment to their satisfaction.
2. Lack of Communication
The way you communicate with your clients directly affects your relationship, and here’s what can go wrong if that communication is shaky:
- Misunderstanding: Poor communication can make your clients misunderstand your deliverables, timelines, and process, and this can lead to frustration and unmet expectations.
- Lack of Trust: When clients feel left in the dark, they may lose trust in your reliability and professionalism, which can damage the relationship.
- Projects Stall or Fail: When there is a lack of communication, it can lead to project failures or delays, resulting in costly rework.
- Missed Opportunities: Without communication, you miss the chance to upsell, cross-sell, or even gain valuable client feedback.
- Negative Word-of-mouth: Clients who feel ignored due to lack of communication can share their distrust with others, which negatively affects your business.
Now, here’s what you can do to avoid these:
- Establish and maintain an effective communication plan and protocol
- Provide regular updates through shared progress reports and milestone achievements
- Continuously encourage client’s feedback and questions
- Promptly respond to questions and inquiries in a timely and professional manner to keep a pool of satisfied clients.
3. Overpromising and Under Delivering

The fastest way to damage your credibility and stain your business’s image is to overpromise your clients and then under-deliver. Here are some dangers of this major pitfall in client management:
- Shattered Expectations: When you overpromise and then under deliver, your client feels misled and cheated.
- Broken Trusts: Some of your loyal clients may be forgiving at first. However, repeated cases of overpromising and under delivering can cause them to lose trust in your ability to deliver.
- Stained Reputation: Negative word-of-mouth and online reviews can damage your business image.
- Weakened Client Relationship: Repeated cases of overpromising and under delivering can cause tension in your client relationship, which may be challenging to recover.
How do you avoid these pitfalls? Here’s what you can do:
- Be honest and straightforward about your capabilities, timelines, and deliverables.
- Set realistic goals and collaborate with your clients to establish an understanding of deadlines and timelines.
- Prioritize meeting commitments and exceeding expectations whenever you can.
- Be proactive about addressing misconceptions and unrealistic client expectations.
4. Inconsistent Service Quality
When the quality of your service delivery varies, it can cause confusion and frustration for your clients. Let’s take a look at some of the dangers of this pitfall:
- Unclear Client Expectations: Your clients may become frustrated because they aren’t sure what to expect of your service.
- Lack of Trust: When your clients start to question your reliability and professionalism due to inconsistent service quality, they begin to lose trust in your services.
- Declined Business Credibility: Your business reputation suffers from inconsistent service quality, as it can lead to negative online reviews and word-of-mouth.
- Declined Client Retention: Your clients may seek out a more consistent and reliable service provider.
Now, here are some strategies you can put in place to avoid this common mistake in client management:
- Establish a well-defined standard of operation through streamlined processes and procedures using cutting-edge software packages.
- Train your teammates to understand and deliver quality services according to established standards.
- Implement quality control measures and identify areas that need improvement.
- Continuously solicit clients’ feedback to understand their goals and expectations and know how to serve them better.
The most efficient way to avoid these common pitfalls is to invest in an intuitive tool for standardizing business processes and streamlining communications, such as SweetProcess.
Level Up Your Client Management Process Using SweetProcess
Congratulations on making it this far! As we conclude this article, remember that clients are the foundation of any successful business and should be managed properly. Effective client management is the key to building trust, increasing growth, and delivering quality experience, which keeps you at the top of the competition.
Throughout this article, we explored the fundamentals of client management, its importance, and the principles for effective client management. We also discussed common pitfalls to avoid and practical guides on streamlining your client management processes using SweetProcess.
By leveraging SweetProcess, you’ll be able to:
- Standardize processes and ensure consistency
- Streamline communication and avoid misunderstandings
- Track client needs and deliver quality experiences
- Scale your business with confidence
Don’t let poor client management prevent your business from reaching its full potential. Join other successful companies using SweetProcess to streamline their processes and transform how their teams handle clients, enjoying effective client management and better client satisfaction.