Forms: Event Ticketing
There is now one place for members to register for an event and then have a scannable ticket code provided to use when coming in the door. This feature can be used for both free and paid events!
-
1Setup Ticketing- Creating the FormThe easiest template to use is the Event Registration. This will set the category right away and create a basic form with a person fieldset and other details. However, you can use any other template or build from scratch and then review the following details.
-
2Category
The primary place to enable the ticketing feature is through Form Properties → General Info and then scroll down for Categories. Check the checkbox to make the form an 'Event Registration'. Now, set the date for the event, and then check the box to Enable Ticketing. Note the which gives some information on Ticketing.
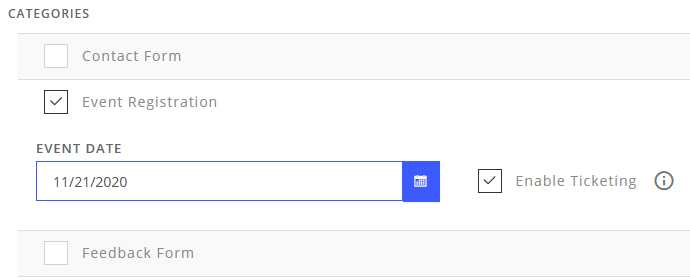
Tooltip → Ticket(s) will be shown to the user after form submission to print out. Each person in a fieldset will get their own ticket in addition to a group ticket. See email tab in form properties for email template with ticket receipt. Email will be sent by default to the billing email and if no payment exists, it will be sent to the first email field on the form. Auto redirect will take longer.
-
3Email Form Properties
From here, review the Form Properties → Email tab to enable the 'Send Email Ticket Receipt' which will send the barcode to the registrant. Enable by using the checkbox.

Fill in the other details around the From address and adjust the Subject and the thank you message if desired. Lastly, if you want to know what the ticket email will look like with the associated QR codes, simply use the
 preview button.
For more on the Email area in form properties, review the following information: Email Tab
-
4Ticket Management
Aside from the user getting their QR code tickets, managers with permission to see the form responses can see this and other details in the form responses.
More on the Forms Manager: Open Forms Manager
-
5Ticket Verification
This is a new column that updates as tickets are scanned or entered and changes from Not Yet Scanned to Verified.

-
6Ticket QR CodesUsing the Created column, click the link to see the detailed information on the submission. Aside from the normal RAW data and other details, there is a tab at the top which says Tickets. You can print and manage the tickets from this area. The 'Open In New Tab +' button will put the ticket in a browser tab so you can copy and paste the URL in an email to a registrant if they have an issue.
-
7Processing Tickets
It is easy to process the tickets right from a mobile phone browser or a computer browser. The process is as follows:
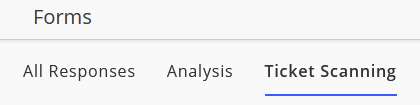
- To digitally collect tickets on the day of the event, go to Forms in the left navigation and open the Responses.
- Navigate to the Ticket Scanning tab.
- Scan or manually enter ticket codes.

Scanning can be done a couple of different ways.
- If using a phone or tablet, simply use the camera on that device to scan the ticket.
- Use a simple 2D barcode scanner connected to the computer to process the ticket. Make sure to have the cursor in the ticket entry box so the scanner can input the code.
- If you have a computer with a webcam, you can scan by holding it up to that camera after it is activated in the browser.
A fallback method is that each ticket has a code assigned to it. This can be manually entered to complete the verification.
Once scanned, you will be presented with a notification that it is verified.

If the ticket has already been used, you will get a notification about this also.
