Using the Fellowship Hall Guest System
The Guest A/V System located in the Contemporary Worship Center is designed to be a simple way for users to project on the TV screens and use a wireless microphone for events. This system is designed to be used by an end-user without involving the A/V staff for support. if by some chance the Pro House System is turned on, the Guest System will not operate. If the Guest System is turned on the Pro House System will not operate.
-
1Equipment NeededThe equipment for the Guest System is located in the locked store room behind the stage in the Contemporary Worship Center. You will need a master key to access this room. The equipment is located in the first bookcase past the metal cabinet on the right side of the store room. It's shelf is labelled, "Guest System".
Equipment Provided:
Key for System; (2) Wireless Microphones; Battery Charger; 25' HDMI Cable. -
2Using the System
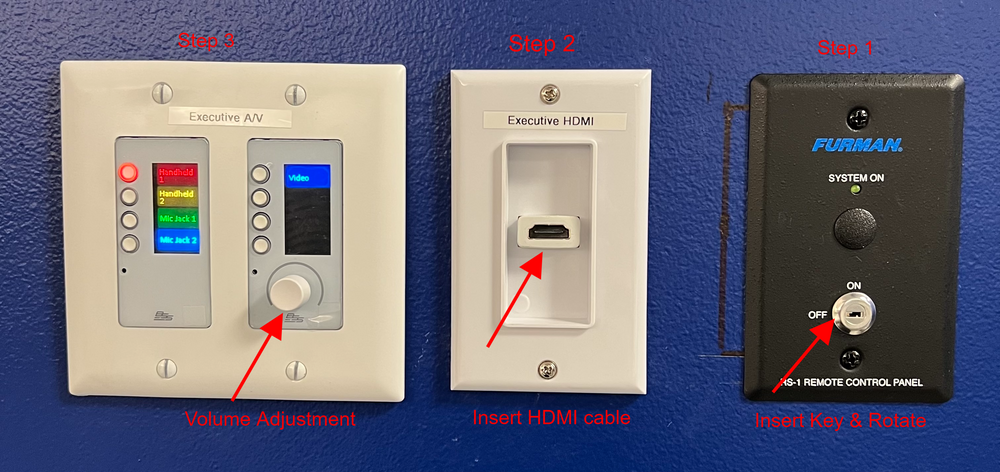 System controls are located on the left wall of the stage.
 - Insert Key and rotate select on. The green light will glow indicating that the system is turned on.
- Insert HDMI cable into HDMI slot on wall and insert the other end into laptop.
- Switches on far left are used to adjust the volume on the speakers. In this example, Handheld Microphone #1 is being used. The button glows red to indicate that is the volume that is being adjusted. To adjust volume, turn the knob.
- To adjust a different piece of equipment, push the button next to the name. Once the button glows, you can turn the knob to adjust the volume. Volume can also be adjusted from your computer when showing a video.
- You can use 2 wireless and 2 wired mics at a time or use instruments with an adapter box.
- The wired mic jacks are located to the right side of the controls near the floor.
- If using screens, confirm that TVs are turned on. TV remote control is located in the rear of the room on A/V box. Once HDMI cable is secured, TVs will automatically display the screen on the connected laptop.
- If you are using a Mac, the audio volume might need to be directed to the "EXTRON HDMI" output which is selected under the "Sound" speaker icon on the top tool bar or in Settings under "Sound".
- This is automatic with a Windows 10 or 11 device.
- This is automatic with a Mac if the Mac is not on the wired or wireless network.
-
3Wireless MicrophonesTwo wireless microphones are provided.
- Turn on microphone by pressing the red power button on the bottom of the microphone. Hold in the button until it glows green.
- If the button does not light, or is orange, it indicates that the batteries need to be charged. Unscrew case sleeve to access battery.
- Re-chargeable batteries can be charged in charging station located on the opposite wall on top of some plastic bins. Observe polarity if using AA batteries.
- Move the On/Off, Mute switch at the top of the microphone to ON.
- There also is a mute button on the bottom of the microphone next to the power button or you can move the on/off switch to off when not using.
- Volume is adjusted on the wall by selecting the microphone number and turning the volume dial.
- Turn on microphone by pressing the red power button on the bottom of the microphone. Hold in the button until it glows green.
-
4When You are FinishedAt the end of the Event, please be sure that the system is completely turned off.
1. Unplug HDMI cable from laptop and wall outlet.
2. Turn off wireless microphones.
a. Turn off at the top of the microphone.
b. Hold the power button on the bottom of the microphone until the lights go out.
3. Turn key to off position and remove from wall.
4. Return HDMI cable, microphones, Key to shelf in store room.
5. Turn off TVs that were used.
Did this answer your question?
If you still have a question, we’re here to help. Contact us