Send a Voice Message
-
1Method
In the left sidebar click Mass Contact. Then select the New Message button.

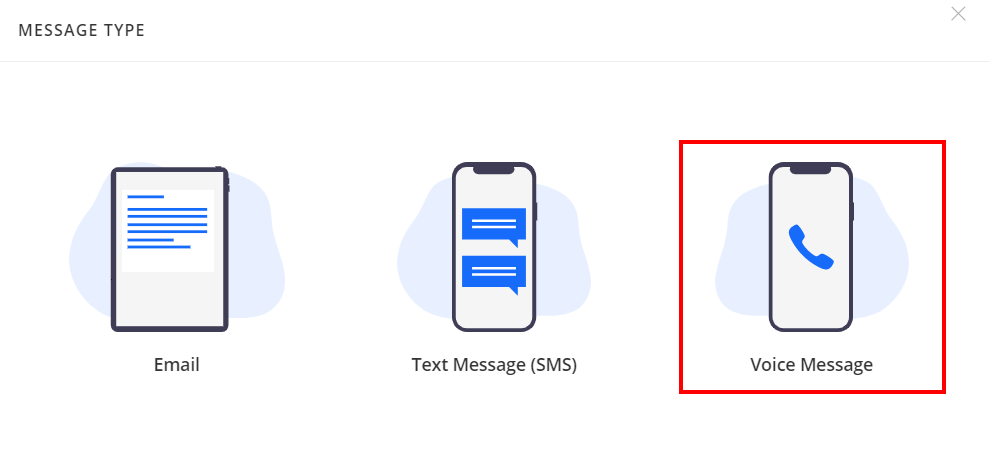
A modal screen will appear giving you the option to choose between an Email, Text Message (SMS), or a Voice Message. Click on Voice Message.
To use this feature, a voice service needs to be setup. Use either our Integrated SMS and Voice Service or contact our support team if you need to enable Twilio SMS and Voice.
-
2~ Twilio Number
If using Twilio, make sure to choose the correct number to send the voice message from. There can be multiple numbers available depending on the account setup.
The integrated voice service does not need this option because ALL messages come from your defined number (CALLER ID NUMBER) during the setup process. Usually, this number is the one for the church.
-
3Choose Group(s) and/or Add Recipients
- Start typing a name to activate the search against your Group list. Relevant results will show below the search bar.
- Click the Group name to select it.
- If more Groups are needed, keep starting the search again to add additional ones.
- Remove a Group by clicking the Grey "X" next to the group name.
- A Group is a collection of names. Use the 'Add Recipients' or 'Edit Recipients' options to manually edit the list of names.
- The 'Add Recipients' option allows for a stand-alone way to manually create a list of contacts from the database instead of using a Group. This way you can send to a single person or a few people quickly.
- By clicking on 'Edit Recipients', the populated list allows for unchecking anyone you do not wish to include in the Contact.
To call an individual with the voice message, they must be a contact in your Database. The member will also need a number in any of the home or cell phone fields.
-
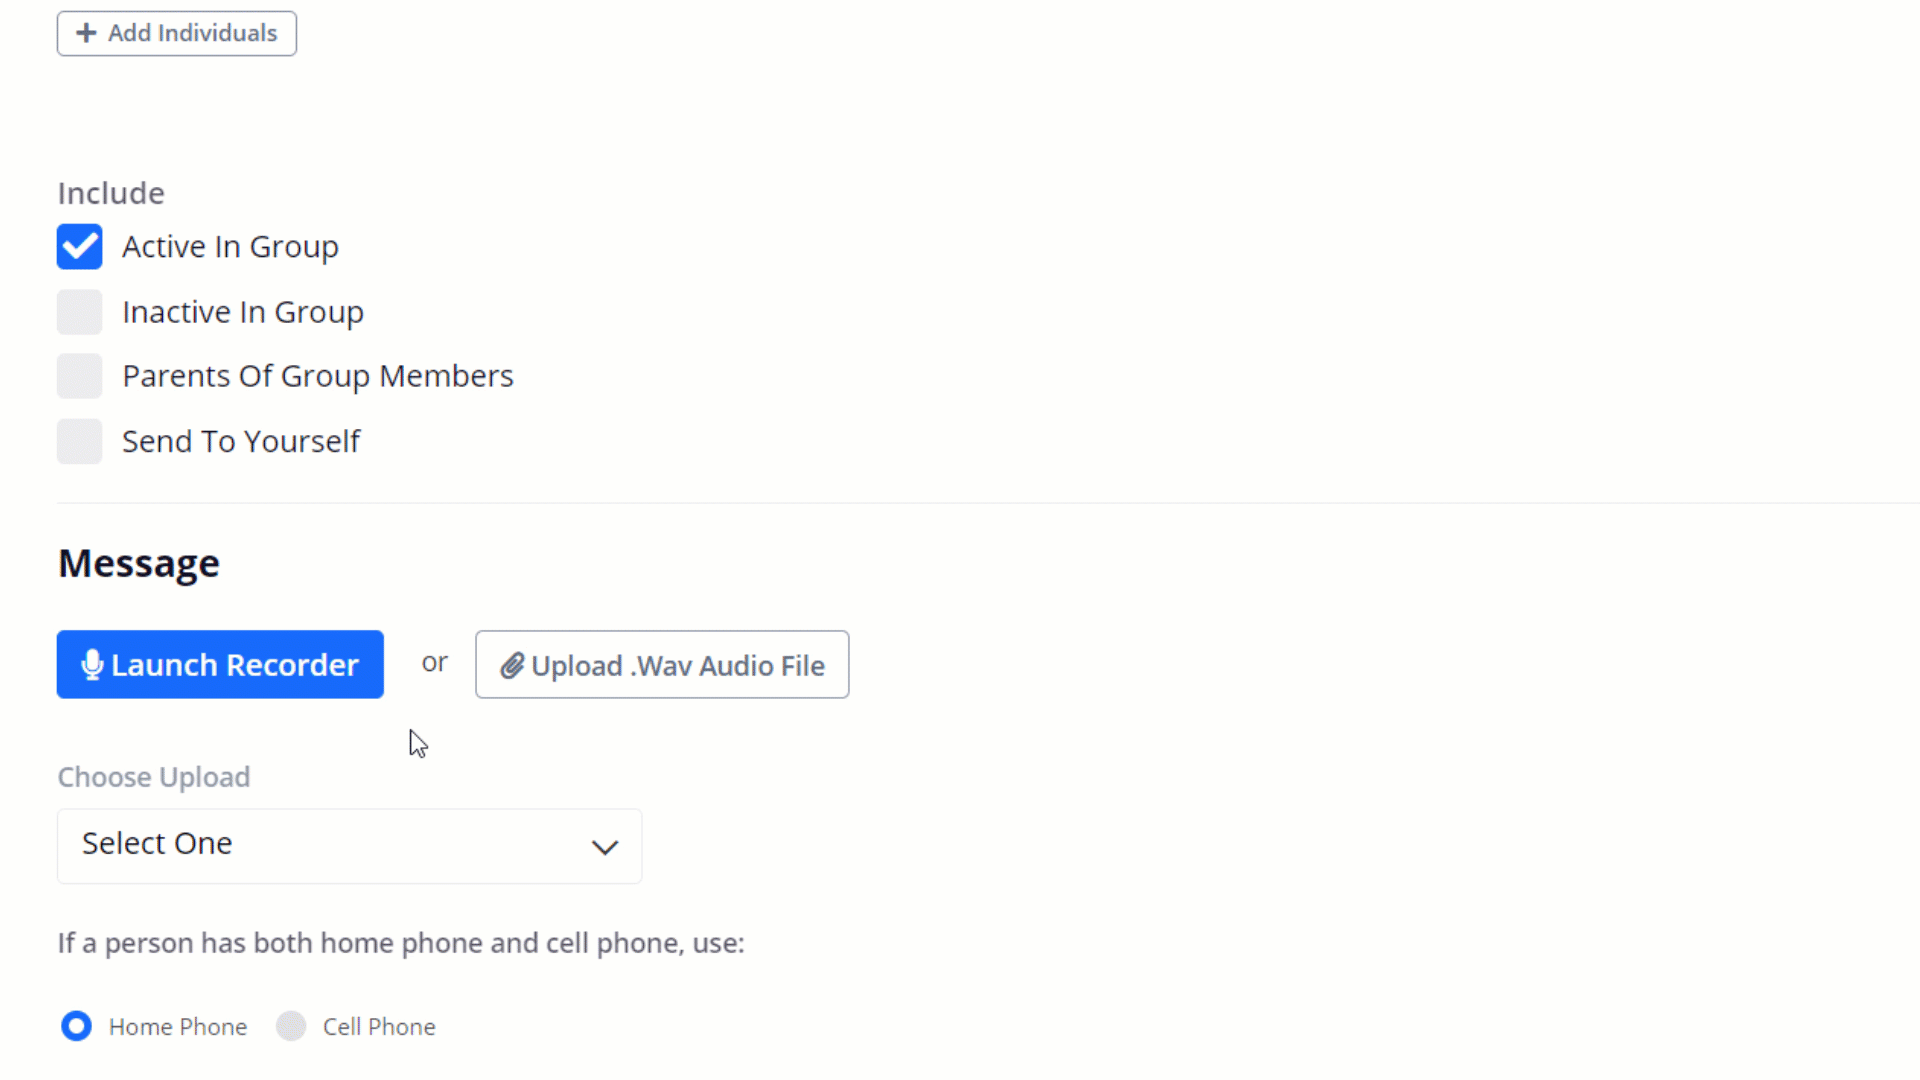
4Include
The three options are
Add yourself as a recipient of the voice call. Especially if you are not one of the people in the group or contact list. The message will be sent to your phone based on the preference established earlier.
Add yourself as a recipient of the voice call. Especially if you are not one of the people in the group or contact list. The message will be sent to your phone based on the preference established earlier.
- Group members - Anyone noted as active in the Group(s) selected.
- Include Inactive - Optionally include anyone that is marked as inactive in the Group(s) selected.
- Parents of Group Members - Particularly useful for youth staff! Choose a group(s) with children in it. Then, based on the family relationship statuses in the linked family (Family positions of Primary, Spouse [husband or wife], and Partner), anyone with a parent position will get the voice recording.
- Send To Yourself - Add yourself as a recipient of the voice call. Especially if you are not one of the people in the group or contact list. The message will be sent to your phone based on the preferences established earlier.
Pro-Tip: When choosing options in "Include"
- To send to Group Members within the group AND their Parents, both "Group Members" and "Parents of Group Members" boxed MUST be checked.
- To send ONLY to the parents, the "Parents of Group Members" box must be checked while the "Group Members" box is UNCHECKED.
-
5~ Errors
If members in the Contact list do not have valid contact information, a notification appears and lets you know this along with a count of how many people may potentially not have a valid number (Troubleshooting FAQ). Member phone numbers can be updated in the modal after clicking the link or find the member profile and resolve it under the Edit tab.
Number Preference
Choose the number preference for which phone to try first (Home or Cell). The database will use the contact list and try your number preference first. If the user has a missing number, the contact will default to the next available phone number.
For instance, if you choose the preference of 'Cell Phone' the voice message will send your recorded message to anyone with a number filled in on their profile for that field. Anyone without a cell number added will have the recording sent to their home phone if there is a number listed there.
-
6Voice Recording to Send
Choose the voice recording from the drop-down list. You can preview/listen to it by using the ' Preview ' link.
If there are no recordings to choose from or you want to add a new one, there is a built-in tool to use for recording your message or the option to upload a '.wav' you record through another source.
Considerations for Voice messages
- Keep the message short → aim for 30 to 45 seconds.
- NOTE that going over 2 minutes in length for a message will use an extra credit per message.
- Shorter messages help in a speedy message delivery because of the file size (along with a shorter upload time).
- Listeners will know quickly what the message is about if it is short.
- Provide clear information for where more details can be found like on a website or Facebook page.
Voice Recorder
For most of the common browsers, there is a utility built into the database that will load to record the message with your attached or internal microphone (Safari on Mac OSX will download an application that requires Java to be installed).
To launch the recorder use the link to ' Launch Voice Recorder '. Follow the prompt to allow the browser access to the microphone (Save the preference to eliminate this step in the future).
Start Recording
Click the "Launch Recorder" button. You will be prompted to record your message, to start your voice message click on the microphone. The circle will turn into a "Stop" button when recording.
Stop Recording
Use the square to stop the recording of the message. Follow the same process if the audio needs to be recorded again.
Upload Recording
At this point, the audio is only in the recording tool and not uploaded to the database yet. Closing this window without clicking the Use Recording button will not save the audio file. If you want to delete the recording, simply use the 'X' to close the window or use the Close button.
Upload File
Click the link ' Upload .wav Audio File ' to use a file from your computer. The file can be created in software like Audacity, Voice Recorder on Windows, or Quicktime on Mac. Mac sure the file is in the '.wav' format and not in other formats like '.mp3' or '.m4a'.
-
7Schedule Sending for Later
When a scheduled message is created, it is saved to the logged-in user profile. This is important to know if you need to adjust the scheduled message content, settings, or time. Admins can log in as the user to edit this or the sender can adjust this also.
Check to schedule the message for later. Add the correct date and time you want the message to send. This time setting references the preference set for the time zone under General Settings
 → General.
Should the scheduled message need to be edited/changed, you can load it again. Select the message from the "Mass Contact" home screen, which will resemble the one found below.
Select the message from the drop-down. This will load the settings and the message body to update with new information. Use the green button to save your updated 'Edit Scheduled Message' or red 'Delete Scheduled Message' button at the bottom to fully delete the contact if it is not needed anymore.
Complete the message by clicking SEND