Workflow: Assimilate Vistors with Automated Follow Ups
Pro-Tip: Use a Form to create a digital connection card that can easily trigger a Guest Follow-Up Workflow. For step by step instructions watch our Micro-Webinar on how to efficiently capture Guest information.
Learn how to easily promote you guest card online, via text, and even with a QR code. Then use this Form to trigger the Workflow outlined below!
Use a Workflow to:
Automate visitor follow up
Reduce administration overhead
Ensure no person falls through the cracks.
Creating this engaging Workflow is simple and steps are laid out below.
Modify this to fit your church setup as needed.
Getting Started:
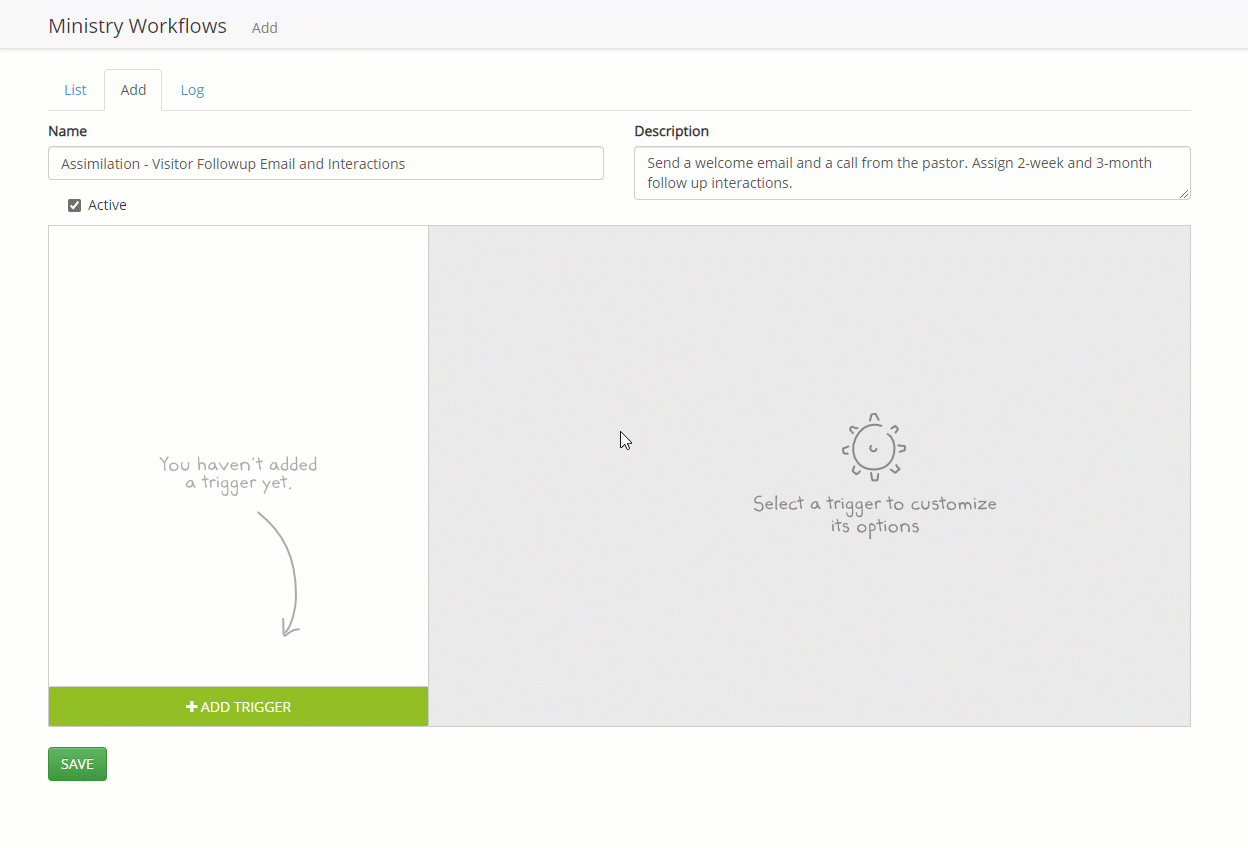
Find the left navigation menu and select Workflows.

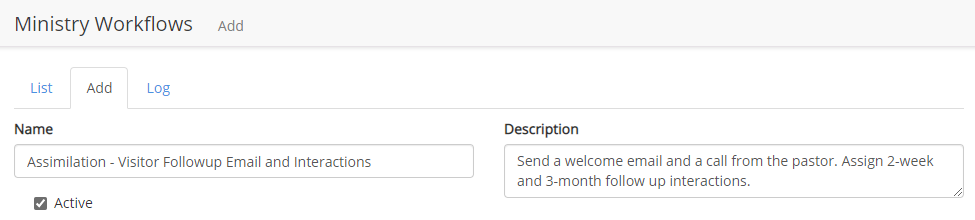
Give the newly added Workflow a name that makes it easily recognizable. Also, add a description so it is understood what the purpose of the Workflow is. This helps bring clarity when reviewing at a later point and focus on the goal of the workflow while building it.
Add triggers to start building the actions of your Workflow. Since we are focusing on follow-ups, we want to keep an eye on groups and attendance. Specifically starting with the Group - Add/Remove trigger.
Select that trigger to add it and then the Group(s) that the workflow should look for. In the example, we will look for anyone that is in the -STATUS - Guest group. Once the group(s) is added, we can start adding some actions to engage the visitor and also notify the staff or pastor.
Pro-Tip: The following common actions often used with Visitor Workflows. Each can be customized to fit your needs.
-
1Send a Text MessageSending a text message is one of the best ways to follow up new visitors.
- Did you know? 90% of text messages are read in 3 minutes or less, and 98% are read overall!
- Use Text Messages to make visitor welcome near-instant.
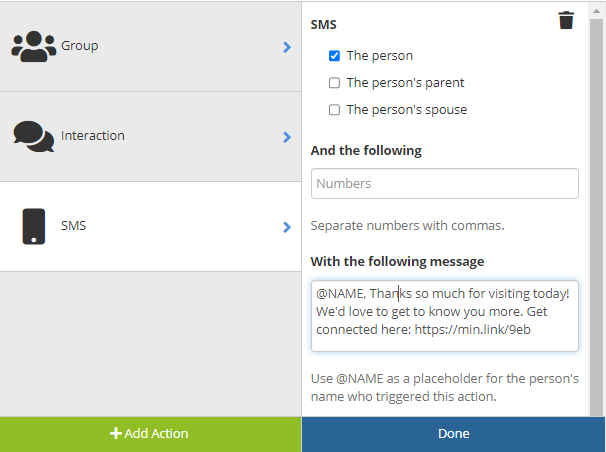
- SMS: Typically check off just the person themselves.
- And the following: Include the cell numbers of anyone you might also want to copy.
- Message Body: Make sure to keep your message to 140 characters or less to avoid your message being broken into two.
Pro Tips:
(1) Use @NAME as a placeholder to personalize your text.
(2) Use our Link Shortner to easily link to a follow up form or web-page. (Ex: "min.link" in the screenshot above). - We include 1000 text messages as part of your software subscription every month. If you haven't done so already, set up texting in about 2 minutes!
-
2Send an EmailEmail is a great way to create a personal message that can engage the new visitor and get them additional information about the ministry.
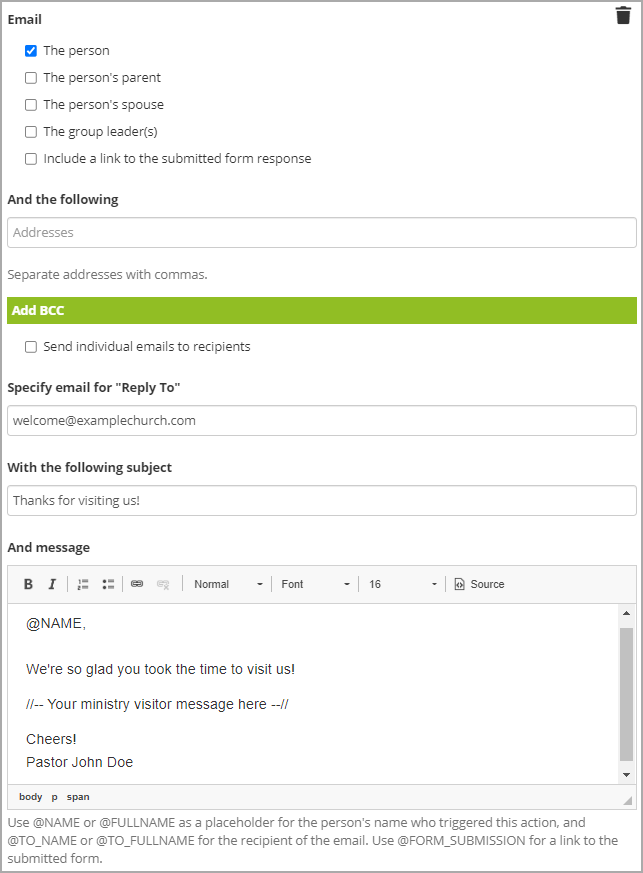
- Email: select the person, their spouse if you want (depends on Family relationships), and any other contact that should be on the email. We will use the person and their spouse only in our example.
- Reply To: Add the email address of a staff member that follows up with new contacts. When the workflow runs and sends the message, this is the email address a reply would go to.
- Subject: Have this be warm and welcoming. Include the name of the church so it is easily recognizable as to where this email is coming from.
- Message body: below the message body are placeholders that can be used to auto-insert the new visitor's name. People warm up to hearing their name and it adds a great personal touch. From there, you can add links to information on your website like upcoming events, new visitor information, staff directory, etc. Be creative and show your personality as a church! If you have a person that does HTML/CSS coding, style can be added to give it extra flair through using the Source button.
- Email: select the person, their spouse if you want (depends on Family relationships), and any other contact that should be on the email. We will use the person and their spouse only in our example.
-
3Create an Interaction
- This allows for a person in the database to have an actionable task to follow up. This is your secret sauce to make sure it is on someone's radar to reach out personally to this new person.
Choose an interaction type from the drop-down, add the person(s) that should get this assignment, and give instructions on the expectations of this interaction so the person being assigned knows when it is complete. (How to Customize Interactions to for your Ministry Processes).
The next trigger is Group - Membership Duration. Using this trigger will automatically watch the date of when the member was added to the group using a relative date. Based on our example, we are going to add this trigger twice. The first will be set for 2 weeks and the second will be set for 12 weeks.
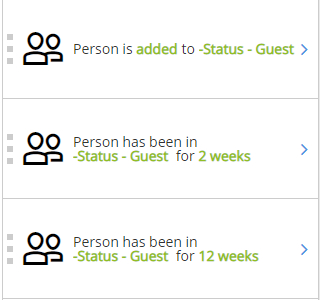
In each of the triggers, a recommended action to use is an Interaction. This creates a follow up for important points in time since that new person visited your ministry. This also has added bonuses for reporting and historical notes to show the contact points that have been made.
Your goal is to create sequential workflow triggers to track the visitor and ideally get them involved in one of your membership groups. If it gets to week 12, then the interaction notes can look something like this...3 month follow-up Actions
- Call to see what their status is and invite them to take the next step (Small group, ministry team, membership, etc.)
- If not still coming change status to Status - No Longer Attending.
- If still attending, change status to Status - Regular Attender.
All our triggers, actions, and customization have been added so we need to save the work done. Use the DONE button to save your Workflow!
Your new Workflow is now set up and ready to use. Click the SAVE button to add the Workflow to the list.
Note: We always suggest testing your workflow using an example person you create.
- This allows for a person in the database to have an actionable task to follow up. This is your secret sauce to make sure it is on someone's radar to reach out personally to this new person.