Bosch Burglar Alarm Operating Notes
This section provides an overview of the building alarm system. It explores the various software apps that are used to access and control the system. A user manual is included. IPS is the alarm provider, and we have a 5-year Service Agreement from February 2019. This covers labor and component service for normal issues. Renewal costs for the service agreement may be preferred for CHPC since we have been with IPS since 2005 and we are low maintenance. Contact IPS to have close times adjusted. Lightning strikes are not covered as our insurance will cover that. To make changes to our account the Service Coordinator, Tyler Woolums twoolums@integratedprotection.com or call him at 513-631-5505. Logan is the assigned IPS Technician for the CHPC account. In an emergency only you can call Logan's cell phone: 513-316-6345 (it's better to schedule through Tyler)
-
1Bosch burglar alarm scheduleSchedule Terms:Begin = disarmEnd = armOpen = disarmClose = armBurglar alarm Open/Close Times(Disarmed) Schedule when alarm is off in buildingsOpen = Disarm alarm on building Close = Arming alarm on buildingCurrent, as of 1/17/2024 Alarm Open (Disarmed) Schedule
Day Open Close
Monday 6:00 AM… 9:30 PM
Tuesday 6:00 AM… 11:55 PM
Wednesday 6:00 AM… 11:55 PM
Thursday 6:00 AM… 9:30 PM
Friday 6:00 AM… 9:30 PM
Saturday 6:00 AM… 9:30 PM
Sunday 6:00 AM…9:30 PM
Note that there is a 5-minute grace period until 9:35 PM
Main St. & both Elevators Unlock Schedule times follow Tuesday and Sunday.
Areas: (Should be envisioned as boundary locations)
The alarm can be activated separately in each of the following areas.- Sanctuary
- Office & Activity (includes Atrium, Fellowship Hall, Fireside Chat Room, Great Hall and LC second floor).
- 3C's Classrooms (3)
- Care Center (4)
Holiday Schedule Time: Allows you to pre-plan when the alarm will disarm and arm.
Holiday 1: Armed at 9:35 pm
Areas Armed: Sanctuary 1; 3C's (3); Care Center (4)
Area(s) Unarmed: Office & Activity (2)
Holiday 2: Armed at 11:35 pm
Areas Armed: Sanctuary 1; 3C's (3); Care Center (4)
Area(s) Unarmed: Office & Activity (2)
Holiday 3: Armed at 9:35 pm
Areas Armed: 3C's (3); Care Center (4)
Area(s) Unarmed: Sanctuary 1; Office & Activity (2) -
2Emergency24 Contact Numbers (The Monitoring Service)
Customer Service Department
Direct Number: (847) 227-2508
Email: customer.service@emergency24.comData Entry Department
Direct Number: (800) 929-1507
Email: dechanges@emergency24.comTechnical Support
Direct Numbers: (773) 458-2288 or (800) 926-1511
Email: technical.support@emergency24.com -
3Black Bosch keypad
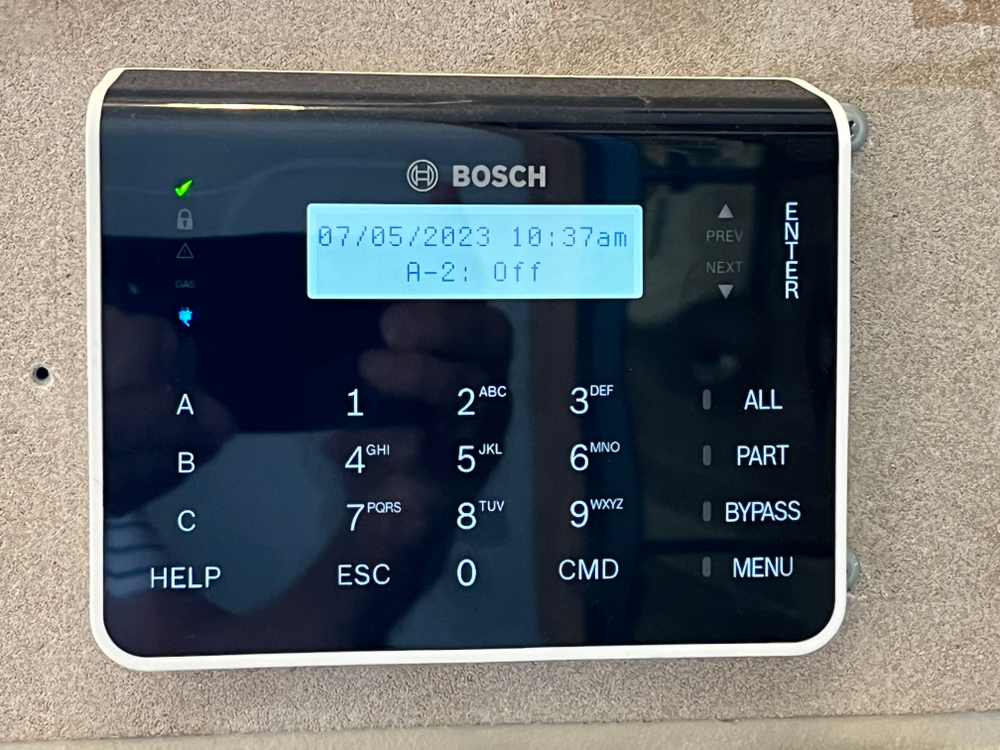 These are located in the Atrium north vestibule, Learning Center Lobby, 3C’s Lobby, South Atrium, Care Center, Sanctuary East Entrance and Learning Center basement west entrance.
-
4Bosch Alarm Panel ManualVerify with IPS if our system will accept all of the commands in the Manual from the keypad.
-
5Manual, partial setting of the burglar alarmThe campus alarm can be partially set for overnight guests.
- Open the Bosch Phone App one or two minutes before 9:35 PM.
- Once the button starts to indicate that it is arming press it to turn it off.
- Once it is off press the Advanced button and then turn on areas A-1 Sanctuary, A-3 3C's School and A-4 Care Center.
- Leaving A-2 turned off allows for Exterior entry/exit and movement in the Office/Activity building; Atrium; Fellowship Hall and Learning Center Lobby, Basement and 2nd floor.
- Our guest should be notified that during this alarm setting process they will hear the keypad signal beeping until the alarm has been turned off. That is inevitable because you can't turn it off until it starts to turn on.
-
6Bypass Devices when a device will not clear or set.To Bypass a device:
- Press Bypass
- Enter your password
- Press the device number
- Press Enter
24 hr bypass seems to be unlimited in length. It might mean it is bypassed 24 hours a day.
When you take a point out of bypass mode it may take 24 hours for the bypass to clear. this is what happened with the Water-bug in the Sanctuary.
If this does not resolve, Call IPS for service at 513 631-5505
-
7Extend Close Time of Burglar Alarm(A short version of these instructions are posted on the North Atrium Keypad as well.)
To Extend Close Time:- Quickly Press: CMD 814
- Enter your password
- Enter the desired time
- Press Enter
- Enter AM or PM
- Press Enter.
This feature has an authority level of 1. Levels 2, 3 & 4 and above do not have rights to use this feature.
Extend Close Time- The way to this through the keyboard is to press:
- CMD 8
- Key 1
- Key 4
- Enter password
- Enter
- Start Time Displays 9:34pm
- Enter new Close time 10:00
- Select am or pm
- Press Enter
-
8Edit or Add User from KeypadVERIFY KEY SEQUENCE FOR ACCURACY
From the Atrium Vestibule Keypad
Press:
Menu
Enter your password, Press Enter
Using arrow keys, scroll down to Users
Enter the requested key number (3)
Scroll through the desired function
Possible data requested depending on desired function.
Double click on the “details” cell for the user to change the authority level from the drop-down menu.
User Group = 0
Area Authority: Staff = L1
Other users: L1
Site Code = 255
Follow the remaining prompts -
9Open Bosch RPS lite (App)
- Double click the RPS desktop icon.
- Enter your user name and password.
- If RPS won't take any user name or password it is because the software is off line due to a communications error with the ISP. Double check to see if other software can connect to the internet.
- It may ask for a second password, use: admin, 1111
- After it opens, double click the line that says College Hill Presbyterian Church.
- Look up at the toolbar and click the button that looks like a electrical connection. After it connects to the cloud, it will ask you if you want to download data. Answer yes. This gives you the most up-to-date information and RPS from the panel.
- When the panel Receive and Overwrite box pops up, select OK to overwrite RPS Account Data.
- The only time you would not want to overwrite would be if you forgot to save up to the panel but you know the data is still on the computer correctly and you want to send it a second time.
- From now on if you make any changes, Press the save button in the lower right corner of the screen and then press the double arrow send and receive button so the changes be saved up to the panel (cloud).
- To double check your work, close the app entirely and reopen, look for your work, verify and celebrate!
-
10Downloading RPS lite historyTo download the history in RPS lite,
- click on the document page icon with the down arrow and clock which will open a window for history events.
- Choose current events and click OK. This process downloads an unreasonable amount of data so it takes 5,10 or 20 minutes or longer.
- After the history is downloaded, you can click on the other page icon to the left to view it.
- The oldest event is at the top of the page so you have to scroll to the bottom for the most recent.
- To view event details, scroll to the right or expand the window. This will show the name of the person that enabled the event if appropriate.
-
11RPS lite holiday schedules
- Under the Program Record Sheet outline drop-down, open schedules, and then click on holiday indexes.
- Double click the set schedule for the desired holiday index as listed below.
- If you double click on a day, it will either set or clear the day in a red color.
- Each holiday Index has its own holiday schedule calendar. Be careful to use the proper holiday index for the desired result.
- Holiday Schedules repeatevery year so you must delete the Holiday after it is finished for IHN or any other one time event.
- Holidays are forward and backward visible in the calendar no matter the year. If you look forward or backward a year at a time you will see the holidays showing as long as they exist.
- Holiday index 1 = set Sanctuary 3C’s and Counseling Center (Use for IHN)
- Holiday index, 2 = set 3C’s and Counseling Center
- Holiday index 3 = set nothing at all
- Holiday index 4 = set all areas for 10:30 PM
-
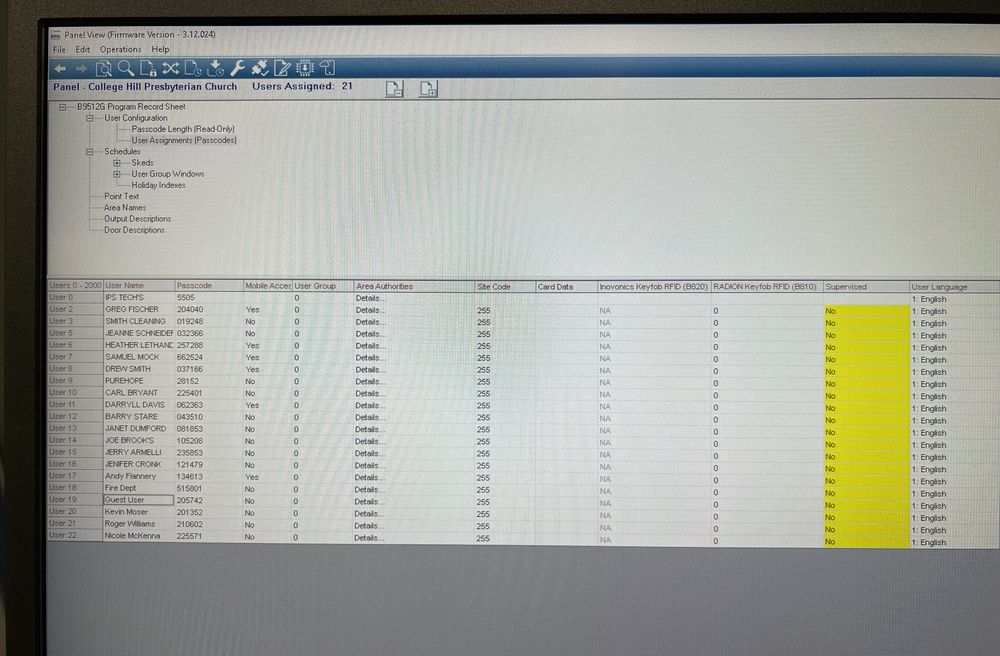
12Add a user in RPS Lite software
- From the IPS light tree, double click user assignments
- Click the expand users table button on the toolbar.
- Enter the name
- Enter the pass code
- Select mobile access if required
- Double click the area, authorities detail…
- Choose L2 for most users.
- Administrators would be L1
- Collapse use your table
- Click save
- Connect
- Send an over right panel
- Check reset panel box
- Disconnect
-
13UR Secure, iPhone AppMaster Account 6B0061
Account S18636
Michael Gaines is primary contact
Heather is secondary contact
Code under stress is 5742
Michael will receive an email confirming any changes made to the App.
The screen must be scrolled with your finger to see all the fields.
You can edit the name and phone number.
The time to call is not editable as of 7/18/23 The keyboard covers the time selector screen so it is not accessible. You must delete the user and reenter the data to change the time.
The time must be entered before any other field is entered or it is not editable. The time defaults to 9:00-17:00. Enter the time as 0:00-23:59 and it will show in the listing as 0:00-24:00. Change the time by rotating in the up direction to arrive at 12:00am, then rotate down to arrive at 11:59pm. Other methods of rotating may not result in the correct time.
Be sure to review the data entries before saving, this may save a lot of time.
Sometimes, it takes two attempts to delete a user.
Enter the time first 12:00am to 12:00pm covers the entire day. Scroll up to select time, if you scroll down the time will be incorrect.
Enter the phone number as digits only.
Call Order as of 11/27/24
Monday thru Friday- Michael Gaines 0:00-23:59 513-344-9862
- Greg Fischer 0:00-23:59 513-543-9495
- Samuel Mock 0:00-23:59 513-507-2929
- Drew Smith 0:00-23:59 513-235-4011
Parties will be called in sequence 2 times until reached.
Be sure to confirm the monitoring people have their phone set to allow calls from the monitoring company to ring at all times. Be aware of do not disturb settings on the phone. -
14Water Bug SensorsA Water bug is a sensor that is designed to detect water incursions and send notifications through the alarm system. They ae typically located in boiler rooms, other locations with sump pumps or location with high probability of water incursion.
If a Water Bug sensor is located on damp concrete, it will register and trip.
To avoid this, mount it on a plastic insulator or spacer. This was the case in the Sanctuary undercroft pit in 02/2022
-
15Repairing "Hot" DevicesYou can repair a damaged interconnect wire going to the keypads without turning off the system. Just keep the wires color aligned.
-
16Motion Sensor SensitivityMotion sensors have a sensitivity dial under the cover that can be turned with a small screwdriver.
-
17Monitoring Phone Numbers for IPSSee Attached letter from 11/13/2021 for origin of phone numbers.
As communicated via email, we made the decision to find another monitoring company for our fire alarm and security panels
to give our customers the best service. IPS fire alarm and security monitoring accounts were moved to EMERgency24 (EM24)
on October 12, 2021.
Your NEW Account Number as of October 12, 2021: S18636 (replaces account # 888636)
New Number to Call to Put Your System on Test: 1-855-794-0250
Caller IDs for Calls from EM24 to Your Call List: (773) 777-0707 or (773) 725-0222
NOTE: We suggest you save these numbers in your phone so it doesn't get flagged as a spam call. -
18Two line alpha numeric keypadThe attached file is a scanned quick reference guide.
-
19Level one permission usersSmith Cleaning
Samuel Mock
Drew Smith
Janet Dumford
Joe Brooks
Kevin Moser
Roger Williams
Nicole McKenna
Greg Fischer
Michael Gaines -
20Creating Schedules: Disarming and ArmingThere are times when we will want to change the time that the alarm arms or disarms.
- Follow instructions to log into RPS lite software on server.
- Select schedules 1-20. Once the schedules open, select the specific column to add a new schedule.
- Click on "no" in the first row. A drop down menu should appear. Select "Yes".
- Move to.next row and select "Arm on Delay" so that there will be a count down before the alarm arms.
- Select Time. This will.be in military time.
-
21Bosch User List
Did this answer your question?
If you still have a question, we’re here to help. Contact us