Creating a Group in SimpleChurch
Groups are used to track attendance or to list people who share common attributes. They are an important way to help manage the large number of people in simplechurch. Groups are used to contain lists of people for: membership status, grades, classes, choirs, services, outreach teams, etc.
Groups are vital to an organized database, serving as sources for creating reports, taking attendance, and mass communication, to name only three.
*this information is taken from chmshelpdesk.com
Groups are vital to an organized database, serving as sources for creating reports, taking attendance, and mass communication, to name only three.
*this information is taken from chmshelpdesk.com
-
1Create a GroupGroups are the fundamental tool for segmenting individuals in your ChMS database. They are collections of individuals who have something in common, like their relationship to the church, their participation in a service cohort, and so forth.
- Navigate to Groups in the left sidebar (This may be different if the terminology is changed in General Settings
 → Terminology).
 - Click the Add tab at the top.
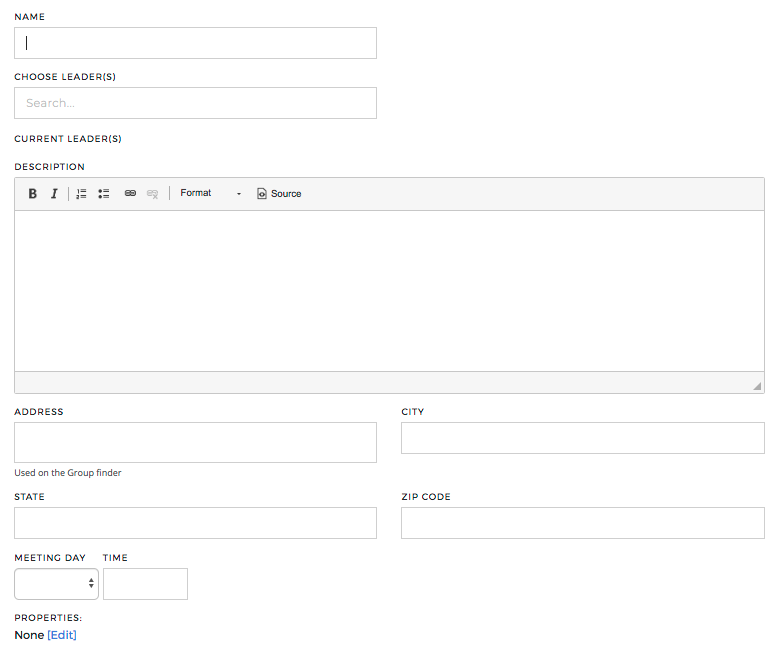
- Give the group a name. Orient the name to represent a function or task, such as 'Directory,' 'Members,' 'Members—Moved Away,' etc.
- Assign a group leader (optional).
- List a brief description (optional - ex. Woman's Wednesday Morning Bible Study).
- Enter Address information (optional - to be used for the Group Finder).
- Assign the Meeting Day and Time (optional - to be used for the Group Finder).
- Assign Group Properties/Settings using the [ Edit ] link.
- click SAVE to complete the group creation process
- Navigate to Groups in the left sidebar (This may be different if the terminology is changed in General Settings
-
2Clone (Copy) a Group
The Clone Group icon allows you to quickly and conveniently create new groups based on an existing group. This can help when you have several new groups to create.
- Navigate to Groups in the left sidebar and select List.
- Locate the Group you want to duplicate and click on the Clone Group icon on the far right.
- When clicked, you will have options for cloning the group. Your options include:
- Group Name: Your original group name will be added with "(Copy)" at the end to differentiate the two.
- Include Group Settings: Group settings from the original group will be copied into the duplicated Group. Double-check the settings to ensure they are correct.
- Include Active Group Members and Leaders: Members and leaders will be copied to the cloned group.
- Group Name: Your original group name will be added with "(Copy)" at the end to differentiate the two.
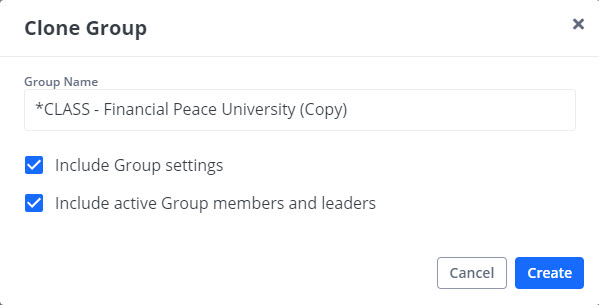
- Click Create and make any changes to the Group you may need to and then click Save!
- Navigate to Groups in the left sidebar and select List.
-
3
Did this answer your question?
If you still have a question, we’re here to help. Contact us